SpringSecurity
简介
核心功能
- 认证(你是谁,用户/设备/系统)
- 验证(你能干什么,也叫权限控制/授权,允许执行的操作)
原理
基于Filter、Servlet、AOP 实现身份认证和权限验证
起步
demo
导入spring-boot-starter-security 起步依赖
1implementation 'org.springframework.boot:spring-boot-starter-security'无任何配置下启动程序,console会输出随机生成的密码

创建controller,然后浏览器访问,此时地址会被拦截,需要输入正确的用户名和密码(临时生成的)才能进入controller
1
2
默认用户名:user 随机密码:6899342d-50a7-4095-bfea-7efecc6d980a自定义用户名和密码,修改配置文件;此时console不再打印随机生成密码
1 2spring.security.user.name=lei spring.security.user.password=123456不使用安全认证机制(排除),启动类的注解上排除
1@SpringBootApplication(exclude = {SecurityAutoConfiguration.class})
自定义认证(内存)
通过继承 WebSecurityConfigurerAdapter 类,并重写其中某些方法实现自定义认证功能
@EnableWebSecurity注解开启安全机制@EnableGlobalMethodSecurity(prePostEnabled = true) 可以开启方法级别的权限认证(通过角色),同一个用户可以有多个角色
密码编码器,springsecurity实现了许多密码编码器,这里采用
BCryptPasswordEncoder实现类,设置内存用户时对密码进行加密1 2 3 4 5 6 7/** * 密码编码器 */ @Bean public PasswordEncoder passwordEncoder(){ return new BCryptPasswordEncoder(); }配置类
1 2 3 4 5 6 7 8 9 10 11 12 13 14 15 16 17 18 19 20 21@Configuration @EnableWebSecurity @EnableGlobalMethodSecurity(prePostEnabled = true) public class WebAutConfig extends WebSecurityConfigurerAdapter { @Autowired private PasswordEncoder passwordEncoder; /** * 重写方法,添加内存用户 */ @Override protected void configure(AuthenticationManagerBuilder auth) throws Exception { // 添加两个内存用户,并指定角色;同一个用户可以有多个角色 auth.inMemoryAuthentication().withUser("lei") .password(passwordEncoder.encode("1234")).roles("normal"); auth.inMemoryAuthentication().withUser("yu") .password(passwordEncoder.encode("1234")).roles("admin","normal"); } }controller,配置方法允许哪些角色访问
1 2 3 4 5 6 7 8 9 10 11 12 13 14 15 16@RestController @RequestMapping("hello") public class HelloController { @RequestMapping("sayCommon") //该方法 normal 和 admin 角色都可以访问 @PreAuthorize("hasAnyRole('normal 和','admin')") public Object sayCommon(){ return "Hello sayCommon"; } @RequestMapping("sayAdmin") //该方法只允许 admin 角色访问 @PreAuthorize("hasAnyRole('admin')") public Object sayAdmin(){ return "Hello sayAdmin"; } }
基于数据库用户认证
从数据库中获取用户信息(用户名称、密码、角色)
在spring secrity中对用户信息表示类为UserDetails,UserDetails是一个接口,高度抽象用户信息
集成postgres数据库
导入依赖
1 2implementation 'org.postgresql:postgresql' implementation 'org.springframework.boot:spring-boot-starter-data-jpa'配置默认数据源
1 2 3 4 5 6 7 8 9spring.datasource.driver-class-name=org.postgresql.Driver spring.datasource.url=jdbc:postgresql://myrapi.io:5432/mydb?useSSL=false&connectTimeout=10000&socketTimeout=30000&serverTimezone=GMT%2B8&zeroDateTimeBehavior=ROUND&rewriteBatchedStatements=true&characterEncoding=utf8&allowMultiQueries=true spring.datasource.username=postgres spring.datasource.password=123456 spring.datasource.password=123456 ## 开启根据实体类自动建表、显示sql、数据库类型 spring.jpa.generate-ddl=true spring.jpa.show-sql=true spring.jpa.database=mysql创建实体类和dao接口
1 2 3 4 5 6 7 8 9 10 11 12 13 14 15 16 17 18 19 20 21 22 23 24 25//实体类 @Entity(name = "USER_INFO") @Data public class UserInfo implements Serializable { private static final long serialVersionUID = -329565948685722547L; @Id // 通过序列化生成主键id,会在数据库中维护一张序列化表(tb_seq) @GeneratedValue(generator = "tb_seq",strategy = GenerationType.TABLE) private Long userId; @Column(name = "username",length = 20) private String username; @Column(name = "password",length = 80) private String password; @Column(name = "role",length = 10) private String role; } //dao接口 public interface UserInfoDao extends JpaRepository<UserInfo,Long> { UserInfo findByUsername(String username); }通过
@PostConstruct生成初始化数据,使用一次1 2 3 4 5 6 7 8 9 10 11 12 13 14 15 16 17 18 19 20 21@Autowired private UserInfoDao userInfoDao; @PostConstruct //该bean注入IOC后,自动调用该方法 public void init(){ List<UserInfo> userInfos=new ArrayList<>(); UserInfo u1=new UserInfo(); u1.setUsername("lei"); u1.setPassword(passwordEncoder.encode("1234")); u1.setRole("admin"); UserInfo u2=new UserInfo(); u2.setUsername("yu"); u2.setPassword(passwordEncoder.encode("1234")); u2.setRole("normal"); userInfos.add(u1); userInfos.add(u2); userInfoDao.saveAll(userInfos); }
实现UserDetailsService
| |
使用UserDetailsService认证
| |
基于角色权限
介绍
认证和授权
- Authentication:认证,访问者是谁,是否是系统有效用户
- Authorization:授权,用户能访问系统中的哪些资源及能做哪些操作
RBAC模型是什么?
RBAC(Role-Based Access Control)即:基于角色的权限控制。通过角色关联用户,角色关联权限的方式间接赋予用户权限

用户拥有角色 –> 角色控制权限
这样在新建用户时只需要分配角色就可以实现权限控制
通常来说rbac模型中表结构
- 用户表:用户认证(用户名、密码、是否启用等相关信息)
- 角色表:定义角色信息(角色名称、角色描述)
- 用户和角色关系表:用户和角色多对多关系
- 权限表:角色可以拥有哪些权限
认证相关类
UserDetails接口
| |
UserDetails接口默认实现类为 org.springframework.security.core.userdetails.User;也可自己自定义 UserDetails 接口实现,作为系统中的用户类
UserDetailsService
主要作用:获取用户信息得到一个UserDetails对象
| |
UserDetailsService 默认提供的实现类;其中有基于内存的、基于数据库的、基于缓存的 用户信息管理
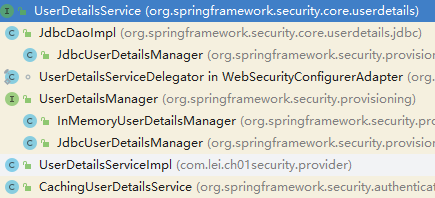
基于数据库的访问认证,在 JdbcDaoImpl 该类的目录下会提供ddl语句
基于JDBC的实现类使用实例
- 找到JdbcDaoImpl 该类的目录下会提供ddl语句,创建表结构
- 声明bean,并创建两个内存用户
| |
在 继承了WebSecurityConfigurerAdapter类的子类中配置
UserDetailsService1 2 3 4 5 6 7 8 9 10 11 12 13 14 15 16 17 18@Resource private UserDetailsService jdbcUserDetailsService; @Resource private PasswordEncoder passwordEncoder; //通过重写两个方法任意一个均可设置 UserDetailsService //1.方法一 @Override protected void configure(HttpSecurity http) throws Exception { super.configure(http); http.userDetailsService(jdbcUserDetailsService); } //2.方法二 @Override protected void configure(AuthenticationManagerBuilder auth) throws Exception { auth.userDetailsService(jdbcUserDetailsService).passwordEncoder(passwordEncoder); }
自定义认证
创建库表
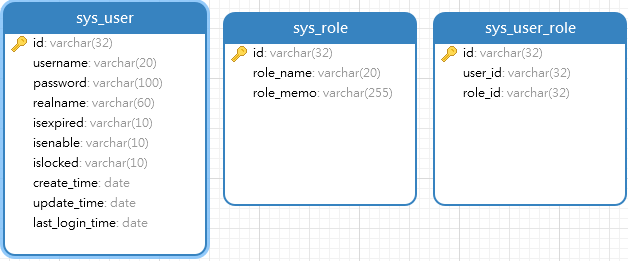
| |
依赖与配置
依赖
1 2 3 4 5 6 7 8 9 10dependencies { implementation 'org.springframework.boot:spring-boot-starter-web' implementation 'org.springframework.boot:spring-boot-starter-security' implementation 'org.postgresql:postgresql' implementation 'com.baomidou:mybatis-plus-boot-starter:3.5.2' compileOnly 'org.projectlombok:lombok' annotationProcessor 'org.projectlombok:lombok' implementation 'cn.hutool:hutool-all:5.8.2' testImplementation 'org.springframework.boot:spring-boot-starter-test' }application配置
1 2 3 4 5 6spring.datasource.driver-class-name=org.postgresql.Driver spring.datasource.url=jdbc:postgresql://myrapi.io:5432/mydb?useSSL=false&connectTimeout=10000&socketTimeout=30000&serverTimezone=GMT%2B8&zeroDateTimeBehavior=ROUND&rewriteBatchedStatements=true&characterEncoding=utf8&allowMultiQueries=true spring.datasource.username=postgres spring.datasource.password=123456 mybatis-plus.mapper-locations=classpath*:/mapper/**/*.xml启动类配置
1 2 3 4 5 6 7 8 9 10 11 12 13 14@SpringBootApplication @MapperScan(basePackages = "com.lei.ch01security.**.dao") public class SecurityApplication { public static void main(String[] args) { SpringApplication.run(SecurityApplication.class, args); } /** * 密码编码器 */ @Bean public PasswordEncoder passwordEncoder(){ return new BCryptPasswordEncoder(); } }
相关类创建
示例 重点 SysUser 实体类 创建;需要实现
UserDetails接口1 2 3 4 5 6 7 8 9 10 11 12 13 14 15 16 17 18 19 20 21 22 23 24 25 26 27 28 29 30 31 32 33 34 35 36 37 38 39 40 41 42 43 44 45 46 47 48 49 50 51 52 53 54 55 56 57 58 59 60 61 62 63 64 65 66 67 68 69 70 71 72 73 74 75 76 77 78 79 80 81 82 83 84 85 86 87@Data @TableName("sys_user") public class SysUser implements Serializable, UserDetails { private static final long serialVersionUID = 771578657753428713L; @TableId(type = IdType.INPUT) private String id; @TableField("username") private String username; @TableField("password") private String password; @TableField("realname") private String realname; @TableField("isenable") private String isenable; //是否启用 @TableField("islocked") private String islocked; //是否锁定 @TableField("isexpired") private String isexpired; //是否过期 @TableField("create_time") private Date createTime; @TableField("update_time") private Date updateTime; @TableField("last_login_time") private Date lastLoginTime; @TableField(exist = false) @Getter(AccessLevel.NONE) @Setter(AccessLevel.NONE) private List<GrantedAuthority> grantedAuthorityList; @Override public Collection<? extends GrantedAuthority> getAuthorities() { if (ObjectUtil.isEmpty(grantedAuthorityList) && ObjectUtil.isNotEmpty(username)) { grantedAuthorityList=new ArrayList<>(); //查询关联角色列表 SysUserRoleDao userRoleDao = SpringUtil.getApplicationContext().getBean(SysUserRoleDao.class); List<String> roleList = userRoleDao.selectRolesByUserId(id); for (String s : roleList) { //角色名称以"ROLE_"打头 grantedAuthorityList.add(new SimpleGrantedAuthority(s)); } } return grantedAuthorityList; } /** * 账户非过期 */ @Override public boolean isAccountNonExpired() { return Objects.equals(isexpired, Constants.ACCOUNT_N); } /** * 账户非锁定 */ @Override public boolean isAccountNonLocked() { return Objects.equals(islocked, Constants.ACCOUNT_N); } /** * 凭证 */ @Override public boolean isCredentialsNonExpired() { return isAccountNonExpired() && isAccountNonLocked() && isEnabled(); } /** * 启用 */ @Override public boolean isEnabled() { return Objects.equals(isenable, Constants.ACCOUNT_Y); } }其他相关接口
1 2 3 4 5 6 7 8 9 10 11 12 13 14 15 16 17 18 19 20 21 22 23 24 25//service接口 public interface SysUserService extends IService<SysUser> { } //service实现类 @Service public class SysUserServiceImpl extends ServiceImpl<SysUserDao, SysUser> implements SysUserService { } //dao接口 public interface SysUserDao extends BaseMapper<SysUser> { } //mapper文件 /* <?xml version="1.0" encoding="UTF-8" ?> <!DOCTYPE mapper PUBLIC "-//mybatis.org//DTD Mapper 3.0//EN" "http://mybatis.org/dtd/mybatis-3-mapper.dtd"> <mapper namespace="com.lei.ch01security.dao.SysUserDao"> </mapper> */ //.......其余根据表结构创建类似这些类
初始化数据
创建相关表结构的mapper,dao,service,serviceimpl;然后初始化数据
初始化数据
| |
配置框架
配置安全框架从数据库加载用户信息
实现UserDetailsService接口,加载库表用户
1 2 3 4 5 6 7 8 9 10 11@Service("chUserDetailsService") public class UserDetailsServiceImpl implements UserDetailsService { @Resource private SysUserService userService; @Override public UserDetails loadUserByUsername(String username) throws UsernameNotFoundException { SysUser byUsername = userService.getUserByUsername(username); byUsername.getAuthorities(); //执行一次该方法,原因可看上面 SysUser 实体类 return byUsername; } }配置安全框架 (WebSecurityConfigurerAdapter 的重写类)
1 2 3 4 5 6 7 8 9 10 11 12 13 14 15 16 17 18 19 20 21 22 23 24 25 26 27 28 29 30 31@Configuration @EnableWebSecurity @EnableGlobalMethodSecurity(prePostEnabled = true) public class WebAutConfig extends WebSecurityConfigurerAdapter { @Autowired private PasswordEncoder passwordEncoder; @Resource private UserDetailsService chUserDetailsService; /** * 重写方法,添加内存用户 */ @Override protected void configure(AuthenticationManagerBuilder auth) throws Exception { auth.userDetailsService(chUserDetailsService).passwordEncoder(passwordEncoder); } @Override protected void configure(HttpSecurity http) throws Exception { http.authorizeRequests() //允许RequestMatcher进行权限控制 .antMatchers("/index").permitAll() //该地址放行 // 注 : 这个地方角色名会默认添加前缀 "ROLE_" .antMatchers("/access/admin/**").hasRole("ADMIN") //该地址只允许ADMIN角色访问 .antMatchers("/access/normal/**").hasAnyRole("NORMAL","ADMIN") //该地址允许NORMAL和ADMIN角色访问 .anyRequest().authenticated() //其他地址任何角色验证都可访问 .and() .formLogin(); } }
其他配置
自定义登录页
security框架内置了许多过滤器,验证用户是否登录也是通过过滤器实现
找到 UsernamePasswordAuthenticationFilter 该过滤器,可以看到 默认的登陆方法以及字段名
默认登陆方法为 /login ,表单值 username password ,采用POST方式提交数据
| |
创建登录页 在 resources/static 目录下创建 登录页 login.html
1 2 3 4 5<form method="post" action="/login"> 用户名:<input type="text" name="username"> 密码:<input type="password" name="password"> <input type="submit" placeholder="登录"> </form>配置框架;登陆成功配置、登陆失败配置、登录用户名密码的字段名,对登陆界面放行
1 2 3 4 5 6 7 8 9 10 11 12 13 14 15 16 17 18@Override protected void configure(HttpSecurity http) throws Exception { http.authorizeRequests() //允许RequestMatcher进行权限控制 .antMatchers("/index","/login.html","/index.html").permitAll() //该地址放行 .antMatchers("/access/admin/**").hasRole("ADMIN") //该地址只允许ADMIN角色访问 .antMatchers("/access/normal/**").hasAnyRole("NORMAL","ADMIN") //该地址允许NORMAL和ADMIN角色访问 .anyRequest().authenticated() //其他地址任何角色验证都可访问 .and() .formLogin() //表单登录 .usernameParameter("username") //配置表单登录的用户名字段 .passwordParameter("password") //配置表单登录的密码字段 .loginPage("/login.html") //登录页 .loginProcessingUrl("/login") //登录方法 .failureForwardUrl("/err.html") //登陆失败跳转的url,可以跳转静态页面 也可以跳转controller 地址进行处理 .successForwardUrl("/index.html") //登陆成功跳转的url,可以跳转静态页面 也可以跳转controller 地址进行处理 .and() .csrf().disable(); //禁用 csrf }
AJAX登陆配置
创建登录页,引入jquery.js,并编写登录逻辑;
注意:jquery.js如果是放在本地的,后台需配置非登录用户也可以访问1 2 3 4 5 6 7 8 9 10 11 12 13 14 15 16 17 18 19 20 21 22 23 24 25 26 27 28 29 30 31 32<head> <meta charset="UTF-8"> <title>登录页</title> <script src="js/jquery-3.6.0.min.js"></script> </head> <body> <h1>登录页</h1> 用户名:<input type="text" name="username"> 密码:<input id="password" type="password" name="password"> <button id="loginBtn"> 登录 </button> </body> <script> $(document).ready(function(){ $("#loginBtn").on("click",function (){ $.ajax({ url:'/login', method:'post', data:{ username:$('input[name="username"]').val(), password:$('input[name="password"]').val() }, success:(res)=>{ if (res.code !== 0){ alert("登陆失败:"+res.msg) }else{ alert("登陆成功!!") } }, }) }) }); </script>配置框架;登陆成功配置、登陆失败配置、登录用户名密码的字段名,对登陆界面放行,以及
静态资源的放行1 2 3 4 5 6 7 8 9 10 11 12 13 14 15 16 17 18 19 20 21 22 23 24 25 26 27 28 29 30 31 32 33 34@Override protected void configure(HttpSecurity http) throws Exception { http.authorizeRequests() //允许RequestMatcher进行权限控制 .antMatchers("/index","/login.html","/index.html","/**/**.js").permitAll() //该地址放行 .antMatchers("/access/admin/**").hasRole("ADMIN") //该地址只允许ADMIN角色访问 .antMatchers("/access/normal/**").hasAnyRole("NORMAL","ADMIN") //该地址允许NORMAL和ADMIN角色访问 .anyRequest().authenticated() //其他地址任何角色验证都可访问 .and() .formLogin() //表单登录 .usernameParameter("username") //配置表单登录的用户名字段 .passwordParameter("password") //配置表单登录的密码字段 .loginPage("/login.html") //登录页 .loginProcessingUrl("/login") //登录方法 .failureHandler((request, response, err) -> { //登陆失败处理 response.setContentType("application/json;charset=utf-8"); PrintWriter out = response.getWriter(); //使用jackson写入json对象 ObjectMapper om=new ObjectMapper(); om.writeValue(out, Map.of("code",-1,"msg", err.getMessage())); out.flush(); out.close(); }) .successHandler((request, response, authentication) -> { //登陆成功处理 response.setContentType("application/json;charset=utf-8"); PrintWriter out = response.getWriter(); //使用jackson写入json对象 ObjectMapper om=new ObjectMapper(); om.writeValue(out, Map.of("code",0,"msg", "登陆成功")); out.flush(); out.close(); }) .and() .csrf().disable(); //禁用 csrf }
无论是登录成功或者登陆失败都会有两个相关处理方法,url 和 handler,选择一个就可
successForwardUrl(String str): 登陆成功后转发,可以转发到静态页面 也可以转发到controller进行处理
successHandler(AuthenticationSuccessHandler authSuccess): 登陆成功后处理器,authSuccess 实现了AuthenticationSuccessHandler 接口,并实现其中唯一方法,该方法有三个参数,通过这三个参数就可返回相关信息
验证码的实现
创建验证码控制器,并实现验证码的生成,并将生成的验证码放入session中
1 2 3 4 5 6 7 8 9 10 11 12 13 14 15 16 17 18 19 20 21 22 23 24 25 26 27 28 29 30 31 32 33 34 35 36 37 38 39 40 41 42 43 44 45 46 47 48 49 50 51 52 53 54 55 56 57 58 59 60 61 62 63 64 65 66 67@RestController @RequestMapping("/verification") public class VerificationController { private static final int height=30; private static final int weight=150; private static final int codeSize=6; private static final int codeSpace=24; @RequestMapping("/code") public void code(HttpServletRequest request, HttpServletResponse response) throws IOException { //创建 BufferedImage 对象,参数为 宽、高、图像类型 BufferedImage image=new BufferedImage(weight,height,BufferedImage.TYPE_INT_RGB); //获取画笔,对图像进行绘制 Graphics g = image.getGraphics(); //设置画笔颜色为白色 g.setColor(Color.WHITE); //填充指定的矩形,参数:起始位置 x y、绘制大小 width height g.fillRect(0,0,weight,height); Random random = new Random(); //存储验证码,后续方便放入session StringBuilder codeStr=new StringBuilder(); //绘制验证码 for (int i=0;i<codeSize;i++){ //设置颜色 g.setColor(new Color( random.nextInt(255),random.nextInt(255),random.nextInt(255) )); //设置字体 字体构造参数:字体、风格、大小 g.setFont(new Font("宋体",Font.BOLD,24)); //绘制字符串 参数:字符、x、y String code = RandomUtil.randomString(1); codeStr.append(code); g.drawString(code,codeSpace*i,random.nextInt(height/2)+height/2); } //将生成的验证码字符串放入session request.getSession().setAttribute("codeStr",codeStr.toString()); //绘制干扰线 for (int i=0;i<4;i++){ g.setColor(new Color( random.nextInt(255),random.nextInt(255),random.nextInt(255) )); //绘制干扰线 参数:线的起点 x1,y1、线的终点 x2,y2 g.drawLine(random.nextInt(weight/2), random.nextInt(height), random.nextInt(weight), random.nextInt(height)); } //告诉浏览器响应内容格式 response.setContentType("image/png"); //告诉浏览器不要进行缓存 response.setHeader( "Pragma", "no-cache" ); response.setHeader( "Cache-Control", "no-cache" ); response.setDateHeader("Expires",0); ServletOutputStream out = response.getOutputStream(); //通过 ImageIO 工具类将图片写入 response 输出流中 ImageIO.write(image,"png",out); out.flush(); out.close(); } }将验证码的请求地址放行
1 2 3http.authorizeRequests() //允许RequestMatcher进行权限控制 .antMatchers("/index","/login.html","/index.html","/**/**.js","/verification/**").permitAll() //该地址放行 //..........前端页面和js设置
1 2 3 4 5 6 7 8 9 10 11 12 13 14 15 16 17 18 19 20 21 22 23 24 25 26 27 28 29 30 31 32 33 34 35 36<body> <h1>登录页</h1> 用户名:<input type="text" name="username"><br> 密码:<input id="password" type="password" name="password"><br> 验证码:<input id="code" type="text" name="code"> <img src="/verification/code" id="imgCode"> <a href="javascript:void(0)" onclick="changeCode()">重新获取</a> <button id="loginBtn"> 登录 </button> </body> <script> $(document).ready(function(){ $("#loginBtn").on("click",function (){ $.ajax({ url:'/login', method:'post', data:{ username:$('input[name="username"]').val(), password:$('input[name="password"]').val(), code:$('input[name="code"]').val() }, success:(res)=>{ if (res.code !== 0){ alert("登陆失败:"+res.msg) }else{ alert("登陆成功!!") } }, }) }) }); function changeCode(){ //对img标签的src重新赋值,可以实现图片的重新加载 $("#imgCode").attr("src","/verification/code?t="+new Date()) } </script>设置过滤器用于验证码的校验,参考后面
自定义过滤器
自定义过滤器
Spring Security 框架是使用过滤器实现的
例如:验证用户名密码是否正确 :UsernamePasswordAuthenticationFilter 过滤器
实现过滤器的方式
- 直接实现 javax.servlet.Filter
- 继承spring框架提供的一些过滤器抽象类;例如:org.springframework.web.filter.OncePerRequestFilter 该过滤器确保了一次请求只执行一次该过滤器
注意:设置字符编码的代码必须在 获取输出对象之前,否则无效
验证码校验过滤器实现
| |
添加过滤器到过滤器链
| |