SpringBoot案例
集成
整合jsp
声明SpringBoot内嵌tomcat对jsp支持依赖
1
2
3
4
<dependency> <groupId>org.apache.tomcat.embed</groupId> <artifactId>tomcat-embed-jasper</artifactId> </dependency>在main目录下创建webapp,并在包设置设定该目录为web资源目录
SpringBoot默认支持view不是jsp,需要手动指定jsp文件编译后位置,SpringBoot规定位置为 META-INF/resources
1
2
3
4
5
6
7
<resource> <directory>src/main/webapp</directory> <targetPath>META-INF/resources</targetPath> <includes> <include>*.*</include> </includes> </resource>在核心配置文件中配置视图解析器
1 2spring.mvc.view.prefix=/ spring.mvc.view.suffix=.jsp
集成mybatis(逆向工程)
声明相关依赖,mysql驱动依赖、mybatis整合SpringBoot的起步依赖
1
2
3
4
5
6
7
8
9
<dependency> <groupId>mysql</groupId> <artifactId>mysql-connector-java</artifactId> </dependency> <dependency> <groupId>org.mybatis.spring.boot</groupId> <artifactId>mybatis-spring-boot-starter</artifactId> <version>2.2.0</version> </dependency>
使用mybatis提供的逆向工程生成实体类、映射文件、Dao接口
根目录下创建
generatorConfig.xml逆向工程配置文件1 2 3 4 5 6 7 8 9 10 11 12 13 14 15 16 17 18 19 20 21 22 23 24 25 26 27 28 29 30 31 32 33 34 35 36 37 38 39 40 41 42 43 44 45 46 47 48<?xml version="1.0" encoding="UTF-8"?> <!DOCTYPE generatorConfiguration PUBLIC "-//mybatis.org//DTD MyBatis Generator Configuration 1.0//EN" "http://mybatis.org/dtd/mybatis-generator-config_1_0.dtd"> <generatorConfiguration> <!-- mysql驱动位置 --> <classPathEntry location="G:\mysql-connector-java-8.0.25.jar" /> <context id="tables" targetRuntime="MyBatis3"> <!-- 关闭注释生成 --> <commentGenerator> <property name="suppressAllComments" value="true" /> </commentGenerator> <jdbcConnection driverClass="com.mysql.cj.jdbc.Driver" connectionURL="jdbc:mysql://192.168.10.129:3306/crm_manage?useSSL=true&useUnicode=true&characterEncoding=utf8" userId="crm_manage" password="JCRMp3LHkrSZ5y6c"> </jdbcConnection> <javaTypeResolver > <property name="forceBigDecimals" value="true" /> </javaTypeResolver> <javaModelGenerator targetPackage="com.lei.model" targetProject="src/main/java/"> <property name="enableSubPackages" value="true" /> <property name="trimStrings" value="true" /> </javaModelGenerator> <sqlMapGenerator targetPackage="com.lei.mapper" targetProject="src/main/java/"> <property name="enableSubPackages" value="true" /> </sqlMapGenerator> <javaClientGenerator type="XMLMAPPER" targetPackage="com.lei.mapper" targetProject="src/main/java/"> <property name="enableSubPackages" value="true" /> </javaClientGenerator> <table tableName="tbl_activity" domainObjectName="Activity" enableCountByExample="false" enableSelectByExample="false" enableDeleteByExample="false" enableUpdateByExample="false" selectByExampleQueryId="false" /> </context> </generatorConfiguration>pom.xml中配置逆向工程插件
1 2 3 4 5 6 7 8 9 10 11<plugin> <groupId>org.mybatis.generator</groupId> <artifactId>mybatis-generator-maven-plugin</artifactId> <version>1.4.0</version> <configuration> <!--本地逆向工程配置文件位置--> <configurationFile>generatorConfig.xml</configurationFile> <verbose>true</verbose> <overwrite>true</overwrite> </configuration> </plugin>使用maven的逆向工程插件,生成对应的mapper、domain
mybatis和SpringBoot整合
在mapper接口上使用注解 @Mapper 注解,将其注入到spring容器
或者使用 @MapperScan(“com.lei.mapper”)注解,将其注解到主配置文件上,指定需要扫描的mapper包
在 SpringBoot 核心配置文件中配置 数据库链接信息
1 2 3 4spring.datasource.driver-class-name=com.mysql.cj.jdbc.Driver spring.datasource.url=jdbc:mysql://192.168.10.129:3306/crm_manage?useSSL=true&useUnicode=true&characterEncoding=utf8 spring.datasource.username=crm_manage spring.datasource.password=JCRMp3LHkrSZ5y6cpom.xml配置资源文件用于编译mapper.xml文件
mapper.xml存放位置,两种
和接口放在一起,需要在pom.xml中配置资源目录
直接将mapper.xml和接口分开,将mapper.xml放在 resource目录下
在资源目录下创建mapper文件夹,将mapper.xml文件放进去
在SpringBoot核心配置文件中指定mapper所在位置
1mybatis.mapper-locations=classpath:mapper/*.xml不需要在pom.xml中指定资源目录
集成redis
SpringBoot2.x之后,原来使用的jedis被替换成了 lettuce
区别:
- jedis:采用直连,多个线程操作的话,是不安全的,如果要避免不安全,使用jedis pool连接池,像 BIO
- lettuce:采用netty,实例可以多个线程中进行共享,不存在线程不安全的情况!可以减少线程数据,像 NIO
添加依赖
1 2 3 4 5<!-- SpringBoot集成redis起步依赖 --> <dependency> <groupId>org.springframework.boot</groupId> <artifactId>spring-boot-starter-data-redis</artifactId> </dependency>在SpringBoot核心配置文件中添加redis配置
1 2 3spring.redis.host=192.168.10.129 spring.redis.port=6379 spring.redis.password=123456redis起步依赖提供了一个操作redis的对象,注入操作redis的对象
1 2@Autowired private RedisTemplate<Object,Object> redisTemplate;事务操作的实现,通过SessionCallback/RedisCallback;默认情况下:redisTemplate每次操作都是采用新的连接执行,而
redisTemplate.multi()是无效的(因为连接池连接默认自动提交),手动提交时会报错ERR EXEC without MULTISessionCallback实现事务操作
1 2 3 4 5 6 7 8 9 10 11 12 13 14 15 16 17 18 19 20@Override public void set(String key, String value) { try { Boolean execute = redisTemplate.execute(new SessionCallback<Boolean>() { @Override public Boolean execute(RedisOperations redisOperations) throws DataAccessException { redisOperations.multi(); //设置缓存 redisOperations.opsForValue().setIfAbsent(key, value); //设置超时时间 redisOperations.expire(key, 120L, TimeUnit.SECONDS); List list = redisOperations.exec(); return (Boolean) list.get(0); } }); } finally { //清除缓存 redisTemplate.delete(key); } }RedisCallback实现事务操作
1 2 3 4 5 6 7 8 9 10 11 12 13 14 15 16 17 18 19 20 21public void set(String key, String value) { try { redisTemplate.execute(new RedisCallback<Boolean>() { @Override public Boolean doInRedis(RedisConnection redisConnection) throws DataAccessException { redisConnection.multi(); Expiration seconds = Expiration.seconds(60L); //如果不存在则设置值 redisConnection.set(key.getBytes(),value.getBytes(),seconds, RedisStringCommands.SetOption.SET_IF_ABSENT); //设置超时时间 redisConnection.expire(key.getBytes(),60L); List<Object> exec = redisConnection.exec(); return null; } }); }finally { //清除缓存 redisTemplate.delete(key); } }
集成Dubbo分布式框架
dubbo简介
- 接口工程:存放实体bean和业务接口
- 服务提供者:业务接口的实现类并将服务暴露且注册到注册中心,调用数据数据持久层
- 添加依赖:dubbo,注册中心,接口工程
- 配置服务者核心配置文件
- 服务消费者:处理浏览器客户端发送的请求,从注册中心调用服务提供者所提供的服务
- 添加依赖:dubbo,注册中心,接口工程
- 配置服务消费者核心配置文件
集成步骤
创建接口工程(maven项目)、创建服务提供者(SpringBoot项目)、创建服务消费者(SpringBoot项目)
服务提供者
添加依赖
1 2 3 4 5<!--dubbo集成SpringBoot起步依赖--> dubbo-spring-boot-starter <!--注册中心依赖--> zkclient <!--接口工程-->核心配置文件中配置
1 2 3 4 5 6 7 8 9 10#内嵌tomcat端口号 #设置上下文根 #声明当前工程名字 spring.application.name= #设置dubbo配置,注意,没有提示 #声明当前工程是一个服务提供者工程 spring.dubbo.server=true #指定注册中心 spring.dubbo.registry=zookeeper://ip:2181
服务消费者
添加依赖
1 2 3 4 5<!--dubbo集成SpringBoot起步依赖--> dubbo-spring-boot-starter <!--注册中心依赖--> zkclient <!--接口工程-->核心配置文件中配置
1 2 3 4 5 6 7 8 9 10#内嵌tomcat端口号 #设置上下文根 #声明当前工程名字 spring.application.name= #设置dubbo配置,注意,没有提示 #声明当前工程是一个服务提供者工程 spring.dubbo.server=true #指定注册中心 spring.dubbo.registry=zookeeper://ip:2181
集成logback日志
SpringBoot默认集成了logback日志框架(log4j 原意 log for java)
SpringBoot核心配置文件可以配置日志,当SpringBoot核心配置文件不够使用时,也可以引入自己扩展的日志配置文件 logback-spring.xml
SpringBoot核心配置文件与logback相关配置
| |
自定义扩展配置 logback-spring.xml
| |
- 日志级别从低到高:TRACE < DEBUG <WARN < ERROR < FATAL,设置了日志级别后,低于该级别的信息都不会输出
- scan:此属性为 true 时,配置文件如果发生改变,将会重新加载,默认为 true
- scanPeriod:设置监测配置文件是否有修改的时间间隔,如果没有给出时间间隔,默认为毫秒。当 scan 为 true 时,此属性生效。默认时间间隔为 1 分钟
- debug :当此属性设置为true时,控制台将打印出 logback 内部日志信息,实时查看。默认值 false,通常不打印
使用swagger和lombok
OAS规范,Linux基金会的一个项目,试图定义一种用来描述API格式或API定义语言,来规范RESTFUL服务开发过程
Swagger是目前最受欢迎的 OAS 规范开发工具框架;随着项目自动生成API文档(通过一些注解)
Swagger使用
pom.xml 添加起步依赖
1 2 3 4 5 6 7 8 9 10 11 12 13 14 15 16 17<!--3.0导入起步依赖--> <dependency> <groupId>io.springfox</groupId> <artifactId>springfox-boot-starter</artifactId> <version>3.0.0</version> </dependency> <!--老版本2.x导入以下依赖--> <dependency> <groupId>io.springfox</groupId> <artifactId>springfox-swagger2</artifactId> <version>2.9.2</version> </dependency> <dependency> <groupId>io.springfox</groupId> <artifactId>springfox-swagger-ui</artifactId> <version>2.9.2</version> </dependency>2.x的老版本swagger除了需要导入相关依赖,还要编写一个配置类
1 2 3 4 5 6 7 8 9 10 11 12 13 14 15 16 17 18 19 20 21 22 23 24 25@Configuration @EnableSwagger2 //开启swagger2的支持 public class MyConfig { @Bean public Docket docket(){ //链式编程,构造器模式,基本是固定的 return new Docket(DocumentationType.SWAGGER_2) .apiInfo(apiInfo()) .select() .apis(RequestHandlerSelectors.withMethodAnnotation(ApiOperation.class)) //扫描有ApiOperation注解的方法 .paths(PathSelectors.any()) .build(); } private ApiInfo apiInfo() { return new ApiInfoBuilder() .title("接口文档") .description("接口文档描述") .termsOfServiceUrl("https://www.lei.com") .contact(new Contact("lei","https://www.lei.com","lei@qq.com")) .license("采用api2.0开源许可证") .licenseUrl("https://www.lei.com/context.txt") .version("1.0.0") .build(); } }编写控制类,并使用相关注解说明,以便生成接口文档
1 2 3 4 5 6 7 8 9 10 11 12 13 14 15 16 17 18 19 20 21 22 23 24 25 26 27 28 29 30 31 32 33 34 35 36 37 38 39@Api(tags = "SpringBoot使用swagger测试") @RestController public class UserController { @ApiOperation(value = "获取用户信息",notes = "根据id获取用户信息") @ApiImplicitParams({ @ApiImplicitParam(paramType = "path",name = "id",value = "用户id",dataTypeClass = String.class) }) @ApiResponses({ @ApiResponse(code = 400,message = "缺少请求参数"), @ApiResponse(code = 401,message = "请求路径没有权限"), @ApiResponse(code = 403,message = "请求路径被隐藏不能访问"), @ApiResponse(code = 404,message = "请求路径错误"), @ApiResponse(code = 405,message = "请求方法不支持") }) @RequestMapping(value = "/query/{id}",method = RequestMethod.GET) public User query(@PathVariable("id") String id){ User user=new User(); user.setId(id); user.setName("小王"); return user; } @ApiOperation(value = "删除用户",notes = "根据id和用户名删除") @ApiImplicitParams({ @ApiImplicitParam(paramType = "path",dataTypeClass = String.class,name = "id",value = "用户id"), @ApiImplicitParam(paramType = "path",dataTypeClass = String.class,name = "name",value = "用户姓名"), }) @ApiResponses({ @ApiResponse(code = 400,message = "缺少请求参数"), @ApiResponse(code = 401,message = "请求路径没有权限"), @ApiResponse(code = 403,message = "请求路径被隐藏不能访问"), @ApiResponse(code = 404,message = "请求路径错误"), @ApiResponse(code = 405,message = "请求方法不支持") }) @RequestMapping(value = "/del/{id}/{name}",method = RequestMethod.POST) public String del(@PathVariable("id") String id,@PathVariable("name") String name){ return "删除成功"; } }实体类相关注解
1 2 3 4 5 6 7 8@Data @ApiModel(value = "User",description = "User实体类") public class User { @ApiModelProperty(name = "id",value = "用户id") private String id; @ApiModelProperty(name = "name",value = "用户姓名") private String name; }浏览器访问
- 3.0访问地址:http://localhost:8080/swagger-ui/index.html#/
- 2.x访问地址:http://localhost:8080/swagger-ui.html
SpringBoot核心配置文件关闭swagger-ui访问
1springfox.documentation.swagger-ui.enabled=false
使用jasypt加密敏感信息
导入依赖
1 2 3 4 5<dependency> <groupId>com.github.ulisesbocchio</groupId> <artifactId>jasypt-spring-boot-starter</artifactId> <version>3.0.3</version> </dependency>SpringBoot核心配置文件配置加密解密的 key
1jasypt.encryptor.password=sdjhauidasdw注入 jasypt bean,并使用加密解密功能生成 密文
1 2 3 4 5 6 7 8 9 10 11 12 13 14 15 16 17 18 19 20 21 22 23 24 25 26 27package com.lei; @SpringBootApplication public class Application implements CommandLineRunner { @Autowired private StringEncryptor stringEncryptor; //注入加密解密的bean public static void main(String[] args) { SpringApplication springApplication=new SpringApplication(Application.class); ApplicationContext context=springApplication.run(); StringEncryptor stringEncryptor=context.getBean(StringEncryptor.class); String username=stringEncryptor.encrypt("root"); System.out.println("username加密结果 :" + username); System.out.println("username解密结果:"+stringEncryptor.decrypt(username)); String password=stringEncryptor.encrypt("123456"); System.out.println("password加密结果 :" + password); System.out.println("password解密结果:"+stringEncryptor.decrypt(password)); } } //输出 /* username加密结果 :KeJAwKEAUZ+HB8NucwwUygG99tWMT7EO/X9J3J50sqFjddx8Nb6jTTQUPEPji2It username解密结果:root password加密结果 :ov7Is+mJiVsT72YCO5t0lgQE4YpEnwYIWkh4dmx6nh+HSg/4W072tGQMzYS0HmE8 password解密结果:123456 */在SpringBoot核心配置文件配置;EVC(密文) 为默认识别密文的格式,可以通过配置文件修改
1 2 3 4 5 6jasypt.encryptor.password=sdjhauidasdw jasypt.encryptor.property.prefix=EVC( jasypt.encryptor.property.suffix=) spring.datasource.username=EVC(KeJAwKEAUZ+HB8NucwwUygG99tWMT7EO/X9J3J50sqFjddx8Nb6jTTQUPEPji2It) spring.datasource.password=EVC(ov7Is+mJiVsT72YCO5t0lgQE4YpEnwYIWkh4dmx6nh+HSg/4W072tGQMzYS0HmE8)
使用fastjson替换默认jackson
导入依赖
1 2 3 4 5<dependency> <groupId>com.alibaba</groupId> <artifactId>fastjson</artifactId> <version>2.0.7</version> </dependency>配置
HttpMessageConvertersBean1 2 3 4 5 6 7 8 9 10 11 12 13 14 15 16 17 18 19 20 21 22 23 24@Bean public HttpMessageConverters fastJsonHttpMessageConverters(){ //1、先定义一个convert转换消息的对象 FastJsonHttpMessageConverter fastConverter=new FastJsonHttpMessageConverter(); //2、添加fastjson的配置信息,比如是否要格式化返回的json数据; FastJsonConfig fastJsonConfig=new FastJsonConfig(); fastJsonConfig.setSerializerFeatures( SerializerFeature.WriteMapNullValue, SerializerFeature.WriteNullListAsEmpty, SerializerFeature.WriteNullNumberAsZero, //SerializerFeature.UseISO8601DateFormat, SerializerFeature.WriteClassName, SerializerFeature.WriteNullStringAsEmpty, SerializerFeature.WriteDateUseDateFormat //使用日期格式化 ); //附加:处理中文乱码 List<MediaType> fastMedisTypes = new ArrayList<MediaType>(); fastMedisTypes.add(MediaType.APPLICATION_JSON); fastConverter.setSupportedMediaTypes(fastMedisTypes); //3、在convert中添加配置信息 fastConverter.setFastJsonConfig(fastJsonConfig); HttpMessageConverter<?> converter=fastConverter; return new HttpMessageConverters(converter); }查看
1 2 3 4 5 6/* * AbstractMessageConverterMethodProcessor类 * writeWithMessageConverters 写入响应消息的方法 * genericConverter.write(body, targetType, selectedMediaType, outputMessage) * 可以查看消息转换器,fastjson在列表第一个 * */
集成Thymeleaf
- Thymeleaf 是一个流行的 java 模板引擎,以 html 为载体
- Thymeleaf模板引擎页面访问,必须经过中央调度器(不能直接访问,类似于页面放在 WEB-INF 目录下)
- http://www.thymeleaf.org
Thymeleaf起步
添加thymeleaf起步依赖
1 2 3 4<dependency> <groupId>org.springframework.boot</groupId> <artifactId>spring-boot-starter-thymeleaf</artifactId> </dependency>在 templates 目录下创建模板文件 hello.html,并引入命名空间
1 2 3 4 5 6 7 8 9 10 11<!DOCTYPE html> <!--suppress ALL --> <html lang="en" xmlns:th="http://www.thymeleaf.org" > <head> <meta charset="UTF-8"> <title>Title</title> </head> <body> <h1 th:text="${msg}"></h1> </body> </html>SpringBoot核心配置文件配置关闭缓存,方便开发,启动类需要设置动态更新资源
1 2 3spring.thymeleaf.cache=false spring.thymeleaf.prefix=classpath:templates/ spring.thymeleaf.suffix=.html
Thymeleaf表达式
${}:标准表达式,和el表达式一致,推荐使用*{}:选择变量表达式,必须使用 th:object 属性来绑定这个对象@{}:路径表达式,
Thymeleaf常见属性
- 标准表达式
th:textth:methodth:actionth:idth:nameth:onclick
th:each="user,userStat:${userList}":遍历,依赖于一个html元素- 条件判断
th:if="${sex} eq 1:满足条件显示th:unless="${sex} eq 1":满足条件不显示,和 th:if 相反th:switch/th:case:选择,满足显示,否则不显示
th:inline="":内敛表达式,有三个值- text:然后在修饰标签里面,可以通过 [[${}]] 取值,而不需要 th:text="${}" 取值
- javascript:可以在 js 中直接取得后台返回过来值,通过 [[${}]]
- 字面量:字符串的意思,分为字符字面量、数字字面量、boolean字面量
- 字符串拼接
th:text="|这里为需要拼接的${data}字符串|"
- 数学运算
后台发送过来的值时,才使用 Thymeleaf 属性
Thymeleaf对象
基本表达式对象
- #request
- #session
功能表达式对象
#dates:java.util.Date 对象的实用方法#calendars:和dates类似,但是是java.util.Calendar 对象#numbers:格式化数字对象的实用方法#strings:字符串对象的实用方法#objects:对 objects 操作的实用方法#arrays:数组的实用方法#bools:对布尔值求值的实用方法#lists:list 的实用方法,#sets:set 的实用方法#maps:map 的实用方法#aggregates:对数组或集合创建聚合的实用方法
实例
| |
配置
多数据源
核心配置,指定mapper接口扫描位置和sqlsession/sqlfactory的映射关系、mapper 和 sqlsession/sqlfactory 的对应关系
多数据源注意事务问题,如果存在多个事务管理器,需明确指定使用哪一个@Transactional("db1TransactionManager")
配置文件
1 2 3 4 5 6 7my.datasource.db1.url=jdbc:mysql://192.168.10.131:3306/db1?useSSL=true&useUnicode=true&characterEncoding=utf8 my.datasource.db1.username=root my.datasource.db1.password=123456 my.datasource.db2.url=jdbc:mysql://192.168.10.131:3306/db2?useSSL=true&useUnicode=true&characterEncoding=utf8 my.datasource.db2.username=root my.datasource.db2.password=123456配置数据源相关
db1数据源
1 2 3 4 5 6 7 8 9 10 11 12 13 14 15 16 17 18 19 20 21 22 23 24 25 26 27 28 29 30 31 32 33 34 35 36 37<?xml version="1.0" encoding="UTF-8"?> <beans xmlns:xsi="http://www.w3.org/2001/XMLSchema-instance" xmlns:tx="http://www.springframework.org/schema/tx" xmlns:aop="http://www.springframework.org/schema/aop" xmlns="http://www.springframework.org/schema/beans" xsi:schemaLocation="http://www.springframework.org/schema/beans http://www.springframework.org/schema/beans/spring-beans-4.2.xsd http://www.springframework.org/schema/aop http://www.springframework.org/schema/aop/spring-aop-4.2.xsd"> <bean id="db1DataSource" class="org.springframework.jdbc.datasource.DriverManagerDataSource"> <property name="url" value="${my.datasource.db1.url}"/> <property name="username" value="${my.datasource.db1.username}"/> <property name="password" value="${my.datasource.db1.password}"/> </bean> <!-- SqlSessionFactory --> <bean id="db1SqlSessionFactory" class="org.mybatis.spring.SqlSessionFactoryBean"> <property name="dataSource" ref="db1DataSource"/> <property name="mapperLocations" value="classpath*:sql/db1/*Mapper.xml"/> </bean> <!-- 这里的配置可以使用注解 @MapperScan --> <!-- <bean class="org.mybatis.spring.mapper.MapperScannerConfigurer"> <property name="basePackage" value="com.lei.**.db1dao"/> <property name="sqlSessionFactoryBeanName" value="db1SqlSessionFactory"/> </bean>--> <!-- sqlSessionTemplate --> <bean id="db1SqlSession" class="org.mybatis.spring.SqlSessionTemplate"> <!-- 只能使用构造方法注入,因为该类没有 set 方法--> <constructor-arg ref="db1SqlSessionFactory"/> </bean> <bean id="db1TransactionManager" class="org.springframework.jdbc.datasource.DataSourceTransactionManager"> <property name="dataSource" ref="db1DataSource"/> </bean> <!-- 自动为spring容器中那些配置@aspectJ切面的bean创建代理--> <aop:aspectj-autoproxy/> </beans>db2数据源
1 2 3 4 5 6 7 8 9 10 11 12 13 14 15 16 17 18 19 20 21 22 23 24 25 26 27 28 29 30 31 32 33 34 35<?xml version="1.0" encoding="UTF-8"?> <beans xmlns:xsi="http://www.w3.org/2001/XMLSchema-instance" xmlns:tx="http://www.springframework.org/schema/tx" xmlns:aop="http://www.springframework.org/schema/aop" xmlns="http://www.springframework.org/schema/beans" xsi:schemaLocation="http://www.springframework.org/schema/beans http://www.springframework.org/schema/beans/spring-beans-4.2.xsd http://www.springframework.org/schema/aop http://www.springframework.org/schema/aop/spring-aop-4.2.xsd"> <bean id="db2DataSource" class="org.springframework.jdbc.datasource.DriverManagerDataSource"> <property name="url" value="${my.datasource.db2.url}"/> <property name="username" value="${my.datasource.db2.username}"/> <property name="password" value="${my.datasource.db2.password}"/> </bean> <!-- SqlSessionFactory --> <bean id="db2SqlSessionFactory" class="org.mybatis.spring.SqlSessionFactoryBean"> <property name="dataSource" ref="db2DataSource"/> <property name="mapperLocations" value="classpath*:sql/db2/*Mapper.xml"/> </bean> <!-- <bean class="org.mybatis.spring.mapper.MapperScannerConfigurer">--> <!-- <property name="basePackage" value="com.lei.**.db2dao"/>--> <!-- <property name="sqlSessionFactoryBeanName" value="db2SqlSessionFactory"/>--> <!-- </bean>--> <!-- sqlSessionTemplate --> <bean id="db2SqlSession" class="org.mybatis.spring.SqlSessionTemplate"> <!-- 只能使用构造方法注入,因为该类没有 set 方法--> <constructor-arg ref="db2SqlSessionFactory"/> </bean> <bean id="db2TransactionManager" class="org.springframework.jdbc.datasource.DataSourceTransactionManager"> <property name="dataSource" ref="db2DataSource"/> </bean> <aop:aspectj-autoproxy/> </beans>启动类配置相关注解
1 2 3 4 5 6 7 8 9 10 11 12@SpringBootApplication //@EnableTransactionManagement //导入数据源配置文件 @ImportResource({"classpath*:config/db1.xml","classpath*:config/db2.xml"}) //绑定mapper接口和sqlsession @MapperScan(basePackages ="com.lei.**.db1dao", sqlSessionTemplateRef = "db1SqlSession") @MapperScan(basePackages ="com.lei.**.db2dao", sqlSessionTemplateRef = "db2SqlSession") public class TwoApplication { public static void main(String[] args) { SpringApplication.run(TwoApplication.class, args); } }
进行测试,多数据源配置成功
注意:定义扫描dao接口时,可能多个数据源扫描了同一位置,此时后扫描到的dao接口时,不再创建实例bean,此时可以通过数据源配置文件导入先后顺序来控制
| |
事务支持
声明式事务
@Transactional:可以标注在类上或方法上,事务支持
@EnableTransactionManagement:Application 类上,表示开启事务,可以省略
编程式事务
事务管理器 PlatformTransactionManager、事务状态 TransactionStatus、事务属性的定义 TransactionDefinition
通过
PlatformTransactionManager实现编程式事务1 2 3 4 5 6 7 8 9 10 11 12 13 14 15 16 17 18 19 20 21 22 23 24 25 26 27 28 29 30 31 32@Override public StudentEntity update(StudentEntity studentEntity) { //事务定义 DefaultTransactionDefinition definition = new DefaultTransactionDefinition(); definition.setPropagationBehavior(TransactionDefinition.PROPAGATION_REQUIRED); //新开事务 TransactionStatus status = transactionManager.getTransaction(definition); try { studentsDao.update(studentEntity); //事务定义 DefaultTransactionDefinition definition1 = new DefaultTransactionDefinition(); definition1.setPropagationBehavior(TransactionDefinition.PROPAGATION_REQUIRES_NEW); //新开事务 TransactionStatus status1 = transactionManager.getTransaction(definition1); try { StudentEntity studentEntity1=new StudentEntity(); BeanUtils.copyProperties(studentEntity,studentEntity1); studentEntity1.setId(2L); studentEntity1.setName("后续更新"); studentsDao.update(studentEntity1); int a=10/0; transactionManager.commit(status1); }catch (Exception e){ transactionManager.rollback(status1); } //提交事务 transactionManager.commit(status); }catch (Exception e){ //回滚事务 transactionManager.rollback(status); } }通过
transactionTemplate实现编程式事务1 2 3 4 5 6 7 8 9 10 11 12 13 14 15 16 17 18 19 20 21 22 23 24 25 26 27 28 29 30 31 32 33@Override public StudentEntity update(StudentEntity studentEntity) { transactionTemplate.setPropagationBehavior(TransactionDefinition.PROPAGATION_REQUIRED); this.transactionTemplate.execute(new TransactionCallbackWithoutResult() { @Override protected void doInTransactionWithoutResult(TransactionStatus transactionStatus) { try { studentsDao.update(studentEntity); //设置事务的传播级别 transactionTemplate.setPropagationBehavior(TransactionDefinition.PROPAGATION_NEVER); //新开事务 transactionTemplate.execute(new TransactionCallbackWithoutResult() { @Override protected void doInTransactionWithoutResult(TransactionStatus transactionStatus) { try { StudentEntity studentEntity1=new StudentEntity(); BeanUtils.copyProperties(studentEntity,studentEntity1); studentEntity1.setId(2L); studentEntity1.setName("后续更新"); studentsDao.update(studentEntity1); }catch(Exception e){ //标记事务为回滚 transactionStatus.setRollbackOnly(); } } }); int a=10/0; }catch (Exception e){ transactionStatus.setRollbackOnly(); } } }); }
注:以上两种编程式事务,都是事务嵌套;外层事务和内层事务通过事务传播级别关联;设置不同的事务传播级别,可以实现:内部事务抛错外部回滚,内部抛错外部提交等;通过事务传播级别,设置事务管理器中的事务是否RollbackOnly
注意:SpringBoot集成mybatis时,通过sqlSession进行数据库操作时,必须注意 sqlSession 可以设置自动提交,但是连接池连接的自动提交并不能在获取sqlSession时设置
openSession(boolean autoCommit),
autoCommit可选参数传递true值即可开启自动提交功能,没有提供同时设置Connection和autoCommit的方法,这是因为 MyBatis 会依据传入的 Connection 来决定是否启用 autoCommit
SqlSessionTemplate
SqlSessionTemplate 是 MyBatis-Spring 的核心,作为 SqlSession 的一个实现,这意味着可以使用它无缝代替你代码中已经在使用的 SqlSession,SqlSessionTemplate 是线程安全的,可以被多个 DAO 或映射器所共享使用,SqlSessionTemplate 将会保证使用的 SqlSession 与当前 Spring 的事务相关
| |
rollback-only
当事务嵌套时,事务传播特性(propagation)为REQUIRED时,以下情况会出现rollback-only
- 当里层事务抛错,标记为回滚,但是错误被捕获,外层未抛错出来,此时里层缺已经标记为只能rollbackOnly,外层提交事务就会抛错rollback-only
- 当外层为只读事务时,里层事务抛错,此时只读事务提交也会抛错rollback-only
业务代码执行时,记录错误
| |
RESTFul风格
主要是用@PathVariable("")注解
controller代码
1 2 3 4 5 6 7 8@RestController public class TestController { @RequestMapping("/test/{id}/{name}") public String test(@PathVariable("id") Integer id, @PathVariable("name") String name){ return id+" "+name; } }访问地址:127.0.0.1:8080/test/123/唐磊
注意请求路径不清楚的情况,restful风格,通常使用对应的方法请求mapping注解,例:
| |
修改为以下代码无误,然后通过对应的请求方式发送请求
| |
普通java程序
SpringBoot实现普通java程序,有两种方法
在SpringBoot启动方法中获取 ConfigurableApplicationContext
1 2//获得容器,然后取得bean并执行 ConfigurableApplicationContext context=SpringApplication.run(Application.class, args);在SpringBoot启动类实现CommandLineRunner接口,并重写run方法
1 2 3 4 5 6 7 8 9 10 11 12 13 14 15 16 17//实现CommandLineRunner接口,并重写run方法 CommandLineRunner @SpringBootApplication public class Application implements CommandLineRunner CommandLineRunner { //注入bean @Autowired private UserService userService; public static void main(String[] args) { SpringApplication.run(Application.class, args); } //重写接口方法,调用bean方法,SpringBoot容器启动后会回调该方法 @Override public void run(String... args) throws Exception { userService.say(); } }
拦截器 Interceptor
实现
HandlerInterceptor接口并实现相关方法1 2 3 4 5 6 7 8 9 10 11 12 13 14 15 16 17 18 19 20 21 22 23 24 25@Order(1) //order代表拦截器执行顺序 @Component //注册到spring容器,以便后续将拦截在WebMvcConfigurer中注册 public class LoginInterceptor implements HandlerInterceptor { //预处理回调方法,实现处理器的预处理,如登录检查;true表示执行下一流程、false中断流程(需要通过response来响应) @Override public boolean preHandle(HttpServletRequest request, HttpServletResponse response, Object handler) throws Exception { if (request.getSession().getAttribute("user")==null){ response.sendRedirect(request.getContextPath()+"/user/err"); return false; } return true; } //后处理回调方法,在控制器后视图层前,可以通过modelAndView来处理视图层 @Override public void postHandle(HttpServletRequest request, HttpServletResponse response, Object handler, ModelAndView modelAndView) throws Exception { HandlerInterceptor.super.postHandle(request, response, handler, modelAndView); } //整个请求处理完毕后的回调方法,即在视图渲染完毕后回调;如性能监控,在此输出结束时间,还可以进行资源清理(类似于finally) @Override public void afterCompletion(HttpServletRequest request, HttpServletResponse response, Object handler, Exception ex) throws Exception { HandlerInterceptor.super.afterCompletion(request, response, handler, ex); } }注册
WebMvcConfigurer bean,添加拦截器到SpringBoot容器,并配置需要拦截的请求1 2 3 4 5 6 7 8 9 10 11 12 13 14@Bean WebMvcConfigurer createWebMvcConfigurer(@Autowired LoginInterceptor loginInterceptor) { return new WebMvcConfigurer() { //需要被拦截的请求 **代表当前请求路径下的所有请求,*代表当前请求路径同级请求 // /user/* 表示拦截/user/xx的请求,/user/** 表示拦截 /user/xx/xx...的请求 String[] addPath={"/user/**"}; String[] excludePath={"/user/login","/user/err"}; public void addInterceptors(InterceptorRegistry registry) { registry.addInterceptor(loginInterceptor) .addPathPatterns(addPath) //需要拦截的请求地址 .excludePathPatterns(excludePath); //不需要拦截的请求地址 } }; }编写测试类
1 2 3 4 5 6 7 8 9 10 11 12 13 14 15 16 17 18 19 20 21 22 23 24 25 26 27 28@RestController @RequestMapping("/user") public class UserController { //登录,可不登录访问 @RequestMapping("/login") public String login(HttpServletRequest request, HttpServletResponse response) throws IOException { User user= (User) request.getSession().getAttribute("user"); if (user==null){ user=new User(); user.setId(UUID.randomUUID().toString()); request.getSession().setAttribute("user",user); }else { response.sendRedirect(request.getContextPath()+"/user/home"); } return "login"; } //需要登录后访问 @RequestMapping("/home") public String home(HttpServletRequest request){ User user= (User) request.getSession().getAttribute("user"); return "home"+user; } //错误,可不登录访问,未登录时跳转这个请求 @RequestMapping("/err") public String err(){ return "err"; } }
servlet、过滤器、监听器
servlet @WebServlet
两种实现方式:主要步骤都是编写一个Servlet,然后在web.xml中注册该servlet
方式一:注解方式实现
@WebServlet@ServletComponentScanservlet编写
1 2 3 4 5 6 7 8 9 10//@WebServlet声明该类是一个servlet @WebServlet(urlPatterns = "/oneSetvlet") public class OneServlet extends HttpServlet { @Override protected void doGet(HttpServletRequest req, HttpServletResponse resp) throws ServletException, IOException { resp.getWriter().println("one servlet"); resp.getWriter().flush(); resp.getWriter().flush(); } }SpringBoot启动类配置servlet扫描
1 2 3 4 5 6 7 8@SpringBootApplication //@ServletComponentScan 启动servlet扫描 @ServletComponentScan(basePackages = "com.lei.servlet") public class Application { public static void main(String[] args) { SpringApplication.run(Application.class, args); } }
方式二:配置类注册组件实现
编写servlet
1 2 3 4 5 6 7 8public class TwoServlet extends HttpServlet { @Override protected void doGet(HttpServletRequest req, HttpServletResponse resp) throws ServletException, IOException { resp.getWriter().println("two servlet"); resp.getWriter().flush(); resp.getWriter().flush(); } }编写配置类,并注册servlet
1 2 3 4 5 6 7@Configuration public class MyConfig { @Bean public ServletRegistrationBean<HttpServlet> registrationBean(){ return new ServletRegistrationBean<>(new TwoServlet(),"/twoServlet"); } }
过滤器 @WebListenner
过滤器属于servlet的,声明过滤器,注册到SpringBoot容器中
SpringBoot有两种实现方式:
方式一:注解方式
@WebFilter、@创建过滤器,实现 servlet 下的 Filter 接口,并重写方法
1 2 3 4 5 6 7 8 9 10 11 12 13 14 15 16 17 18 19 20//定义该类为一个过滤器 @WebFilter(urlPatterns = "/*") public class TwoFilter implements Filter { //过滤器的创建由web服务器控制,过滤器执行顺序,可在注册时通过setOrder,当不设置 setOrder 次序时,过滤器的执行顺序默认是 Bean 的加载顺序 //初始化参数,在创建Filter时自动调用。当我们需要设置初始化参数的时候,可以写到该方法中 @Override public void init(FilterConfig filterConfig) throws ServletException { Filter.super.init(filterConfig); } //拦截到要执行的请求时,doFilter就会执行。这里面写我们对请求和响应的预处理 @Override public void doFilter(ServletRequest servletRequest, ServletResponse servletResponse, FilterChain filterChain) throws IOException, ServletException { System.out.println("过滤器1生效"); } //在销毁Filter时自动调用 @Override public void destroy() { Filter.super.destroy(); } }SpringBoot启动类,配置启动servlet扫描
1 2 3 4 5 6 7@SpringBootApplication @ServletComponentScan(basePackages = "com.lei.filter") public class Application { public static void main(String[] args) { SpringApplication.run(Application.class, args); } }
方式二:配置类注册组件方式
创建过滤器,实现 servlet 下的 Filter 接口,并重写方法
1 2 3 4 5 6 7 8 9 10 11 12 13 14 15 16public class Filter1 implements Filter { @Override public void init(FilterConfig filterConfig) throws ServletException { Filter.super.init(filterConfig); } @Override public void destroy() { Filter.super.destroy(); } @Override public void doFilter(ServletRequest servletRequest, ServletResponse servletResponse, FilterChain filterChain) throws IOException, ServletException { System.out.println("过滤器1"); //放行 filterChain.doFilter(servletRequest,servletResponse); } }编写配置类,注册过滤器到SpringBoot
1 2 3 4 5 6 7 8 9 10@Configuration public class MyConfig { @Bean public FilterRegistrationBean<Filter> registrationBean(){ FilterRegistrationBean<Filter> registrationBean=new FilterRegistrationBean<>(new Filter1()); registrationBean.addUrlPatterns("/*"); System.out.println(registrationBean.getOrder()); return registrationBean; } }
listenner 和 servlet 监听器实现类似
过滤器实现过滤空参数
创建ServletRequest包装类处理空字符
| |
创建过滤器
| |
设置字符编码
针对servlet使用,两种方式
方式一:使用SpringBoot核心配置文件设置
application.properties
1 2 3server.servlet.encoding.enabled=true server.servlet.encoding.force=true server.servlet.encoding.charset=utf-8设置浏览器编码
1 2 3 4 5 6 7 8 9 10@WebServlet(urlPatterns = "/oneSetvlet") public class OneServlet extends HttpServlet { @Override protected void doGet(HttpServletRequest req, HttpServletResponse resp) throws ServletException, IOException { resp.setContentType("text/html;character=utf-8"); resp.getWriter().println("你好世界,one servlet"); resp.getWriter().flush(); resp.getWriter().close(); } }
方式二:通过注册spring编码过滤器,并关闭SpringBoot自带编码
SpringBoot自带编码过滤器注册
1 2 3 4 5 6 7 8 9 10 11 12@Configuration public class MyConfig { @Bean public FilterRegistrationBean<Filter> filterFilterRegistrationBean(){ CharacterEncodingFilter characterEncodingFilter=new CharacterEncodingFilter("utf-8"); //forceEncoding用来设置是否理会 request.getCharacterEncoding()方法,设置为true则强制覆盖之前的编码格式 characterEncodingFilter.setForceEncoding(true); FilterRegistrationBean<Filter> filterFilterRegistrationBean=new FilterRegistrationBean<>(); filterFilterRegistrationBean.setFilter(characterEncodingFilter); return filterFilterRegistrationBean; } }关闭SpringBoot自带编码
1server.servlet.encoding.enabled=false设置浏览器编码
1 2 3 4 5 6 7 8 9 10@WebServlet(urlPatterns = "/oneSetvlet") public class OneServlet extends HttpServlet { @Override protected void doGet(HttpServletRequest req, HttpServletResponse resp) throws ServletException, IOException { resp.setContentType("text/html;character=utf-8"); resp.getWriter().println("你好世界,one servlet"); resp.getWriter().flush(); resp.getWriter().close(); } }
SpringBoot工程打包
打包war
修改pom.xml
- 修改打包形式
- 移除内嵌tomcat
- 添加servlet依赖
- 指定web资源文件夹,指定配置资源文件夹
配置类继承 SpringBootServletInitializer 并重写 configure 方法
1 2 3 4 5 6 7 8 9 10 11 12 13@SpringBootApplication @ServletComponentScan(basePackages = "com.lei.filter") //打包war启动类继承SpringBootServletInitializer类,并重写configure方法 public class Application extends SpringBootServletInitializer { public static void main(String[] args) { SpringApplication.run(Application.class, args); } @Override protected SpringApplicationBuilder configure(SpringApplicationBuilder builder) { return builder.sources(Application.class); } }
SpringBoot打war包,在SpringBoot核心配置文件中配置的tomcat相关配置失效,以部署的tomcat配置为主
热部署插件
- JRebel插件 或者 devtools 或者 启动配置更新 resource 和 class
- 代码修改后 build一下
数据库连接池
SpringBoot2.x后默认使用 HikariCP 作为数据源,因此使用其他数据源需要进行配置
pom.xml 排除默认的 HikariCP 数据库连接池,并添加 数据库连接池
1 2 3 4 5 6 7 8 9 10 11 12 13 14 15<dependency> <groupId>org.mybatis.spring.boot</groupId> <artifactId>mybatis-spring-boot-starter</artifactId> <exclusions> <exclusion> <groupId>com.zaxxer</groupId> <artifactId>HikariCP</artifactId> </exclusion> </exclusions> </dependency> <dependency> <groupId>com.alibaba</groupId> <artifactId>druid</artifactId> <version>1.2.6</version> </dependency>SpringBoot核心配置文件指定数据源
1 2#指定数据源 spring.datasource.type=com.alibaba.druid.pool.DruidDataSource
也可以直接使用起步依赖,不需要在SpringBoot核心配置文件中指定数据源,并且可以在SpringBoot核心配置文件中配置该连接池相关参数
| |
CORS跨域
传统ajax请求,只能请求同一域下的资源,否则存在跨域错误
同源:指的是协议、端口、host都相同,则视为同源
使用
CorsRegistry,注册 WebMvcConfigurer bean,在该bean中配置可以跨域访问的请求1 2 3 4 5 6 7 8 9 10 11 12 13 14 15 16 17@Bean public WebMvcConfigurer mvcConfigurer(){ return new WebMvcConfigurer() { @Override public void addCorsMappings(CorsRegistry registry) { registry.addMapping("/api/**") //放行哪些请求方式 .allowedMethods("GET","POST") //设置放行哪些原始域 .allowedOrigins("*") //放行哪些原始请求头部信息 .allowedHeaders("*") //暴露哪些原始请求头部信息 .exposedHeaders("*"); } }; }创建配置类,实现接口WebMvcConfigurer ,并重写 addCorsMappings() 方法
1 2 3 4 5 6 7 8 9 10 11 12 13 14 15@Configuration public class MyWebMvcConfig implements WebMvcConfigurer { @Override public void addCorsMappings(CorsRegistry registry) { registry.addMapping("/api/**") //放行哪些请求方式 .allowedMethods("GET","POST") //设置放行哪些原始域 .allowedOrigins("*") //放行哪些原始请求头部信息 .allowedHeaders("*") //暴露哪些原始请求头部信息 .exposedHeaders("*"); } }使用注解
@CrossOrigin(origins = "*",methods = {RequestMethod.GET,RequestMethod.POST})使用jsonp方式,只支持get请求,局限性大,但是支持老式浏览器
静态资源的处理
SpringBoot默认静态资源位于 classpath 目录下,且满足如下命名
/static/public/resources/META-INF/resources
以上目录编译后在classpath下,可以直接访问,不需要加目录名
可以通过资源类查看
| |
可以通过核心配置文件修改默认的静态资源放置位置,修改后原先默认的失效
| |
线程池异步调用
SpringBoot框架自动装配提供了一个线程池,用于异步提交任务
有了线程池,只需要编写任务即可,采用注解@Async提交任务
SpringBoot自动装配的线程池还可以根据需要配置
创建配置类,注入线程池 bean,覆盖默认的线程池,会覆盖SpringBoot创建的默认线程池
1 2 3 4 5 6 7 8 9 10@Bean public ThreadPoolTaskExecutor asyncExecutor(){ ThreadPoolTaskExecutor taskExecutor=new ThreadPoolTaskExecutor(); taskExecutor.setThreadNamePrefix("mythread"); taskExecutor.setCorePoolSize(2); taskExecutor.setMaxPoolSize(10); taskExecutor.setQueueCapacity(9999); taskExecutor.setRejectedExecutionHandler(new ThreadPoolExecutor.CallerRunsPolicy()); return taskExecutor; }SpringBoot核心配置文件也可以配置线程池
1 2 3 4spring.task.execution.pool.core-size=5 spring.task.execution.pool.max-size=100 spring.task.execution.thread-name-prefix=th- spring.task.execution.pool.queue-capacity=999实例一:通过
@Async注解,需要在启动类开启异步执行@EnableAsync,@Async标注的方法会放入线程池中执行(通过AOP方式)1 2 3 4 5 6 7 8 9 10 11 12 13 14 15 16 17 18 19 20 21 22 23 24 25 26 27 28 29 30@Service public class MyServiceImpl implements MyService { @Async //标注该方法异步执行 @Override public Future<String> speak() { return AsyncResult.forValue("hello"); } } @SpringBootApplication @EnableAsync //开启异步执行 public class Application implements CommandLineRunner { @Autowired private MyService myService; public static void main(String[] args) { ApplicationContext context= SpringApplication.run(Application.class, args); System.out.println(1); } @Override public void run(String... args) throws Exception { System.out.println("主--------------"); Future<String> th =myService.speak(); System.out.println("主------------"); System.out.println("线程池任务-----"+th.get()); } }实例二:通过注入的线程池执行对象
1 2 3 4 5 6 7 8 9 10 11 12 13 14 15 16 17 18 19 20 21 22 23 24 25 26 27 28 29 30 31 32 33 34 35@SpringBootApplication public class Application implements CommandLineRunner { @Autowired private ThreadPoolTaskExecutor taskExecutor; public static void main(String[] args) { ApplicationContext context= SpringApplication.run(Application.class, args); } @Override public void run(String... args) throws Exception { List<Future<String>> futureList=new ArrayList<>(); for (int i=0;i<20;i++){ Future<String> future=taskExecutor.submit(()->{ System.out.println(Thread.currentThread().getName()+"线程池任务运行"); Thread.sleep(150); return "运行成功"; }); futureList.add(future); } for(Future<String> future:futureList){ //轮询查询任务执行完没,完了获取返回值终止等待该任务返回值,否则睡5ms再次查询 while (true){ if (future.isDone()&&!future.isCancelled()){ //获取线程执行返回值 System.out.println(future.get()+ LocalDateTime.now()); break; }else { Thread.sleep(10); } } } } }
内嵌服务器
SpringBoot内嵌服务器默认为 Tomcat,也可以将程序切换为其他服务器 Undertow、Jetty,只需要通过pom.xml配置即可
排除默认的tomcat服务器,导入其他服务器的起步依赖
| |
HTTPS支持
生成证书,JDK生成(也可以采用openssl生成)
1 2 3 4 5 6#生成jks证书文件 keytool -genkey -keyalg RSA -keystore tomcat.jks #转换为行业规范 pkcs12 证书 keytool -importkeystore -srckeystore tomcat.jks -destkeystore tomcat.pkcs12 -deststoretype pkcs12 #查看证书内容 keytoll -list -v -keystore tomcat.jksSpringBoot核心配置文件配置
1 2 3 4 5 6 7 8#ssh端口 server.port=8088 #证书 server.ssl.key-store=classpath:tomcat.pkcs12 #证书密码 server.ssl.key-store-password=123456 #证书证书类型 jks/PKCS12 server.ssl.trust-store-type=PKCS12浏览器访问:https://127.0.0.1:8088/web/t1
HTTPS和HTTP不能同时配置,可以通过配置一个HTTPS,编写类实现一个HTTP
HTTPS和HTTP共存
方法一
核心配置文件中启动 HTTPS支持
在配置类中注册 servletContainer bean
1 2 3 4 5 6 7 8 9 10 11 12 13 14 15 16 17 18 19 20 21 22 23 24 25 26 27 28@Bean public TomcatServletWebServerFactory servletContainer(){ TomcatServletWebServerFactory tomcat=new TomcatServletWebServerFactory(){ @Override //该方法重写可以实现用户访问HTTP时,跳转到HTTPS protected void postProcessContext(Context context) { SecurityConstraint constraint=new SecurityConstraint(); constraint.setUserConstraint("CONFIDEETIAL"); SecurityCollection collection=new SecurityCollection(); collection.addPattern("/*"); constraint.addCollection(collection); context.addConstraint(constraint); } }; tomcat.setContextPath("/web"); tomcat.addAdditionalTomcatConnectors(createHttpConnector()); return tomcat; } //创建连接器 private Connector createHttpConnector() { Connector connector=new Connector("org.apache.coyote.http11.Http11NioProtocol"); connector.setScheme("http"); connector.setPort(8080); connector.setSecure(false); //https端口 connector.setRedirectPort(8088); return connector; }此时访问http会自动跳转到https上
全部通过代码实现HTTP和HTTPS,HTTPS实现也是注册一个bean
全局异常拦截
方式一:
创建一个拦截异常的控制器
1 2 3 4 5 6 7 8 9 10 11 12 13 14 15//ControllerAdvice返回指定页面;RestControllerAdvice返回JSON数据,也可以使用@ControllerAdvice和@ResponBody配合返回JSON数据 //annotations表示存在该注解的类,发生错误时,拦截 @RestControllerAdvice(annotations = {Controller.class, RestController.class}) public class ExceptionAdvice { // 可以注入已存在的 bean @ExceptionHandler(LoginException.class) public Object errHandlerError(HttpServletRequest request, Exception e) throws Exception{ Map<String,String> map=new HashMap<>(); map.put("请登录","value1"); // 获取错误信息 map.put("error",e.getMessage()); return map; } }此时当控制器出现异常时,会返回指定信息;也可以配置为返回指定错误页,不能多次定义一个异常
方式二
注册一个 WebServerFactory Bean,并重写其中的 factory方法,会拦截SpringBoot的错误响应,并根据状态码返回不同的页面
| |
注意:错误页放在以下目录中都可:
| |
方式三
在控制器中创建@ExceptionHandler注解标记的方法,该异常处理方法没有固定的方法签名,可以传入Exception、HttpServletRequest等,返回值可以是void,也可以是ModelAndView等
ControllerA定义的ExceptionHandler对ControllerB不生效
| |
统一切面日志打印
| |
SpringCache
定义缓存管理器
1 2 3 4 5 6 7 8// 这里使用简单的本地缓存 @Bean("cacheManager") public CacheManager cacheManager() { SimpleCacheManager cacheManager = new SimpleCacheManager(); ConcurrentMapCache cache = new ConcurrentMapCache("concurrentMapCache"); cacheManager.setCaches(List.of(cache)); return cacheManager; }启动添加注解
1 2 3 4 5@SpringBootApplication @EnableCaching public class Application implements ApplicationRunner { //............... }在需要缓存的方法上使用注解开启缓存
1 2 3 4 5 6 7 8 9 10 11/* * cacheManager 缓存管理器bean * cacheNames 缓存的名字 * key 缓存的key,可自定义,默认是方法参数值 使用spEL 表达式 * unless 否定缓存。当 unless 指定的条件为 true ,方法的返回值就不会被缓存 使用spEL 表达式 * condition 符合条件的情况下才缓存 使用spEL 表达式 */ @Cacheable(cacheManager = "cacheManager", cacheNames = {"concurrentMapCache"}, key = "#root.methodName+'['+#paramA+#paramB+']'", unless = "#paramA=='noCache'",,condition = "#result!=null") public Object cacheableTestB(String paramA, String paramB) { return paramA + paramB; }
SpringCache 中 spEL 表达式常用元数据
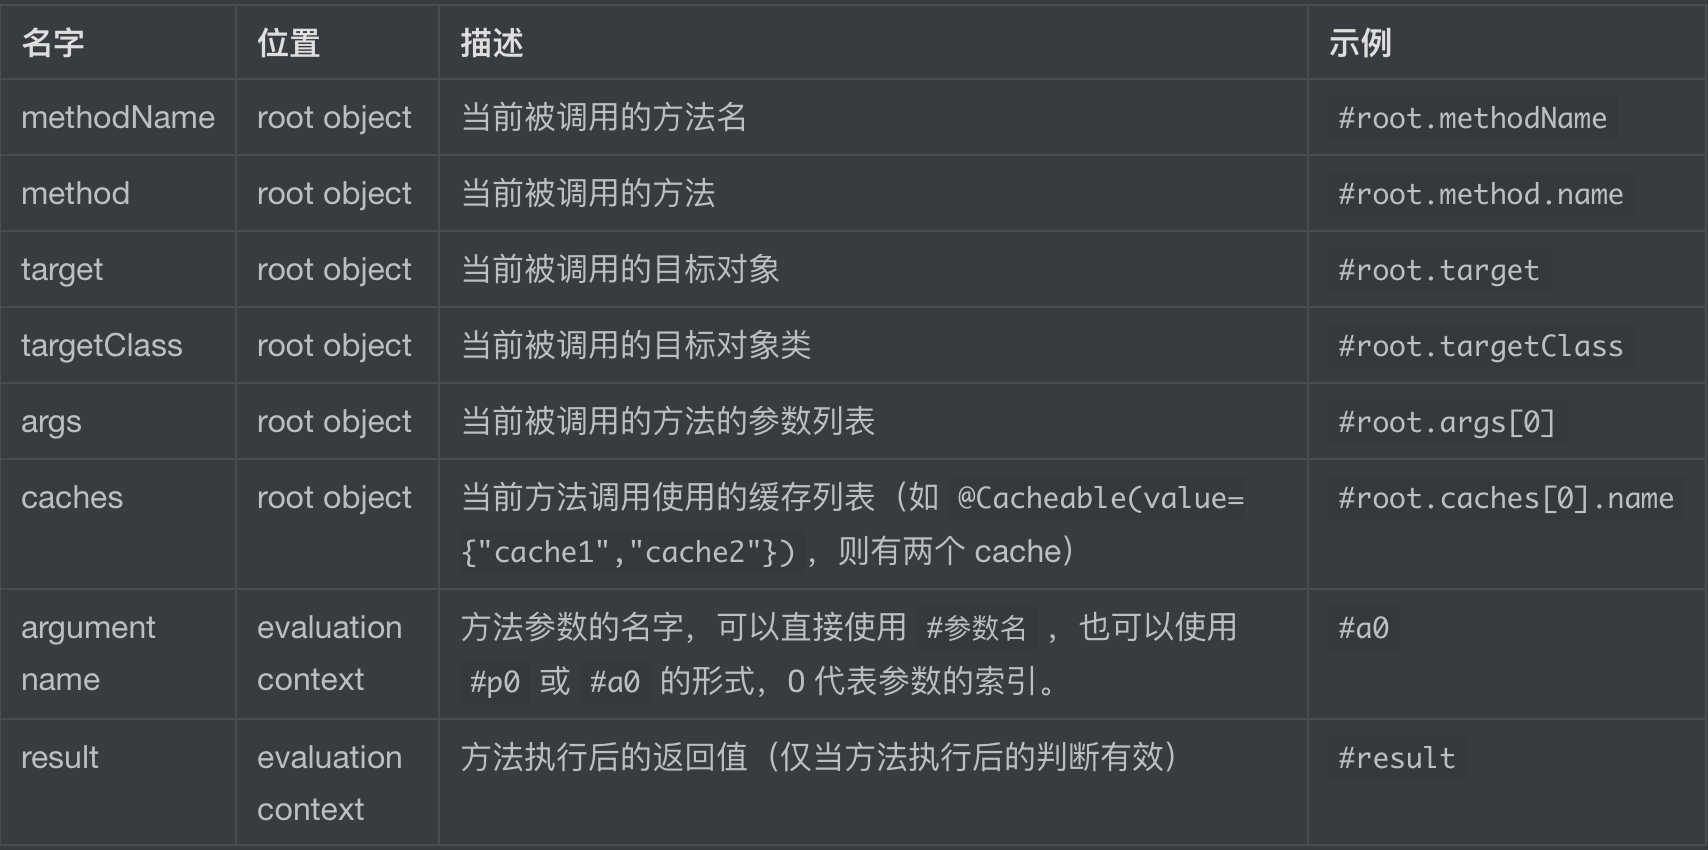
配置元数据
spring-configuration-metadata.json用于配置元数据,主要作用是当在配置文件中尝试编写配置时,IDE 可以根据这个元数据信息进行提示
配置元数据文件位于jars中 META-INF/spring-configuration-metadata.json 下。 它们使用JSON格式,项目分类为 “groups” 或 “properties”,附加值提示分类为 “hints”
Group 属性
包含在 groups 数组中的JSON对象可以包含下表中的属性。
| Name | 类型 | 目的 |
|---|---|---|
name | String | 该组的全名。 这个属性是强制性的。 |
type | String | 该组的数据类型的类名。 例如,如果该组是基于一个用 @ConfigurationProperties 注解的类,该属性将包含该类的完全限定名称。 如果它是基于一个 @Bean 方法,它将是该方法的返回类型。 如果类型不详,该属性可以省略。 |
description | String | 对该组的简短描述,可以显示给用户。 如果没有描述,可以省略。 建议描述是简短的段落,第一行提供一个简洁的摘要。 描述中的最后一行应以句号(.)结束。 |
sourceType | String | 贡献这个组的来源的类名。 例如,如果这个组是基于一个 @Bean 方法,用 @ConfigurationProperties 注释,这个属性将包含包含该方法的 @Configuration 类的完全合格名称。 如果不知道源类型,该属性可以省略。 |
sourceMethod | String | 贡献这个组的方法的全名(包括括号和参数类型)(例如,一个 @ConfigurationProperties 注释的 @Bean 方法的名称)。 如果源方法不知道,可以省略。 |
Property 属性
properties 数组中包含的JSON对象可以包含下表中描述的属性。
| Name | 类型 | 目的 |
|---|---|---|
name | String | 属性的全名。 名称采用小写的句号分隔形式(例如,server.address)。 这个属性是强制性的。 |
type | String | 该属性的数据类型的完整签名(例如,java.lang.String),但也有完整的通用类型(例如 java.util.Map<java.lang.String,com.example.MyEnum>)。 你可以使用此属性来指导用户可以输入的值的类型。 为了保持一致性,基元的类型是通过使用其包装类型来指定的(例如,boolean 变成 java.lang.Boolean)。 请注意,这个类可能是一个复杂的类型,当值被绑定时,会从 String 转换过来。 如果该类型不知道,可以省略。 |
description | String | 可以显示给用户的该property的简短描述。 如果没有描述,可以省略。 建议描述是简短的段落,第一行提供一个简洁的摘要。 描述中的最后一行应以句号(.)结束。 |
sourceType | String | 贡献此属性的来源的类名。 例如,如果该属性来自于一个用 @ConfigurationProperties 注解的类,该属性将包含该类的完全限定名称。 如果源类型未知,可以省略。 |
defaultValue | Object | 默认值,如果没有指定该属性,则使用该值。 如果该属性的类型是一个数组,它可以是一个数组的值。 如果默认值是未知的,它可以被省略。 |
deprecation | Deprecation | 指定该属性是否被废弃。 如果该字段没有被废弃,或者不知道该信息,可以省略。 下表提供了关于 deprecation 属性的更多细节。 |
注解处理器(Annotation Processor)生成元数据
该处理器同时拾取带有 @ConfigurationProperties 注解的类和方法。
导入依赖
| |
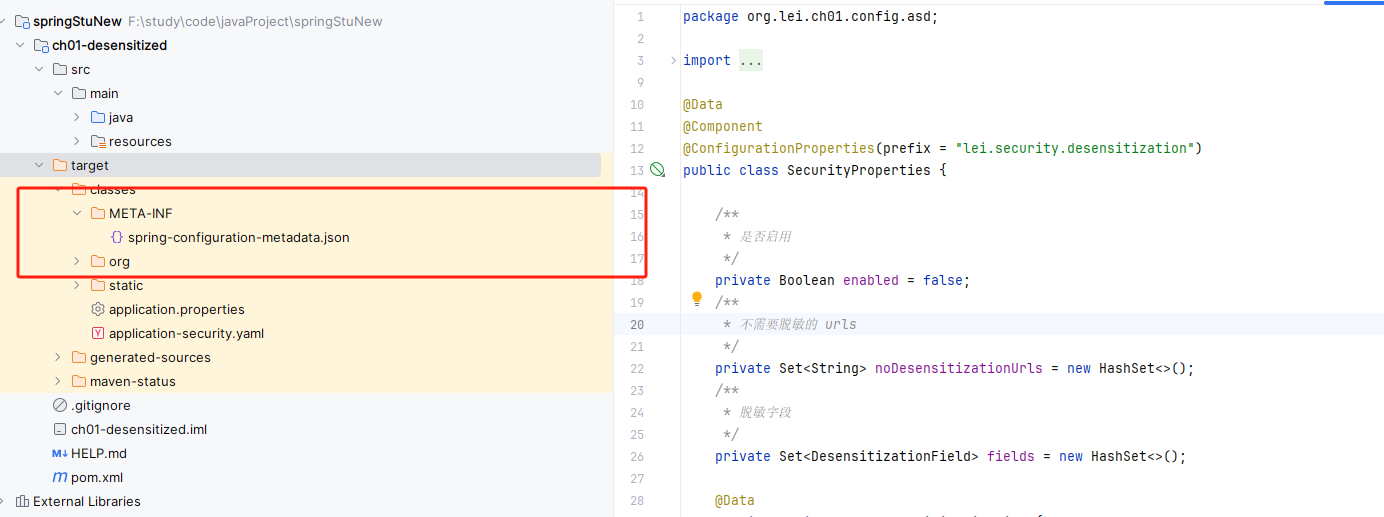
实例
| |
脱敏
脱敏的规则有很多种,例如:
- 替换(常用):将敏感数据中的特定字符或字符序列替换为其他字符。例如,将信用卡号中的中间几位数字替换为星号(*)或其他字符。
- 删除:将敏感数据中的部分内容随机删除。例如,将电话号码的随机 3 位数字进行删除。
- 重排:将原始数据中的某些字符或字段的顺序打乱。例如,将身份证号码的随机位交错互换。
- 加噪:在数据中注入一些误差或者噪音,达到对数据脱敏的效果。例如,在敏感数据中添加一些随机生成的字符。
方式1(@JsonSerialize)
利用Hutool 提供的 DesensitizedUtil脱敏工具类配合 Jackson 通过注解的方式完成数据脱敏
新建自定义序列化类
DesensitizationSerialize1 2 3 4 5 6 7 8 9 10 11 12 13 14 15 16 17 18 19 20 21 22 23 24 25 26 27 28 29 30 31 32 33 34 35 36 37 38 39 40 41/** * 自定义序列化类,用于数据脱敏处理 * 支持多种脱敏类型,包括自定义规则。 */ @AllArgsConstructor @NoArgsConstructor public class DesensitizationSerialize extends JsonSerializer<String> implements ContextualSerializer { private DesensitizationTypeEnum type; private Integer startInclude; private Integer endExclude; @Override public void serialize(String s, JsonGenerator jsonGenerator, SerializerProvider serializerProvider) throws IOException { jsonGenerator.writeString(type.desensitize(s, startInclude, endExclude)); } @Override public JsonSerializer<?> createContextual(SerializerProvider serializerProvider, BeanProperty beanProperty) throws JsonMappingException { if (beanProperty != null) { // 判断数据类型是否为String类型 if (Objects.equals(beanProperty.getType().getRawClass(), String.class)) { // 获取定义的注解 Desensitization desensitization = beanProperty.getAnnotation(Desensitization.class); // 如果字段上没有注解,则从上下文中获取注解 if (desensitization == null) { desensitization = beanProperty.getContextAnnotation(Desensitization.class); } // 如果找到了注解,创建新的序列化实例 if (desensitization != null) { return new DesensitizationSerialize(desensitization.type(), desensitization.startInclude(), desensitization.endExclude()); } } // 如果不是String类型,使用默认的序列化处理 return serializerProvider.findValueSerializer(beanProperty.getType(), beanProperty); } // 如果beanProperty为null,返回默认的null值序列化处理 return serializerProvider.findNullValueSerializer(null); } }新建常用的脱敏类型
DesensitizationTypeEnum1 2 3 4 5 6 7 8 9 10 11 12 13 14 15 16 17 18 19 20 21 22 23 24 25 26 27 28 29 30 31 32 33 34 35 36 37 38 39 40public enum DesensitizationTypeEnum { // 自定义 MY_RULE { @Override public String desensitize(String str, Integer startInclude, Integer endExclude) { return StrUtil.hide(str, startInclude, endExclude); } }, // 用户id USER_ID { @Override public String desensitize(String str, Integer startInclude, Integer endExclude) { return String.valueOf(DesensitizedUtil.userId()); } }, MOBILE_PHONE { @Override public String desensitize(String str, Integer startInclude, Integer endExclude) { return String.valueOf(DesensitizedUtil.mobilePhone(str)); } }, EMAIL { @Override public String desensitize(String str, Integer startInclude, Integer endExclude) { return String.valueOf(DesensitizedUtil.email(str)); } }, ID_CARD { @Override public String desensitize(String str, Integer startInclude, Integer endExclude) { return String.valueOf(DesensitizedUtil.idCardNum(str,4,4)); } }; // 省略其他枚举字段 // ... // 使用 hutool 提供的脱敏工具对数据进行脱敏 public abstract String desensitize(String str, Integer startInclude, Integer endExclude); }新建注解,用于标记需要脱敏字段
Desensitization1 2 3 4 5 6 7 8 9 10 11 12 13 14 15 16 17 18 19 20 21@Target(ElementType.FIELD) @Retention(RetentionPolicy.RUNTIME) @JacksonAnnotationsInside // 指定序列化时使用 DesensitizationSerialize 这个自定义序列化类 @JsonSerialize(using = DesensitizationSerialize.class) public @interface Desensitization { /** * 脱敏数据类型,在MY_RULE的时候,startInclude和endExclude生效 */ DesensitizationTypeEnum type() default DesensitizationTypeEnum.MY_RULE; /** * 脱敏开始位置(包含) */ int startInclude() default 0; /** * 脱敏结束位置(不包含) */ int endExclude() default 0; }在需要脱敏的实体类字段上使用该注解标注即可
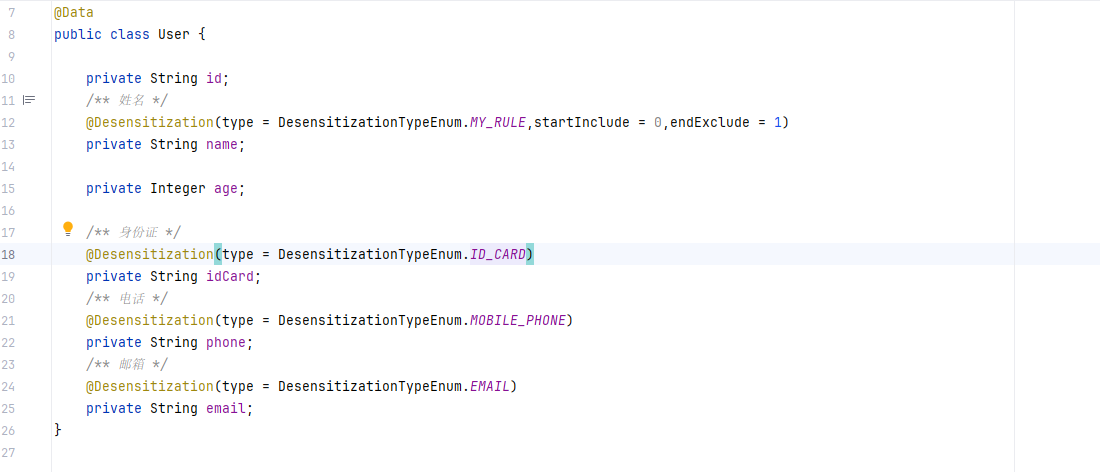
方式2(@JsonComponent)
不是用注解,在配置文件配置需要脱敏的字段和脱敏方式
新增配置信息
1 2 3 4 5 6 7 8 9lei: security: desensitization: enabled: true fields: - field: email sensitive-strategy: email - field: idCard sensitive-strategy: id_card新建配置读取文件,可以使用
spring-boot-configuration-processor生成配置元数据,方便尝试编写配置时 IDE 可以提示1 2 3 4 5 6 7 8 9 10 11 12 13 14 15 16 17 18 19 20 21 22 23 24@Data @Component @ConfigurationProperties(prefix = "lei.security.desensitization") public class DesensitizationProperties { /** * 是否启用 */ private Boolean enabled = false; /** * 不需要脱敏的 urls */ private Set<String> noDesensitizationUrls = new HashSet<>(); /** * 脱敏字段 */ private Set<DesensitizationField> fields = new HashSet<>(); @Data public static class DesensitizationField{ private String field; private SensitiveStrategy sensitiveStrategy; } }自定义 String 类型的
JsonSerializer1 2 3 4 5 6 7 8 9 10 11 12 13 14 15 16 17 18 19 20 21 22 23 24 25 26 27 28@JsonComponent public class DesensitizationJsonSerializer extends JsonSerializer<String> { @Resource private DesensitizationProperties desensitizationProperties; public DesensitizationJsonSerializer() { } public void serialize(String value, JsonGenerator gen, SerializerProvider serializers) throws IOException { JsonStreamContext outputContext = gen.getOutputContext(); String currentName = outputContext.getCurrentName(); // 判断是否启用脱敏 及 脱敏字段是否为空 if (this.desensitizationProperties.getEnabled() && !this.desensitizationProperties.getFields().isEmpty()) { Optional<DesensitizationProperties.DesensitizationField> first = this.desensitizationProperties.getFields().stream() .filter((desensitizationFieldx) -> desensitizationFieldx.getField().equalsIgnoreCase(currentName)) .findFirst(); if (first.isPresent()) { DesensitizationProperties.DesensitizationField desensitizationField = first.get(); // 通过脱敏枚举类进行脱敏操作 String apply = desensitizationField.getSensitiveStrategy().desensitizer().apply(value); gen.writeString(apply); return; } } gen.writeString(value); } }新建脱敏枚举类
SensitiveStrategy1 2 3 4 5 6 7 8 9 10 11 12 13 14 15 16 17 18 19 20 21 22 23 24 25 26 27 28 29 30public enum SensitiveStrategy { PERSON_NAME((s) -> { return s.replaceAll("(?<=^.{1}).", "*"); }), ID_CARD((s) -> { return s.replaceAll("\\d{6}(\\d{8})\\w{4}", "******$1****"); }), PHONE((s) -> { return s.replaceAll("(\\d{3})\\d{4}(\\d{4})", "$1****$2"); }), ADDRESS((s) -> { return s.replaceAll("(\\S{3})\\S{2}(\\S*)\\S{2}", "$1****$2****"); }), EMAIL((s) -> { return s.replaceAll("(\\w+)\\w{3}@(\\w+)", "$1***@$2"); }), BANK_CARD((s) -> { return s.replaceAll("(\\S{3})\\S*(\\S{3})", "$1******$2"); }); private final Function<String, String> desensitizer; SensitiveStrategy(Function<String, String> desensitizer) { this.desensitizer = desensitizer; } public Function<String, String> desensitizer() { return this.desensitizer; } }
综合案例
创建父工程
- 创建 parent 工程,用于管理依赖
- 修改 pom.xml 中package为 pom,指定JDK版本号以及相关依赖,声明SpringBoot父依赖,因为后续子工程包含有SpringBoot工程
- pom.xml文件如下
| |
接口工程
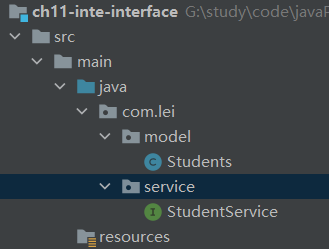
- 创建接口工程 interface,包含业务接口、实体bean
- 声明父依赖
- pom.xml文件
| |
提供者
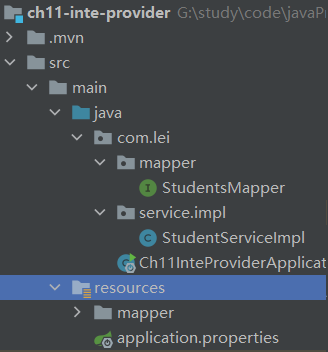
创建服务提供者 provider 工程
pom.xml依赖,指定父工程,主要有 redis起步依赖、mybatis起步依赖、mysql驱动、dubbo、dubbo起步依赖、zookeeper客户端、接口工程
1 2 3 4 5 6 7 8 9 10 11 12 13 14 15 16 17 18 19 20 21 22 23 24 25 26 27 28 29 30 31 32 33 34 35 36 37 38 39 40 41 42 43 44 45 46 47 48 49 50 51 52 53 54 55 56 57 58 59 60 61 62 63 64 65 66 67 68 69 70 71 72 73 74 75 76<?xml version="1.0" encoding="UTF-8"?> <project xmlns="http://maven.apache.org/POM/4.0.0" xmlns:xsi="http://www.w3.org/2001/XMLSchema-instance" xsi:schemaLocation="http://maven.apache.org/POM/4.0.0 https://maven.apache.org/xsd/maven-4.0.0.xsd"> <modelVersion>4.0.0</modelVersion> <parent> <groupId>com.lei</groupId> <artifactId>ch11-inte-parent</artifactId> <version>1.0.0</version> <relativePath>../ch11-inte-parent/pom.xml</relativePath> </parent> <artifactId>ch11-inte-provider</artifactId> <properties> <java.version>11</java.version> </properties> <dependencies> <dependency> <groupId>org.springframework.boot</groupId> <artifactId>spring-boot-starter</artifactId> </dependency> <dependency> <groupId>org.mybatis.spring.boot</groupId> <artifactId>mybatis-spring-boot-starter</artifactId> </dependency> <dependency> <groupId>mysql</groupId> <artifactId>mysql-connector-java</artifactId> </dependency> <dependency> <groupId>org.springframework.boot</groupId> <artifactId>spring-boot-starter-data-redis</artifactId> </dependency> <!--SpringBoot dubbo整合起步依赖--> <dependency> <groupId>org.apache.dubbo</groupId> <artifactId>dubbo-spring-boot-starter</artifactId> </dependency> <!--dubbo--> <dependency> <groupId>org.apache.dubbo</groupId> <artifactId>dubbo</artifactId> </dependency> <!--zookeeper客户端--> <dependency> <groupId>org.apache.curator</groupId> <artifactId>curator-framework</artifactId> </dependency> <dependency> <groupId>org.apache.curator</groupId> <artifactId>curator-recipes</artifactId> </dependency> <dependency> <groupId>com.lei</groupId> <artifactId>ch11-inte-interface</artifactId> <version>1.0.0</version> </dependency> </dependencies> <build> <plugins> <plugin> <groupId>org.mybatis.generator</groupId> <artifactId>mybatis-generator-maven-plugin</artifactId> <version>1.4.0</version> <configuration> <!--本地逆向工程配置文件位置--> <configurationFile>generatorConfig.xml</configurationFile> <verbose>true</verbose> <overwrite>true</overwrite> </configuration> </plugin> <plugin> <groupId>org.springframework.boot</groupId> <artifactId>spring-boot-maven-plugin</artifactId> </plugin> </plugins> </build> </project>mybatis逆向工程文件 generatorConfig.xml
1 2 3 4 5 6 7 8 9 10 11 12 13 14 15 16 17 18 19 20 21 22 23 24 25 26 27 28 29 30 31 32 33 34 35 36 37 38 39 40 41 42 43 44 45 46 47 48<?xml version="1.0" encoding="UTF-8"?> <!DOCTYPE generatorConfiguration PUBLIC "-//mybatis.org//DTD MyBatis Generator Configuration 1.0//EN" "http://mybatis.org/dtd/mybatis-generator-config_1_0.dtd"> <generatorConfiguration> <!-- mysql驱动位置 --> <classPathEntry location="G:\study\soft\apache\MavenRepository\mysql\mysql-connector-java\8.0.25\mysql-connector-java-8.0.25.jar" /> <context id="tables" targetRuntime="MyBatis3"> <!-- 关闭注释生成 --> <commentGenerator> <property name="suppressAllComments" value="true" /> </commentGenerator> <jdbcConnection driverClass="com.mysql.cj.jdbc.Driver" connectionURL="jdbc:mysql://192.168.10.129:3306/jdbc_learn?useSSL=true&useUnicode=true&characterEncoding=utf8" userId="jdbc_learn" password="tWDp8b2xDFZpzF5N"> </jdbcConnection> <javaTypeResolver > <property name="forceBigDecimals" value="true" /> </javaTypeResolver> <javaModelGenerator targetPackage="com.lei.model" targetProject="G:\study\code\javaProject\SpringBoot\ch11-inte-interface\src\main\java\"> <property name="enableSubPackages" value="true" /> <property name="trimStrings" value="true" /> </javaModelGenerator> <sqlMapGenerator targetPackage="mapper" targetProject="src/main/resources/"> <property name="enableSubPackages" value="true" /> </sqlMapGenerator> <javaClientGenerator type="XMLMAPPER" targetPackage="com.lei.mapper" targetProject="src/main/java/"> <property name="enableSubPackages" value="true" /> </javaClientGenerator> <table tableName="students" domainObjectName="Students" enableCountByExample="false" enableSelectByExample="false" enableDeleteByExample="false" enableUpdateByExample="false" selectByExampleQueryId="false" /> </context> </generatorConfiguration>SpringBoot核心配置文件
1 2 3 4 5 6 7 8 9 10 11 12 13 14 15 16 17 18 19 20spring.datasource.driver-class-name=com.mysql.cj.jdbc.Driver spring.datasource.url=jdbc:mysql://192.168.10.129:3306/jdbc_learn?useSSL=true&useUnicode=true&characterEncoding=utf8 spring.datasource.username=jdbc_learn spring.datasource.password=tWDp8b2xDFZpzF5N mybatis.mapper-locations=classpath:mapper/*.xml mybatis.type-aliases-package=com.lei.model dubbo.application.name=provider dubbo.registry.address=zookeeper://192.168.10.129 dubbo.registry.port=2181 dubbo.protocol.name=dubbo dubbo.protocol.port=20880 dubbo.scan.base-packages=com.lei.service.impl spring.redis.host=192.168.10.129 spring.redis.port=6379 logging.level.root=info logging.level.com.lei.mapper=debugSpringBoot启动类上配置 mapper 包扫描
1 2 3 4 5 6 7@SpringBootApplication @MapperScan(basePackages = "com.lei.mapper") public class Ch11InteProviderApplication { public static void main(String[] args) { SpringApplication.run(Ch11InteProviderApplication.class, args); } }创建接口工程业务的实现,并使用
@DubboService暴露服务1 2 3 4 5 6 7 8 9 10 11 12 13@DubboService public class StudentServiceImpl implements StudentService { @Autowired private StudentsMapper studentsMapper; @Autowired private RedisTemplate<Object,Object> redisTemplate; @Override public Students getById(int id) { Students students=null; students=studentsMapper.queryById(id); return students; } }
消费者
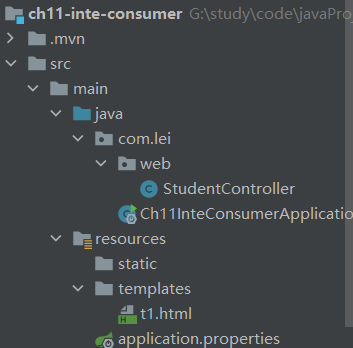
创建服务消费者 consumer,并指定父工程
pom.xml 文件添加依赖,dubbo起步依赖、dubbo、zookeeper客户端、SpringBoot-web起步依赖、SpringBoot-thymeleaf起步依赖、接口工程
1 2 3 4 5 6 7 8 9 10 11 12 13 14 15 16 17 18 19 20 21 22 23 24 25 26 27 28 29 30 31 32 33 34 35 36 37 38 39 40 41 42 43 44 45 46 47 48 49 50 51 52 53 54 55 56 57<?xml version="1.0" encoding="UTF-8"?> <project xmlns="http://maven.apache.org/POM/4.0.0" xmlns:xsi="http://www.w3.org/2001/XMLSchema-instance" xsi:schemaLocation="http://maven.apache.org/POM/4.0.0 https://maven.apache.org/xsd/maven-4.0.0.xsd"> <modelVersion>4.0.0</modelVersion> <parent> <groupId>com.lei</groupId> <artifactId>ch11-inte-parent</artifactId> <version>1.0.0</version> <relativePath>../ch11-inte-parent/pom.xml</relativePath> </parent> <artifactId>ch11-inte-consumer</artifactId> <properties> <java.version>11</java.version> </properties> <dependencies> <dependency> <groupId>org.springframework.boot</groupId> <artifactId>spring-boot-starter-thymeleaf</artifactId> </dependency> <dependency> <groupId>org.springframework.boot</groupId> <artifactId>spring-boot-starter-web</artifactId> </dependency> <dependency> <groupId>org.apache.dubbo</groupId> <artifactId>dubbo</artifactId> </dependency> <dependency> <groupId>org.apache.dubbo</groupId> <artifactId>dubbo-spring-boot-starter</artifactId> </dependency> <dependency> <groupId>org.apache.curator</groupId> <artifactId>curator-framework</artifactId> </dependency> <dependency> <groupId>org.apache.curator</groupId> <artifactId>curator-recipes</artifactId> </dependency> <dependency> <groupId>com.lei</groupId> <artifactId>ch11-inte-interface</artifactId> <version>1.0.0</version> </dependency> </dependencies> <build> <plugins> <plugin> <groupId>org.springframework.boot</groupId> <artifactId>spring-boot-maven-plugin</artifactId> </plugin> </plugins> </build> </project>SpringBoot核心配置文件
1 2 3 4 5 6 7 8 9 10spring.thymeleaf.cache=false dubbo.application.name=consumer dubbo.registry.address=zookeeper://192.168.10.129 dubbo.registry.port=2181 dubbo.scan.base-packages=com.lei.controller server.servlet.encoding.enabled=false server.servlet.encoding.force=true server.servlet.encoding.charset=UTF-8编写控制类,并远程注入 服务bean
1 2 3 4 5 6 7 8 9 10 11@Controller public class StudentController { @DubboReference private StudentService studentService; @RequestMapping("/t1/{id}") public String getUser(@PathVariable("id") int id, Model model){ Students students=studentService.getById(id); model.addAttribute("student",students); return "t1"; } }编写模板文件 t1.html
1 2 3 4 5 6 7 8 9 10 11 12 13 14 15 16 17 18<!DOCTYPE html> <!--suppress ALL --> <!--防止模板引擎取值时报红--> <html lang="en" xmlns:th="http://www.thymeleaf.org" > <head> <meta charset="UTF-8" > <title>Title</title> </head> <body> <h1>hello</h1> <div> id:<span th:text="${student.id}+' '"></span> name:<span th:text="${student.name}+' '"></span> gender:<span th:if="${student.gender eq 1}">男 </span> gender:<span th:unless="${student.gender eq 1}">女 </span> score:<span th:text="${student.score}+' '"></span> </div> </body> </html>