SpringcloudNetflix 
简介 
架构的演化 
集中式架构:传统架构,所有的功能一个项目完成,可以进行集群;一个war包或jar包
分布式架构:对一个完整的项目进行拆分,通过rpc,http等调用共同完成工作;多个war包或jar包
微服务架构:属于分布式的一种,对系统进行拆分,每个服务间使用http的restful风格进行调用;每个服务都可以独立的进行测试、开发、部署;每个服务专注于自己的功能,并且可以使用不同的语言进行开发
分布式和微服务的区别?
分布式目的:拆分项目为各个模块,部署在不同机器上,增加访问量
微服务目的:拆分项目为各个模块(服务),各服务间的升级,重构不会影响到其他的服务
两者类似,目的不同
springcloud 
Spring Cloud是一套工具的集合,用于快速构建分布式项目以及解决分布式项目中的一些常见问题(配置管理、服务发现、断路器、智能路由、微代理、控制总线、一次性令牌、全局锁、领导选举、分布式会话、集群状态等)
整体架构
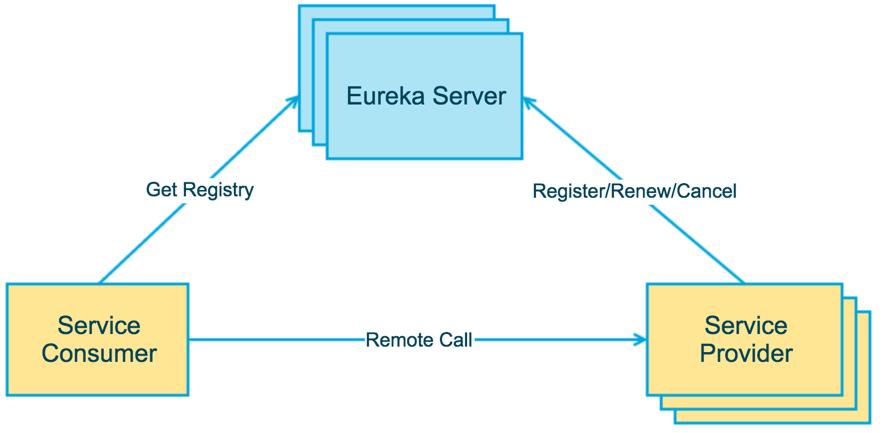
Service Provider:暴露服务的服务提供方
Service Consumer:调用远程服务的服务消费方
Eureka Server:服务注册中心和服务发现中心
起步 
新建springboot项目,导入springcloud依赖,并申明为父项目,供后续服务springcloud的版本统一
 1<?xml version="1.0" encoding="UTF-8"?>
 2<project xmlns="http://maven.apache.org/POM/4.0.0" xmlns:xsi="http://www.w3.org/2001/XMLSchema-instance"
 3    xsi:schemaLocation="http://maven.apache.org/POM/4.0.0 https://maven.apache.org/xsd/maven-4.0.0.xsd">
 4    <modelVersion>4.0.0</modelVersion>
 5    <groupId>org.lei</groupId>
 6    <artifactId>spring-cloud-netflix</artifactId>
 7    <version>0.0.1-SNAPSHOT</version>
 8    <packaging>pom</packaging>
 9    <name>spring-cloud-netflix</name>
10    <description>spring-cloud-netflix</description>
11    <properties>
12        <java.version>11</java.version>
13        <project.build.sourceEncoding>UTF-8</project.build.sourceEncoding>
14        <project.reporting.outputEncoding>UTF-8</project.reporting.outputEncoding>
15        <spring-boot.version>2.7.6</spring-boot.version>
16    </properties>
17    <dependencyManagement>
18        <dependencies>
19            <dependency>
20                <groupId>org.springframework.boot</groupId>
21                <artifactId>spring-boot-dependencies</artifactId>
22                <version>${spring-boot.version}</version>
23                <type>pom</type>
24                <scope>import</scope>
25            </dependency>
26            <dependency>
27                <groupId>org.springframework.cloud</groupId>
28                <artifactId>spring-cloud-dependencies</artifactId>
29                <version>2021.0.9</version>
30                <type>pom</type>
31                <scope>import</scope>
32            </dependency>
33        </dependencies>
34    </dependencyManagement>
35</project>
Eureka 
Eureka介绍 
Eureka Server 主要对外提供了三个功能:
- 服务注册:所有的服务都注册到 Eureka Server 上面来
- 提供注册表:注册表是所有注册上来的服务的列表,Eureka Client 在调用服务时,需要获取这个注册表,一般来说,这个注册表会被缓存下来,如果缓存失效,则直接获取最新的注册表
- 同步状态:Eureka Client 通过注册、心跳等机制,和 Eureka Server 同步当前客户端的状态
Eureka Client 主要用来简化每个服务和 Eureka Server 的交互。 Eureka Client 会自动拉取、更新以及缓存 Eureka Server 中的信息,这样,即使 Eureka Server 所有节点都宕机,Eureka Client 依然能够获取到想要调用服务的地址(地址可能不准确)
服务注册
服务提供者将自己注册到注册中心(Eureka Server),需要注意,所谓的服务提供者,只是一个业务上的分类,本质上它就是一个 Eureka Client 。当 Eureka Client 向 Eureka Server 注册时,它需要提供一些自身的元数据信息,如 IP 地址、端口、名称、运行状态等
服务续约
Eureka Client 注册到 Eureka Server 上之后,事情没有结束,刚刚开始而已。注册成功后,默认情况下,Eureka Client 每隔 30 秒就要向 Eureka Server 发行一条心跳信息,告诉 Eureka Server 我还在运行
服务下线
当 Eureka Client 下线时,它会主动发送一条信息,告诉 Eureka Server ,我下线了
获取注册表信息
Eureka Client 从 Eureka Server 上获取服务的注册信息,并将其缓存到本地。本地客户端,在需要调用远程服务时,会从该信息中查找远程服务所对应的的 IP 地址、端口等信息。Eureka Client 上缓存的服务注册信息会定期更新(30 秒),如果 Eureka Server 返回的注册表信息与本地缓存的注册表信息不同的话,Eureka Client 会自动处理
EurekaServer搭建 
新建项目添加依赖
xml1<dependency> 2 <groupId>org.springframework.cloud</groupId> 3 <artifactId>spring-cloud-starter-netflix-eureka-server</artifactId> 4</dependency>配置文件配置
properties1#服务端口 2server.port=8761 3#服务名称 4spring.application.name=eurekaServer 5#指定Eureka服务端的IP、域名 6eureka.instance.hostname=127.0.0.1 7#是否将服务注册到Eureka服务端(自己就是eureka服务端,一般不需要注册,默认为true) 8eureka.client.register-with-eureka=false 9#是否从Eureka服务端获取服务信息(自己就是eureka服务端,一般不需要注册,默认为true) 10eureka.client.fetch-registry=false 11#开启注册中心的保护机制,默认是开启 12eureka.server.enable-self-preservation=true 13#设置保护机制的阈值,默认是0.85。 14eureka.server.renewal-percent-threshold=0.5启动类添加注解
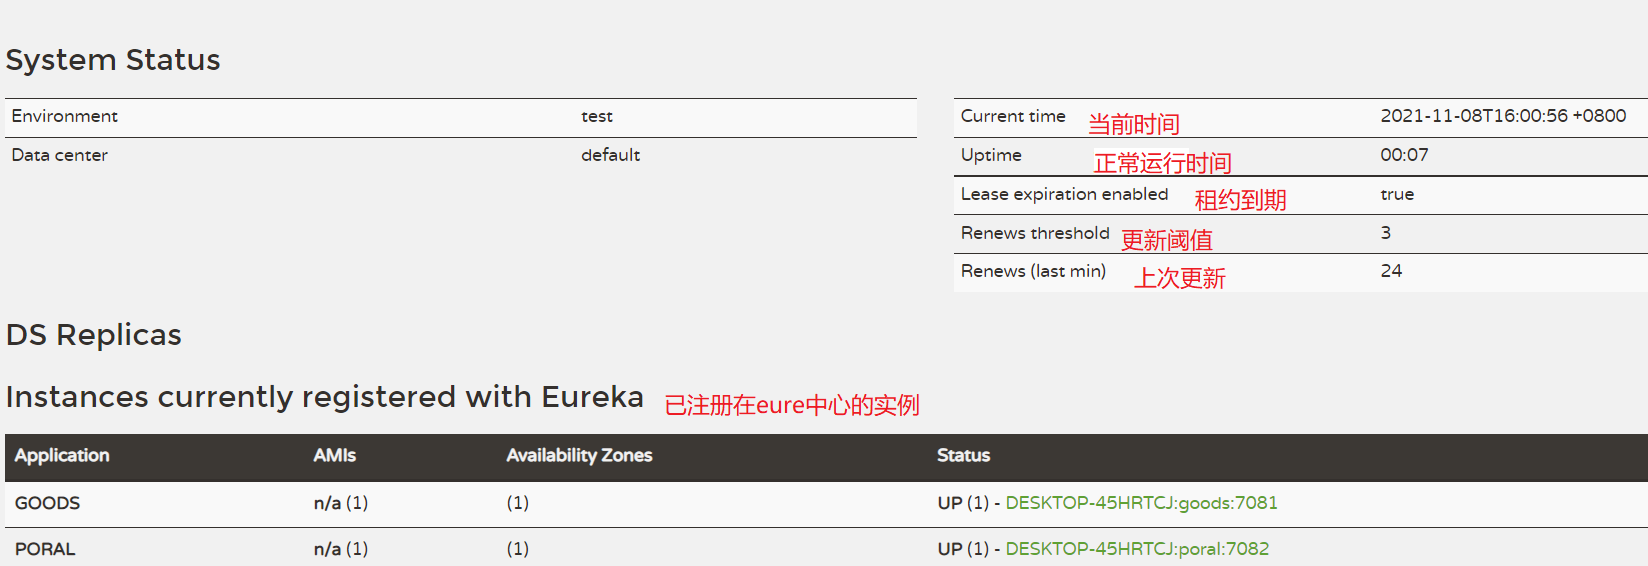
@EnableEurekaServerjava1@EnableEurekaServer 2@SpringBootApplication 3public class Application { 4 public static void main(String[] args) { 5 SpringApplication.run(Application.class); 6 } 7}访问 127.0.0.1:8761 可以看到如下界面:
EurekaClient 
导入
EurekaClient客户端依赖xml1<dependency> 2 <groupId>org.springframework.cloud</groupId> 3 <artifactId>spring-cloud-starter-netflix-eureka-client</artifactId> 4</dependency>配置
Eureka-clientapplication配置文件properties1#服务端口 2server.port=7082 3#服务名称,eureka通过服务名称识别是否为同一服务 4spring.application.name=portal-service 5#当前服务器的服务地址(ip或域名) 6eureka.instance.hostname=localhost 7#注册中心路径,表示我们向这个注册中心注册服务,如果向多个注册中心注册,用“,”进行分隔 8eureka.client.serviceUrl.defaultZone=http://127.0.0.1:8761/eureka 9#心跳间隔5s,默认30s。每一个服务配置后,心跳间隔和心跳超时时间会被保存在server端,不同服务的心跳频率可能不同,server端会根据保存的配置来分别探活 10eureka.instance.lease-renewal-interval-in-seconds=5 11#心跳超时时间10s,默认90s。从client端最后一次发出心跳后,达到这个时间没有再次发出心跳,表示服务不可用,将它的实例从注册中心移除 12eureka.instance.lease-expiration-duration-in-seconds=10Application启动类添加注解
@EnableEurekaClient,启动Eureka客户端,用于注册当前服务到EurekaServer
远程服务调用 
注册RestTemplate模板,并添加@LoadBalanced注解
 1@SpringBootApplication
 2@EnableEurekaClient
 3public class PortalApplication {
 4    @Bean
 5    @LoadBalanced
 6    public RestTemplate restTemplate(){return new RestTemplate();}
 7    public static void main(String[] args) {
 8        SpringApplication.run(PortalApplication.class, args);
 9    }
10}
通过ip直接调用
 1@Autowired
 2private RestTemplate restTemplate;
 3@RequestMapping("/getGoods")
 4public WrapperResponse getGoods(){
 5    MultiValueMap<String, Object> param= new LinkedMultiValueMap<>();
 6    param.add("total",100);
 7    //这个的地址参数更换为需要调用的服务名(该服务已注册在EurekaServer)
 8    ResponseEntity<WrapperResponse> responseEntity = restTemplate.postForEntity("http://127.0.0.1/goods/getGoods",param,WrapperResponse.class);
 9    return responseEntity.getBody();
10}
通过注册到eurekaServer中心的服务名调用
1@Autowired
2private RestTemplate restTemplate;
3@RequestMapping("/getGoods")
4public WrapperResponse getGoods(){
5 MultiValueMap<String, Object> param= new LinkedMultiValueMap<>();
6 param.add("total",100);
7 //这个的地址参数更换为需要调用的服务名(该服务已注册在EurekaServer)
8 ResponseEntity<WrapperResponse> responseEntity = restTemplate.postForEntity("http://GOODS/goods/getGoods",param,WrapperResponse.class);
9 return responseEntity.getBody();
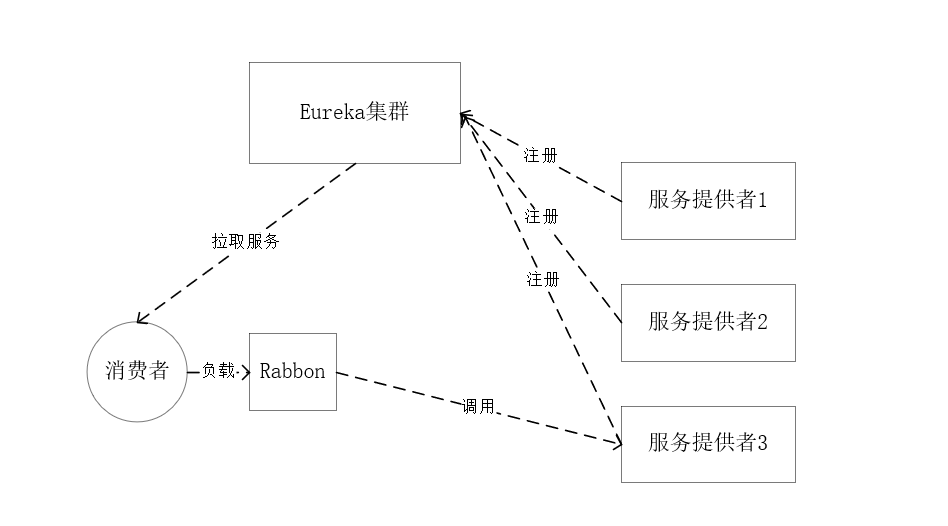
10}Eureka集群 
所谓的Eureka集群,就是启动多个服务端,相互进行注册即可
Eureka 分区:
- region:地理上的不同区域
- zone:具体的机房
同一个分区内的 Eureka Server 和 Eureka Client 会优先进行心跳同步
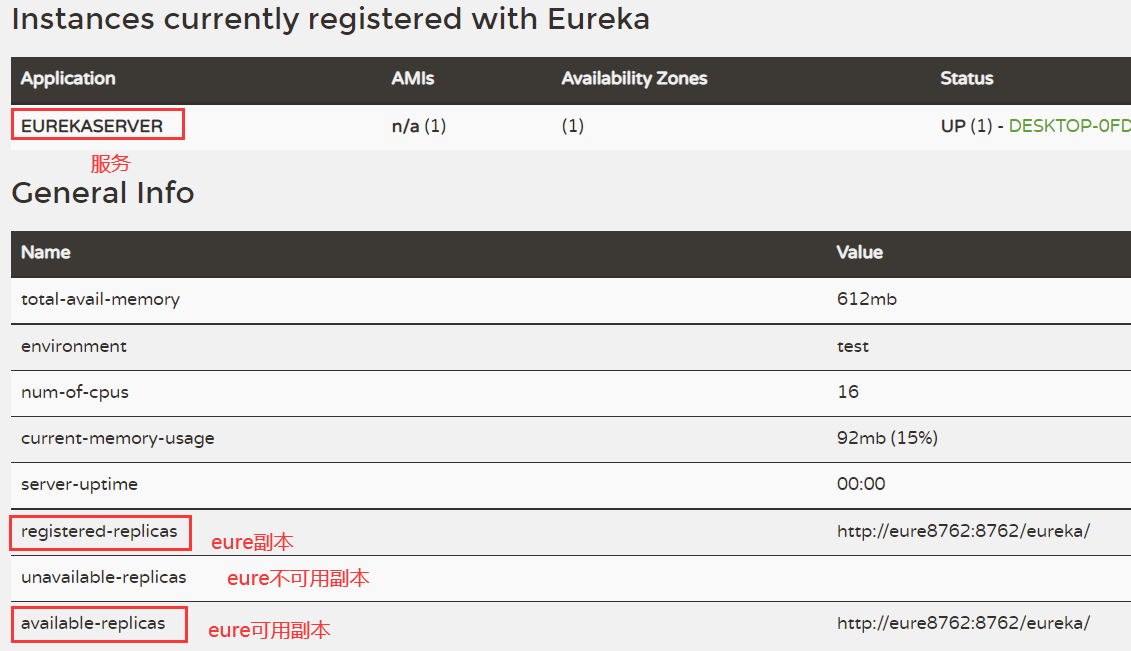
Eureka集群架构中,Eureka Server 之间通过 Replicate 进行数据同步,不同的 Eureka Server 之间不区分主从节点,所有节点都是平等的。节点之间,通过置顶 serviceUrl 来相互注册,形成一个集群,进而提高节点的可用性
**注意:**本地搭建集群环境需要更改host文件,eureka默认使用
eureka.instance.hostname主机名注册以及通信
服务端配置文件大概如下:
 1#服务端口
 2server.port=8761
 3#服务名称
 4spring.application.name=eurekaServer
 5#指定Eureka服务端的IP、域名
 6eureka.instance.hostname=eure8761
 7#是否将服务注册到Eureka服务端(一般来说客户端需要开启,server需要关闭,但是这里搭建eureka集群)
 8eureka.client.register-with-eureka=true
 9#是否从Eureka服务端获取服务信息
10eureka.client.fetch-registry=true
11#开启注册中心的保护机制,默认是开启
12eureka.server.enable-self-preservation=true
13#设置保护机制的阈值,默认是0.85
14eureka.server.renewal-percent-threshold=0.5
15
16#注册中心路径,如果有多个eureka server,在这里需要配置其他eureka server的地址,用","进行区分,如"http://address:8888/eureka,http://address:8887/eureka"
17eureka.client.service-url.defaultZone=http://eure8762:8762/eureka/
18
19#本地测试时,可能需要忽略虚拟网卡,否则会识别错误
20spring.cloud.inetutils.ignored-interfaces=VMware.*
21spring.cloud.inetutils.use-only-site-local-interfaces=true
22#优先使用ip地址
23spring.cloud.inetutils.preferred-networks=10.0.15.94
客户端配置文件:
1#服务端口
2server.port=7082
3#服务名称
4spring.application.name=portal-service
5#注册中心路径,表示我们向这个注册中心注册服务,如果向多个注册中心注册,用“,”进行分隔
6eureka.client.serviceUrl.defaultZone=http://eure01:8761/eureka,http://eure02:8762/eureka,http://eure03:8763/eureka
通过上面配置既实现了Eureka集群
本地测试
准备三个application.properties配置文件,分别配置eureka-server的配置,然后通过参数指定配置文件启动服务
java -jar myproject.jar --spring.profiles.active=test 用于springboot指定配置文件applicaiton-test启动
打包
打包时通过parent进行打包
将最后的成功配置好的Eureka-server进行打包,然后部署到服务器上,便后续使用
单机测试部署时,修改hosts文件,并编写shell脚本
1#!/bin/bash
2nohup java -jar springcloud-eureka-server-1.0-SNAPSHOT.jar --spring.profiles.active=eure8761 > ./log/eure8761 &
3nohup java -jar springcloud-eureka-server-1.0-SNAPSHOT.jar --spring.profiles.active=eure8762 > ./log/eure8762 &
Eureka-server的自我保护机制 
1#开启注册中心的保护机制,默认是开启
2eureka.server.enable-self-preservation=trueEureka-server的保护机制,默认开启的;作用是:当出现eure-server在一段时间没收到服务(多个服务)的心跳时,Eureka-server会认为时自己网络出现问题,不会将服务进行剔除,而是将服务保护起来等待恢复
例如:两个客户端实例 C1 和 C2 的连通性是良好的,但是由于网络故障,C2 未能及时向 Eureka 发送心跳续约,这时候 Eureka 不能简单的将 C2 从注册表中剔除。因为如果剔除了,C1 就无法从 Eureka 服务器中获取 C2 注册的服务,但是这时候 C2 服务是可用的
Eureka和zookeeper比较 
CAP理论,一致性、可用性、分区容错性;分区容错性是分布式系统必须要保证的,因此只能在一致性和可用性之间进行取舍
zookeeper保证服务的AP,当zookeeper集群中某台机器宕机时,zookeeper会选举出新的leader,然后才对外提供服务
Eureka保证服务的CP,当Eureka集群中某台机器宕机时,Eureka Client 会自动切换到新的 Eureka Server 上。每个 Eureka Server 节点,都会互相同步数据
负载均衡Ribbon 
Ribbon是一个开源的运行在消费端的客户端/进程内负载均衡器
消费端从eureka获取所有服务,并在内部采用Ribbon实现负载均衡,对多个服务进行调用
Ribbon与nginxs 
Ribbon是在请求发起前,对所有服务进行负载均衡后,选择服务进行调用
Nginx是在收到客户端发起的请求,进行负载均衡
注意: Request 的位置,在 Nginx 中请求是先进入负载均衡器,而在 Ribbon 中是先在客户端进行负载均衡才进行请求的
Ribbon负载均衡算法 
Ribbon负载均衡算法都实现了IRule接口,可以通过IDEA自带的工具Diagrams查看UML图,如下:
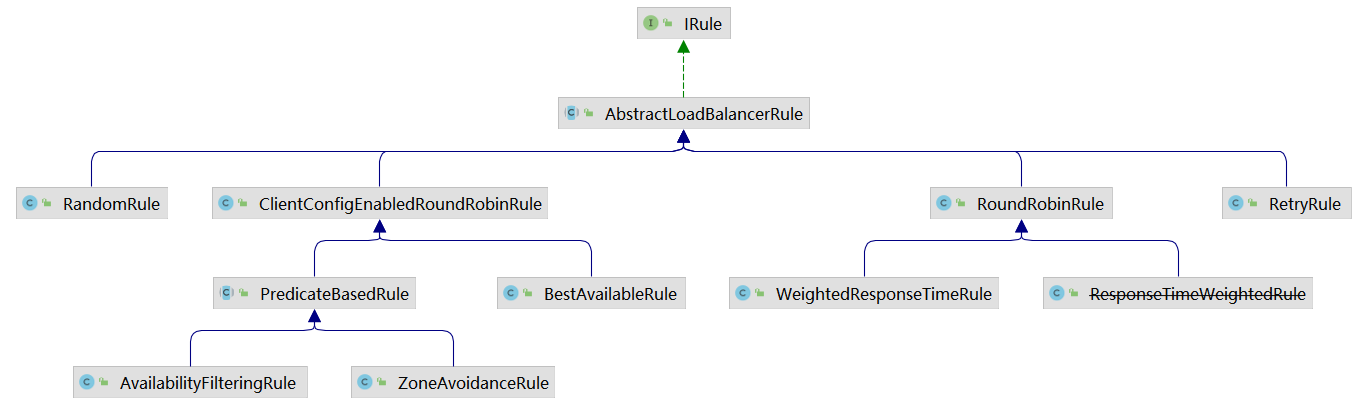
ILoadBalancer接口:
 1public interface ILoadBalancer {
 2    void addServers(List<Server> var1);
 3    Server chooseServer(Object var1);
 4    void markServerDown(Server var1);
 5    /** @deprecated */
 6    @Deprecated
 7    List<Server> getServerList(boolean var1);
 8    List<Server> getReachableServers();
 9    List<Server> getAllServers();
10}通过debug该接口的实现类的chooseServer方法,可以查看当前选择的规则;默认规则实现为ZoneAvoidanceRule
Ribbon的基本使用 
使用注解,将@LoadBalanced注解加到RestTemplate Bean上,当使用RestTemplate进行http访问时,会将请求进行拦截,然后通过Ribbon进行负载均衡后,再将请求发出
1@Bean
2@LoadBalanced
3public RestTemplate restTemplate(){
4    return new RestTemplate();
5}
修改默认负载均衡
1@Bean
2public IRule iRule(){
3    //修改robbin负载策略为 轮询
4    return new RoundRobinRule();
5}修改后可以通过debug查看ILoadBalancer接口实现类的chooseServer方法,可以查看到当前规则的实现
负载均衡策略 
所有策略实现IRule接口
| 策略名称 | 策略对应的类名 | 实现原理 |
|---|---|---|
| 轮询策略(默认) | RoundRobinRule | 轮询策略表示每次都顺序取下一个 provider,比如一共有 5 个provider,第 1 次取第 1 个,第 2次取第 2 个,第 3 次取第 3 个,以此类推 |
| 权重轮询策略 | WeightedResponseTimeRule | 1.根据每个 provider 的响应时间分配一个权重,响应时间越长,权重越小,被选中的可能性越低。2.原理:一开始为轮询策略,并开启一个计时器,每 30 秒收集一次每个 provider 的平均响应时间,当信息足够时,给每个 provider附上一个权重,并按权重随机选择provider,高权越重的 provider会被高概率选中。 |
| 随机策略 | RandomRule | 从 provider 列表中随机选择一个provider |
| 最少并发数策略 | BestAvailableRule | 选择正在请求中的并发数最小的 provider,除非这个provider 在熔断中。 |
| 在“选定的负载均衡策略”基础上进行重试机制 | RetryRule | 1.“选定的负载均衡策略”这个策略是轮询策略RoundRobinRule2.该重试策略先设定一个阈值时间段,如果在这个阈值时间段内当选择 provider 不成功,则一直尝试采用“选定的负载均衡策略:轮询策略”最后选择一个可用的provider |
| 可用性敏感策略 | AvailabilityFilteringRule | 过滤性能差的 provider,有 2种:第一种:过滤掉在 eureka 中处于一直连接失败 provider 第二种:过滤掉高并发的 provider |
| 区域敏感性策略 | ZoneAvoidanceRule | 1.以一个区域为单位考察可用性,对于不可用的区域整个丢弃,从剩下区域中选可用的provider2.如果这个 ip 区域内有一个或多个实例不可达或响应变慢,都会降低该 ip 区域内其他 ip 被选中的权重。 |
默认实现为ZoneAvoidanceRule策略
远程调用OpenFeign 
介绍 
通过 RestTemplate 进行远程调用时,不够优雅,即使注册到eureka后,仍需要填写远程服务名,如下:
1public WrapperResponse getGoods(){
2    MultiValueMap<String, Object> param= new LinkedMultiValueMap<>();
3    param.add("total",100);
4    ResponseEntity<WrapperResponse> responseEntity = restTemplate.postForEntity("http://GOODS-SERVICE/goods/getGoods",param,WrapperResponse.class);
5    return responseEntity.getBody();
6}因此引入了Open Feign,利用了OpenFeign的声明式方式定义Web服务客户端;可以将远程服务像本地服务一样进行调用
使用 
添加
spring-cloud-starter-openfeign起步依赖xml1<!-- 因为继承了springcloud 依赖, 它申明了openfeign版本--> 2<!-- 起步依赖集成了 openfeign-core 等依赖 --> 3<dependency> 4 <groupId>org.springframework.cloud</groupId> 5 <artifactId>spring-cloud-starter-openfeign</artifactId> 6</dependency>Applicaition启动类添加注解@EnableFeignClients编写接口,用于远程调用服务;注意:定义的接口必须包含在 Applicaiton 同级或子包下,或者在启动类的注解上指定接口地址
@EnableFeignClients(basePackages = "com.lei.api")java1//FeignClient(服务名),它会自动转换为从 eureka 获得的服务IP地址 2@FeignClient("GOODS-SERVICE") 3public interface GoodsClient { 4 //方法签名需和远程服务的方法签名一致 5 // 传参方式一:RequestParam 指定参数名 6 @PostMapping("/goods/getGoods") 7 WrapperResponse getGoods(@RequestParam("total") Integer total); 8}编写测试类,此时可以像本地开发一样,进行远程服务调用
java1@RestController 2@RequestMapping("/portal") 3public class PortalController { 4 @Autowired 5 private GoodsClient goodsClient; 6 7 @RequestMapping("/getGoodsFign") 8 public WrapperResponse geGoodsFign(){ 9 //通过声明的 Feign客户端,进行远程调用 10 return goodsClient.getGoods(100); 11 } 12}
传参方式 
默认情况下,Feign会将标有@RequestParam注解的参数转换成字符串添加到URL中,将没有注解的参数通过Jackson转换成json放到请求体中。注意,如果在@RequetMapping中的method将请求方式指定为POST,那么所有未标注解的参数将会被忽略
@RequestParam(org.springframework.web.bind.annotation.RequestParam)用于将指定的请求参数赋值给方法中的形参java1//Feign客户端 2@FeignClient("GOODS-SERVICE") 3public interface GoodsClient { 4 @PostMapping("/goods/getGoods") 5 WrapperResponse getGoods(@RequestParam("total") Integer total); 6} 7 8//服务提供方 直接获取就行,因为参数拼接在URL中此时请求:http://GOODS/goods/getGoods?total=100,它会将参数拼接在URL后
没有注解时,相当于
@RequestBody,参数通过Jackson转换成json放到请求体中;可以在服务提供方使用@RequestBody从请求体中获取参数java1//Feign客户端 2@FeignClient("GOODS-SERVICE") 3public interface GoodsClient { 4 @PostMapping("/goods/getGoods") 5 WrapperResponse getGoods(Map map); 6} 7 8//服务提供方,使用@RequestBody取得参数 9public WrapperResponse getGoods(@RequestBody Map map){ 10 return WrapperResponse.success(map); 11}@PathVariable使用RestFul进行参数传递java1//Feign客户端 2@FeignClient("GOODS-SERVICE") 3public interface GoodsClient { 4 @PostMapping("/goods/getGoods/{total}") 5 WrapperResponse getGoods(@PathVariable("total")Integer total); 6} 7 8//服务提供者 9@PostMapping("/getGoods/{total}") 10public WrapperResponse getGoods(@PathVariable("total") Integer total){ 11 return WrapperResponse.success(total); 12}
服务熔断与降级 Hystrix 
介绍 
Hystrix 提供了熔断降级和请求限流
服务降级是指当某个微服务响应时间过长,发生异常,或者服务不可用了,我们不能把错误信息返回回来,或者让它一直卡在那里,所以要准备一个对应的策略(一个方法),当发生这种问题时,我们直接调用这个备用的方法来快速返回一个默认的结果,让请求得到快速响应,而不是一直卡在那里
Hystrix目的
- 防止复杂分布式系统中出现级联故障
- 快速失败和快速恢复
- 在允许的情况下,提供退路对服务进行优雅的降级
- 提供近实时监控、报警和操作控制
降级是作用
- 可以监听你的请求有没有超时;(默认是1秒,时间可以改)
- 异常或报错了可以快速让请求返回,不会一直等待;(避免线程累积)
- 系统马上大量并发时,可以考虑先关闭一些不重要的微服务(在降级方法中返回一个比较友好的信息),把资源让给核心微服务,待高峰流量过去,再开启回来。
Hystrix使用 
导入已经整合的 start 依赖
xml1<dependency> 2 <groupId>org.springframework.cloud</groupId> 3 <artifactId>spring-cloud-starter-netflix-hystrix</artifactId> 4</dependency>在启动类上添加注解
@EnableCircuitBreaker启动断路器java1@SpringBootApplication 2@EnableEurekaClient 3@EnableFeignClients 4@EnableCircuitBreaker 5public class PortalApplication { 6 //...... 7}可以观察到启动类上又很多注解,可以使用
@SpringCloudApplication注解代替@SpringBootApplication、@EnableEurekaClient、@EnableCircuitBreaker,该注解内部java1@Target({ElementType.TYPE}) 2@Retention(RetentionPolicy.RUNTIME) 3@Documented 4@Inherited 5@SpringBootApplication 6@EnableDiscoveryClient 7@EnableCircuitBreaker 8public @interface SpringCloudApplication { 9}在调用远程服务的方法上加上注解
@HystrixCommand(fallbackMethod = "fallback"),hystrix 默认超时时间是 1000 毫秒,如果该方法响应时间超过此时间,就会触发断路器,可以修改hustrix的默认超时时间注解方式配置超时时间
java1@RequestMapping("/geGoodsHystrix") 2@HystrixCommand(fallbackMethod = "getDetailFallback", //超时调用方法 3 commandProperties={ 4 @HystrixProperty(name="execution.timeout.enabled", value="true"), //默认启动 5 @HystrixProperty(name="execution.isolation.thread.timeoutInMilliseconds", value="2000") //修改超时时间为5s 6 }) 7public WrapperResponse geGoodsHystrix(){ 8 try { 9 Thread.sleep(3000); 10 } catch (InterruptedException e) { 11 e.printStackTrace(); 12 } 13 return goodsClient.getGoods(999); //调用远程方法 14} 15public WrapperResponse getDetailFallback(){ 16 return WrapperResponse.fail("服务降级了"); 17}配置文件方式配置超时时间
properties1#ribbon默认连接超时时间和默认超时时间 2ribbon.ConnectTimeout=1000 3ribbon.ReadTimeout=2000 4 5#hystrix是否启动,以及调用远程方法的超时时间 6hystrix.command.default.execution.timeout.enabled=true 7hystrix.command.default.execution.isolation.thread.timeoutInMilliseconds=4000注意:ribbon不仅有负载均衡的作用,还会有失败重试,但实例1宕机或者读超时,ribbon会把请求转发到另外一台实例;如果hystrix的熔断时间小于ribbon的超时时间的话,就有可能hystrix在ribbon进行重试的时候就熔断了,所以ribbon的重试配置就没有实际作用了
因此hystrix超时时间应该大于rabbin所有配置时间,如下例子:
yaml1ribbon: 2 ReadTimeout: 5000 3 ConnectTimeout: 2000 4 MaxAutoRetries: 1 #同一台实例最大重试次数,不包括首次调用 5 MaxAutoRetriesNextServer: 2 #重试负载均衡其他的实例最大重试次数,不包括首次调用 6 OkToRetryOnAllOperations: false #是否所有操作都重试?默认get请求起作用,如果想其他类型的请求起作用,需要配置true,但是! post请求一般是create,如果接口没做幂等性会有并发问题,所以慎重配置。 7 8 #上面rabbin的配置有: 9 ## 1(首次访问) + 1(MaxAutoRetries一次) + 1 (负载到实例2之后请求一次) + 1 (实例2重试一次) + 1(负载到实例3之后请求一次)+ 1(实例3重试一次)= 6次,那么rabbin总共工作时间为 42s的时间,此时hystrix熔断时间应该配置为大于42s
Hystrix异常处理 
默认情况下方法抛了异常会自动进行服务降级,交给服务降级中的方法去处理; 当发生异常后,只需要在服务降级方法中添加一个 Throwable 类型的参数就能够获取到抛出的异常的类型,如下
 1@RequestMapping("/geGoodsHystrix")
 2@HystrixCommand(fallbackMethod = "getDetailFallback")
 3public WrapperResponse geGoodsHystrix() throws Exception {
 4    if (true){
 5        throw new Exception("异常了!!!");
 6    }
 7    return goodsClient.getGoods(999);
 8}
 9//降级方法添加参数 Throwable ,就可以获取到方法抛出的异常
10public WrapperResponse getDetailFallback(Throwable th){
11    return WrapperResponse.fail(th.getMessage());
12}
Hystrix限流 
限流的方案
- Nginx
- Redis + Lua
- Sentinel
- 基于限流算法自己实现(令牌桶、漏桶算法)
hystrix限流就是限制你某个微服务的使用量(可用线程数、信号量);hystrix通过线程池的方式来管理微服务的调用,它默认是一个线程池(大小10个) 管理你的所有微服务,你可以给某个微服务开辟新的线程池
1@RequestMapping("/geGoodsHystrix")
2@HystrixCommand(fallbackMethod = "getDetailFallback",
3                threadPoolKey = "goods",
4                threadPoolProperties = {@HystrixProperty(name = "coreSize", value = "2"), 		                                                     @HystrixProperty(name = "maxQueueSize", value = "1")}
5               )
6public WrapperResponse geGoodsHystrix() throws Exception {
7    Thread.sleep(2000);
8    return goodsClient.getGoods(99);
9}
threadPoolKey 是线程池唯一标识, hystrix 会使用该标识来计数,看线程占用是否超过了, 超过了就会直接降级该次调用;这里coreSize给他值为2 那么假设你这个方法调用时间是1s执行完, 那么在1s内如果有超过2个请求进来的话,剩下的请求则全部降级;其中maxQueueSize是一个线程队列,里面只能放一个请求线程,本来线程数有2个,队列里面允许放一个,那么总共只能有3个请求线程执行,如果超过了就会限流走降级方法,并能捕获到如下错误信息:
1Task java.util.concurrent.FutureTask@2d934502[Not completed, task = java.util.concurrent.Executors$RunnableAdapter@965faa0[Wrapped task = null]] rejected from java.util.concurrent.ThreadPoolExecutor@174a1fe4[Running, pool size = 1, active threads = 1, queued tasks = 1, completed tasks = 14]Feign整合Hystrix 
feign 默认是支持hystrix的,需要在配置文件中开启
properties1feign.hystrix.enabled=true@FeignClient添加fallback,值为classjava1@FeignClient(value = "GOODS",fallback = GoodsClientFallback.class) 2public interface GoodsClient { 3 @PostMapping("/goods/getGoods/{total}") 4 WrapperResponse getGoods(@PathVariable("total")Integer total); 5}GoodsClientFallback类
java1@Component 2public class GoodsClientFallback implements GoodsClient { 3 @Override 4 public WrapperResponse getGoods(Integer total) { 5 return WrapperResponse.fail("feign降级方法!!!"); 6 } 7}如果需要获取异常信息,需要在
@FeignClient指定fallbackFactory ,值为classjava1@FeignClient(value="GOODS", fallbackFactory = GoodsClientFallbackFactory.class) 2public interface GoodsClient { 3 @PostMapping("/goods/getGoods/{total}") 4 WrapperResponse getGoods(@PathVariable("total")Integer total); 5}GoodsClientFallbackFactory类
java1@Component 2public class GoodsClientFallbackFactory implements FallbackFactory<GoodsClient> { 3 @Override 4 public GoodsClient create(Throwable throwable) { 5 return new GoodsClient() { 6 @Override 7 public WrapperResponse getGoods() { 8 String message = throwable.getMessage(); 9 return WrapperResponse.fail(message); 10 } 11 }; 12 } 13}
Spring Cloud Feign超时时间设置 
Feign调用服务的默认时长是1秒钟,也就是如果超过1秒没连接上或者超过1秒没响应,那么会相应的报错。而实际情况是因为业务的不同可能出现超出1秒的情况,这时我们需要调整超时时间
Feign 的负载均衡底层用的就是 Ribbon在application.properties中添加如下配置,超过5秒没连接上报连接超时,如果超过5秒没有响应,报请求超时
1#请求连接超时时间
2ribbon.ConnectTimeout=2000
3#请求处理的超时时间
4ribbon.ReadTimeout=5000ribbon还有MaxAutoRetries对当前实例的重试次数
MaxAutoRetriesNextServer对切换实例的重试次数
如果ribbon的ReadTimeout超时,或者ConnectTimeout连接超时,会进行重试操作;由于ribbon的重试机制,通常熔断hystrix的超时时间需要配置的比ReadTimeout长,ReadTimeout比ConnectTimeout长,否则还未重试,就熔断了
为了确保重试机制的正常运作,理论上建议hystrix的超时时间为:(1 + MaxAutoRetries + MaxAutoRetriesNextServer) * ReadTimeout
hystrix相关配置 
Execution相关的属性的配置
hystrix.command.default.execution.isolation.strategy 隔离策略,默认是Thread, 可选Thread|Semaphore(信号量)
hystrix.command.default.execution.isolation.thread.timeoutInMilliseconds 命令执行超时时间,默认1000ms
hystrix.command.default.execution.timeout.enabled 执行是否启用超时,默认启用true
hystrix.command.default.execution.isolation.thread.interruptOnTimeout 发生超时是是否中断,默认true
hystrix.command.default.execution.isolation.semaphore.maxConcurrentRequests 最大并发请求数,默认10,该参数当使
ExecutionIsolationStrategy.SEMAPHORE策略时才有效。如果达到最大并发请求数,请求会被拒绝。理论上选择semaphore size原则和选择thread size一致,但选用semaphore时每次执行的单元要比较小且执行速度快(ms级别),否则的话应该用thread。semaphore应该占整个容器(tomcat)的线程池的一小部分。 Fallback相关的属性 这些参数可以应用于Hystrix的THREAD和SEMAPHORE策略;
hystrix.command.default.fallback.isolation.semaphore.maxConcurrentRequest如果并发数达到该设置值,请求会被拒绝和抛出异常并且fallback不会被调用。默认10
hystrix.command.default.fallback.enabled 当执行失败或者请求被拒绝,是否会尝试调用hystrixCommand.getFallback() 。默认true
Circuit Breaker相关的属性
- hystrix.command.default.circuitBreaker.enabled 用来跟踪circuit的健康性,如果未达标则让request短路。默认true
- hystrix.command.default.circuitBreaker.requestVolumeThreshold 一个rolling window内最小的请求数。如果设为20,那么当一个rolling window的时间内(比如说1个rolling window是10秒)收到19个请求, 即使19个请求都失败,也不会触发circuit break。默认20
- hystrix.command.default.circuitBreaker.sleepWindowInMilliseconds 触发短路的时间值,当该值设为5000时,则当触发circuit break后的5000毫秒内都会拒绝request,也就是5000毫秒后才会关闭circuit。 默认5000
- hystrix.command.default.circuitBreaker.errorThresholdPercentage错误比率阀值,如果错误率>=该 值,circuit会被打开,并短路所有请求触发fallback。默认50
- hystrix.command.default.circuitBreaker.forceOpen 强制打开熔断器,如果打开这个开关,那么拒绝所 有request,默认false
- hystrix.command.default.circuitBreaker.forceClosed 强制关闭熔断器 如果这个开关打开,circuit将 一直关闭且忽略circuitBreaker.errorThresholdPercentage
Metrics相关参数
- hystrix.command.default.metrics.rollingStats.timeInMilliseconds 设置统计的时间窗口值的,毫秒值,circuit break 的打开会根据1个rolling window的统计来计算。若rolling window被设为10000毫秒, 则rolling window会被分成n个buckets,每个bucket包含success,failure,timeout,rejection的次数的统计信息。默认10000
- hystrix.command.default.metrics.rollingStats.numBuckets 设置一个rolling window被划分的数 量,若numBuckets=10,rolling window=10000,那么一个bucket的时间即1秒。必须符合rolling window % numberBuckets == 0。默认10
- hystrix.command.default.metrics.rollingPercentile.enabled 执行时是否enable指标的计算和跟踪, 默认true
- hystrix.command.default.metrics.rollingPercentile.timeInMilliseconds 设置rolling percentile window的时间,默认60000
- hystrix.command.default.metrics.rollingPercentile.numBuckets 设置rolling percentile window的numberBuckets。逻辑同上。默认6
- hystrix.command.default.metrics.rollingPercentile.bucketSize 如果bucket size=100,window =10s,若这10s里有500次执行,只有最后100次执行会被统计到bucket里去。增加该值会增加内存开销以及排序 的开销。默认100
- hystrix.command.default.metrics.healthSnapshot.intervalInMilliseconds 记录health 快照(用 来统计成功和错误绿)的间隔,默认500ms
Request Context 相关参数
- hystrix.command.default.requestCache.enabled 默认true,需要重载getCacheKey(),返回null时不 缓存
- hystrix.command.default.requestLog.enabled 记录日志到HystrixRequestLog,默认true
- Collapser Properties 相关参数
- hystrix.collapser.default.maxRequestsInBatch 单次批处理的最大请求数,达到该数量触发批处理,默认 Integer.MAX_VALU
- hystrix.collapser.default.timerDelayInMilliseconds 触发批处理的延迟,也可以为创建批处理的时间 +该值,默认10
- hystrix.collapser.default.requestCache.enabled 是否对HystrixCollapser.execute() and HystrixCollapser.queue()的cache,默认true
ThreadPool 相关参数 线程数默认值10适用于大部分情况(有时可以设置得更小),如果需要设置得更大,那有个基本得公式可以 follow: requests per second at peak when healthy × 99th percentile latency in seconds + some breathing room 每秒最大支撑的请求数 (99%平均响应时间 + 缓存值) 比如:每秒能处理1000个请求,99%的请求响应时间是60ms,那么公式是: 1000 (0.060+0.012)基本得原则时保持线程池尽可能小,他主要是为了释放压力,防止资源被阻塞。 当一切都是正常的时候,线程池一般仅会有1到2个线程激活来提供服务
- hystrix.threadpool.default.coreSize 并发执行的最大线程数,默认10
- hystrix.threadpool.default.maxQueueSize BlockingQueue的最大队列数,当设为-1,会使用SynchronousQueue,值为正时使用LinkedBlcokingQueue。该设置只会在初始化时有效,之后不能修改threadpool的queue size,除非reinitialising thread executor。默认-1。
- hystrix.threadpool.default.queueSizeRejectionThreshold 即使maxQueueSize没有达到,达到 queueSizeRejectionThreshold该值后,请求也会被拒绝
- hystrix.threadpool.default.metrics.rollingStats.timeInMilliseconds 线程池统计指标的时间,默 认10000
- hystrix.threadpool.default.metrics.rollingStats.numBuckets 将rolling window划分为n个 buckets,默认10
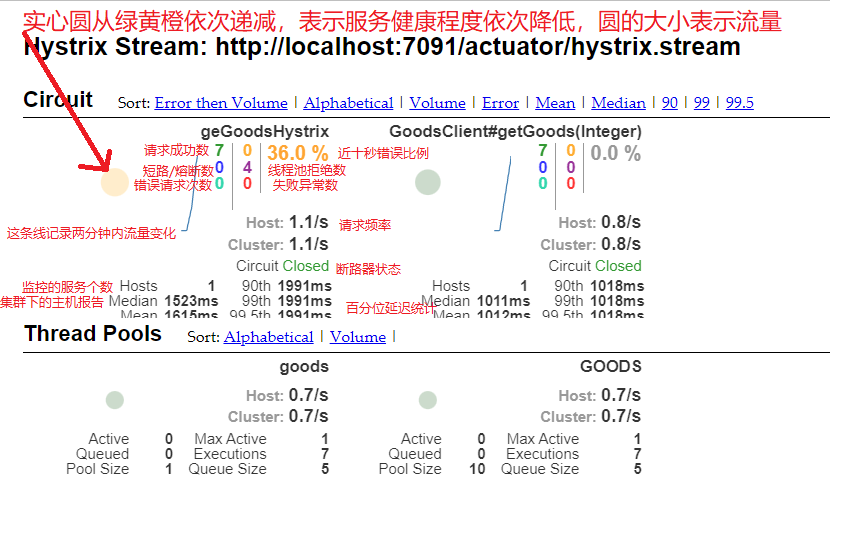
Hystrix 仪表盘监控 
Hystrix 仪表盘主要用来监控 Hystrix 的实时运行状态,通过它可以看到 Hystrix 的各项指标信息
**搭建一个 Hystrix Dashboard 服务用于监控Hystrix **
新建springboot工程,导入依赖,依然需要继承springcloud父依赖项目
xml1<parent> 2 <artifactId>ch01-springcloud-parent</artifactId> 3 <groupId>com.lei</groupId> 4 <version>1.0-SNAPSHOT</version> 5 <relativePath>../ch01-springcloud-parent/pom.xml</relativePath> 6</parent> 7<dependencies> 8 <dependency> 9 <groupId>org.springframework.boot</groupId> 10 <artifactId>spring-boot-starter-web</artifactId> 11 </dependency> 12 <dependency> 13 <groupId>org.springframework.cloud</groupId> 14 <artifactId>spring-cloud-starter-netflix-hystrix-dashboard</artifactId> 15 </dependency> 16</dependencies>配置文件配置服务端口,启动使用注解启动仪表盘功能
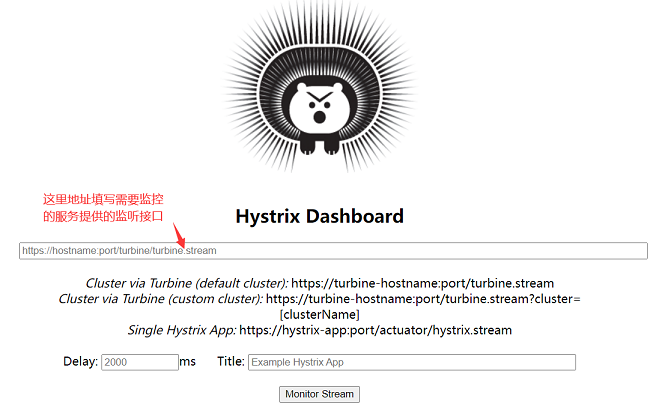
@EnableHystrixDashboardproperties1server.port=3721 2#允许仪表盘监控的地址,否则会无法监控,这里监控的本地随意指定的localhost 3hystrix.dashboard.proxy-stream-allow-list=localhostjava1@SpringBootApplication 2@EnableHystrixDashboard 3public class HystrixDashboardApplication { 4 public static void main(String[] args) { 5 SpringApplication.run(HystrixDashboardApplication.class, args); 6 } 7}访问仪表盘:http://localhost:3721/hystrix
将需要监控
hystrix的服务,暴露监控接口在portal消费者服务中,导入springboot提供的监控接口
xml1<!-- springboot 提供的监控接口--> 2<dependency> 3 <groupId>org.springframework.boot</groupId> 4 <artifactId>spring-boot-starter-actuator</artifactId> 5</dependency>配置spring boot 监控端点
properties1#配置spring boot 监控端点,暴露 endpoints 的,由于 endpoints 中会包含很多敏感信息 2#除了 health 和 info 两个支持直接访问外,其他的默认不能直接访问,所以我们让它都能访问 3management.endpoints.web.exposure.include=*访问监控接口:http://localhost:7091/actuator/hystrix.stream;注意:需要先访问一次hystrix熔断接口,否则该监控接口会一直输出ping;然后在仪表盘输入地址,就可以看到仪表盘监控了
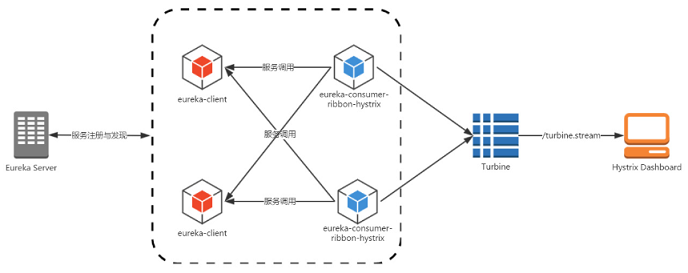
多个hystrix服务的监控,需要整合,新建一个turbine的springboot项目,注册到注册中心,整合多个hystrix服务,然后仪表盘通过监控turbine项目提供的接口进行监控多个服务
导入依赖:同时该项目依然依赖于自建的springcloud父依赖
xml1<!-- 用于汇集hystrix监控 --> 2<dependency> 3 <groupId>org.springframework.cloud</groupId> 4 <artifactId>spring-cloud-starter-netflix-turbine</artifactId> 5</dependency> 6<dependency> 7 <groupId>org.springframework.cloud</groupId> 8 <artifactId>spring-cloud-starter-netflix-eureka-client</artifactId> 9</dependency>配置文件
properties1server.port=3722 2#不向注册中心注册自己 3eureka.client.register-with-eureka=false 4#注册中心路径,表示我们向这个注册中心注册服务,如果向多个注册中心注册,用“,”进行分隔 5eureka.client.serviceUrl.defaultZone=http://139.155.239.250:8761/eureka,http://139.155.239.250:8762/eureka,http://139.155.239.250:8763/eureka 6#配置turbine,这里指定服务名 7turbine.app-config=portal,portal2 8#需要有这个,没有的话聚合不了多个项目 9turbine.cluster-name-expression="default"启动类上添加注解:
@EnableTurbine,用于聚合监控java1@EnableTurbine 2@SpringBootApplication 3public class TurbineApplication { 4 public static void main(String[] args) {SpringApplication.run(TurbineApplication.class, args);} 5}访问:http://localhost:3722/turbine.stream,就可以监控多个hystrix服务了
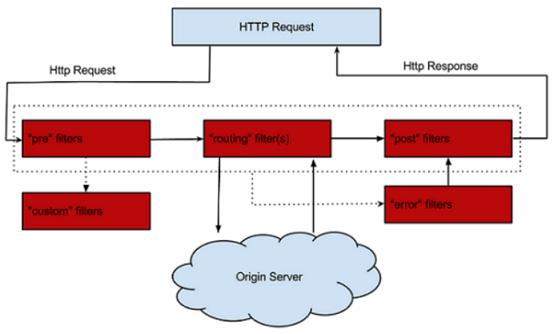
网关Zuul 
介绍 
Zuul包含了对请求的过滤和路由两个功能
其中路由功能负责将外部的请求转发到具体的微服务实例上,实现外部访问统一入口的基础;过滤功能是对外部的请求进行校验、服务聚合等功能的基础
Zuul和eureka进行整合,将自身注册为eureka服务治理下,同时从eureka获取其他微服务的信息,以后访问微服务都可以通过zuul跳转后获得
Zuul服务搭建 
导入依赖
xml1<!--spring-cloud-starter-netflix-eureka-client--> 2<dependency> 3 <groupId>org.springframework.cloud</groupId> 4 <artifactId>spring-cloud-starter-netflix-eureka-client</artifactId> 5</dependency> 6 7<!-- spring-cloud-starter-netflix-zuul --> 8<dependency> 9 <groupId>org.springframework.cloud</groupId> 10 <artifactId>spring-cloud-starter-netflix-zuul</artifactId> 11</dependency>启动类添加注解,@EnableZuulProxy简单理解为@EnableZuulServer的增强版
java1@EnableZuulProxy //启动zuul网关 2public class ZuulApplication { 3 public static void main(String[] args) { 4 SpringApplication.run(ZuulApplication.class, args); 5 } 6 7}zuul服务已经搭建成功,然后通过
zuul服务地址+微服务名+请求地址,即可访问具体微服务的方法实现;例如:http://localhost/portal-service/portal/geGoodsFign
路由 
Zuul网关搭建好后,可以通过:zuul服务地址+微服务名+请求地址访问微服务
自定义访问微服务得路径,而不是通过微服务名;此时可以通过:http://localhost/portal/portal/geGoodsFign 访问
properties1## 超时时间 2zuul.host.connect-timeout-millis=5000 3 4## 路由规则配置 5## / **代表是所有(多个)层级 /cloud/goodsFeignHystrix 6## / * 是代表一层 7zuul.routes.portal.service-id=portal-service 8zuul.routes.portal.path=/portal/**屏蔽使用微服务名进行访问
properties1#屏蔽使用微服务名进行访问;*代表屏蔽所有微服务名,这里可以指定微服务名 2zuul.ignored-services=*统一前缀,添加访问前缀;此时通过: 进行访问
properties1#前缀,当请求匹配前缀时会进行代理 2zuul.prefix=/zuul 3#代理前缀默认会从请求路径中移除;即localhost/api/UserService -> localhost:8080 4zuul.strip-prefix=true
通配符含义
| 通配符 | 含义 | 举例 | 说明 |
|---|---|---|---|
| ? | 匹配任意单个字符 | /portal-service/? | 匹配 /portal-service/a |
| * | 匹配任意数量的字符 | /portal-service/* | 匹配 /portal-service/aaa,无法匹配 /portal-service/a/b/c |
| ** | 匹配任意数量的字符 | /portal-service/** | 匹配 /portal-service/aaa, /portal-service/a/b/c |
过滤器 
限流、权限验证、记录日志
过滤器(filter)是zuul得核心组件,zuul大部分功能都通过过滤器实现;zuul中定义了四种过滤器类型,这些过滤器分别对应请求得生命周期
- PRE:这种过滤器在请求被路由之前调用。可利用这种过滤器实现身份验证、在 集群中选择请求的微服务、记录调试信息等
- ROUTING:这种过滤器将请求路由到微服务。这种过滤器用于构建发送给微服 务的请求,并使用 Apache HttpClient或 Netfilx Ribbon请求微服务
- POST:这种过滤器在路由到微服务以后执行。这种过滤器可用来为响应添加标准 的 HTTP Header、收集统计信息和指标、将响应从微服务发送给客户端等
- ERROR:在其他阶段发生错误时执行该过滤器
编写过滤器
编写过滤器需要继承ZuulFilter类,并重写其中的方法;需要声明为Spring Bean
java1@Component 2public class LogFilter extends ZuulFilter { 3 /** 4 * 过滤器类型,pre、route、post、error 5 */ 6 @Override 7 public String filterType() { 8 return FilterConstants.ROUTE_TYPE; 9 } 10 11 /** 12 * 过滤器,过滤器执行顺序,不同的过滤器可以返回相同的数字,越小越先执行 13 */ 14 @Override 15 public int filterOrder() { 16 return 1; 17 } 18 19 /** 20 * 该过滤器是否执行,true 表示执行、false 表示不执行 21 */ 22 @Override 23 public boolean shouldFilter() { 24 return true; 25 } 26 27 /** 28 * 过滤器运行逻辑,返回值暂无意义 29 */ 30 @Override 31 public Object run() throws ZuulException { 32 RequestContext currentContext = RequestContext.getCurrentContext(); 33 HttpServletRequest request = currentContext.getRequest(); 34 System.out.println("访问地址:"+request.getServerName()+request.getRequestURI()); 35 return null; 36 } 37}过滤器禁用
properties1#过滤器禁用 zuul.<SimpleClassName>.<filterType>.disable = true 2zuul.LogFilter.route.disable=true
异常处理 
正常情况下,zuul过滤器按顺序 PRE–>ROUTE 然后由POST返回response;如果 PRE 阶段或者 ROUTE 阶段发生异常,会执行ERROR过滤器,统一处理异常
禁用zuul提供的默认异常过滤器
SendErrorFilter过滤器properties1#过滤器禁用 zuul.<SimpleClassName>.<filterType>.disable = true 2zuul.SendErrorFilter.error.disable=true过滤器编写,只要其他过滤器执行发生异常,就会进入异常过滤器
java1@Component 2public class ErrorFilter extends ZuulFilter { 3 @Override 4 public String filterType() { 5 return FilterConstants.ERROR_TYPE; 6 } 7 8 @Override 9 public int filterOrder() { 10 return 0; 11 } 12 13 @Override 14 public boolean shouldFilter() { 15 return true; 16 } 17 18 @Override 19 public Object run() throws ZuulException { 20 try { 21 RequestContext context = RequestContext.getCurrentContext(); 22 ZuulException exception = (ZuulException)context.getThrowable(); 23 System.out.println("进入系统异常拦截" + exception.getMessage()); 24 HttpServletResponse response = context.getResponse(); 25 response.setContentType("application/json; charset=utf8"); 26 response.setStatus(exception.nStatusCode); 27 PrintWriter writer = null; 28 try { 29 writer = response.getWriter(); 30 writer.print("{code:"+ exception.nStatusCode +",message:\""+ 31 exception.getMessage() +"\"}"); 32 } catch (IOException e) { 33 e.printStackTrace(); 34 } finally { 35 if(writer!=null){ 36 writer.close(); 37 } 38 } 39 } catch (Exception e) { 40 ReflectionUtils.rethrowRuntimeException(e); 41 } 42 return null; 43 } 44}此时错误也返回的也是友好页面,全局统一异常拦截
zuul服务降级熔断 
zuul是一个代理服务,但如果被代理的服务突然断了,这个时候zuul上面会有出错信息,例如,停止了被调用的微服务;
一般服务方自己会进行服务的熔断降级,但对于zuul本身,也应该进行zuul的降级处理;
配置降级后,错误页面友好;当调用微服务超时或异常时,就会进入配置的zuul降级方法,返回友好的错误提示
zuul服务降级,实现如下
 1@Component
 2public class ProviderFailback implements FallbackProvider {
 3    /**
 4     * 哪个微服务提供降级,* 匹配所有
 5     */
 6    @Override
 7    public String getRoute() {
 8        return "*";
 9    }
10
11    /**
12     * 响应逻辑;route为当前微服务名称
13     */
14    @Override
15    public ClientHttpResponse fallbackResponse(String route, Throwable cause) {
16        //通过匿名内部类得方式返回 ClientHttpResponse 响应对象
17        return new ClientHttpResponse() {
18            @Override
19            public HttpHeaders getHeaders() {
20                HttpHeaders headers = new HttpHeaders();
21                headers.set("Content-Type", "text/html; charset=UTF-8");
22                return headers;
23            }
24            @Override
25            public InputStream getBody() throws IOException {
26                // 响应体
27                return new ByteArrayInputStream("服务正在维护,请稍后再试.".getBytes());
28            }
29
30            @Override
31            public HttpStatus getStatusCode() throws IOException {
32                //状态码相关
33                return HttpStatus.BAD_REQUEST;
34            }
35            @Override
36            public int getRawStatusCode() throws IOException {
37                //状态码相关
38                return HttpStatus.BAD_REQUEST.value();
39            }
40            @Override
41            public String getStatusText() throws IOException {
42                //状态码相关
43                return HttpStatus.BAD_REQUEST.getReasonPhrase();
44            }
45            @Override
46            public void close() { }
47        };
48    }
49}
配置中心Config 
简介 
为什么使用配置中心
- 安全性:配置跟随源代码保存在代码库中,容易造成配置泄漏
- 时效性:修改配置,需要重启服务才能生效
- 局限性:无法支持动态调整:例如日志开关、功能开关
常用分布式配置中心框架
- Apollo(阿波罗):携程框架部门研发的分布式配置中心
- diamond : 淘宝开源的持久配置中心,支持各种持久信息发布和订阅
- XDiamond:全局配置中心,存储应用的配置项,解决配置混乱分散的问题
- Qconf:奇虎360内部分布式配置管理工具
- Disconf:百度的分布式配置管理平台
- Spring Cloud Config:Spring Cloud微服务开发的配置中心,提供服务端和客户端支持
什么是Spring Cloud Config
Spring Cloud Config 是一个解决分布式系统的配置管理方案。它包含 Client和 Server 两个部分,Server 提供配置文件的存储、以接口的形式将配置文件的内容提供出去,Client 通过接口获取数据、并依据此数据初始化自己的应用。 Spring cloud config使用 git 或 svn 、也可以是本地存放配置文件,默认情况下使用 git
Springcloud config 的工作原理
创建一个远程 Git 仓库
每当 Config Server访问远程 Git 仓库时,都会克隆一份到本地,这样当远程仓库无法连接时,就直接使用本地存储的配置信息
微服务 A、微服务 B 则是我们的具体应用,这些应用在启动的时会从 Config
Server 中获取相应的配置信息
当微服务 A、微服务 B 尝试从 Config Server 中加载配置信息的时候,Config Server 会先通过 git clone 命令克隆一份配置文件保存到本地
由于配置文件是存储在 Git 仓库中,所以配置文件天然具有版本管理功能
Config Server构建 
构建springboot项目,并添加依赖
xml1<dependency> 2 <groupId>org.springframework.cloud</groupId> 3 <artifactId>spring-cloud-config-server</artifactId> 4</dependency>启动类上使用
@EnableConfigServer注解方式,启动配置中心java1@SpringBootApplication 2@EnableConfigServer 3public class ConfigApplication { 4 public static void main(String[] args) { 5 SpringApplication.run(ConfigApplication.class, args); 6 } 7}创建远程仓库,目录结构如下
tex1ch01 2 --goods 3 ---application-goods1.properties 4 ---application-goods2.properties 5 --portal 6 ---application-portal1.properties 7 ---application-portal2.properties编写配置文件
application-portal1.propertiesproperties1#服务端口 2server.port=7091 3#服务名称 4spring.application.name=portal-service 5#这里配置当前微服务地址,eure点击微服务可跳转,当前服务器的服务地址(ip或域名) 6eureka.instance.hostname=localhost 7 8#开启feign支持hystrix 9feign.hystrix.enabled=true 10 11#ribbon默认连接超时时间和默认超时时间 12ribbon.ConnectTimeout=1500 13ribbon.ReadTimeout=3000 14 15hystrix.command.default.execution.timeout.enabled=true 16hystrix.command.default.execution.isolation.thread.timeoutInMilliseconds=5000 17 18#服务检索开启 19eureka.client.fetch-registry=true 20#注册中心路径,表示我们向这个注册中心注册服务,如果向多个注册中心注册,用“,”进行分隔 21eureka.client.serviceUrl.defaultZone=http://eure8761:8761/eureka/,http://eure8762:8762/eureka/ 22#心跳间隔5s,默认30s。每一个服务配置后,心跳间隔和心跳超时时间会被保存在server端,不同服务的心跳频率可能不同,server端会根据保存的配置来分别探活 23eureka.instance.lease-renewal-interval-in-seconds=6 24#心跳超时时间10s,默认90s。从client端最后一次发出心跳后,达到这个时间没有再次发出心跳,表示服务不可用,将它的实例从注册中心移除 25eureka.instance.lease-expiration-duration-in-seconds=10 26#配置spring boot 监控端点,暴露 endpoints 的,由于 endpoints 中会包含很多敏感信息 27#除了 health 和 info 两个支持直接访问外,其他的默认不能直接访问,所以我们让它都能访问 28 29management.endpoints.web.exposure.include=*在application.properties配置文件中,配置仓库信息
properties1server.port=8888 2spring.application.name=config-service 3#uri 表示配置中心所在仓库的位置 4spring.cloud.config.server.git.uri=https://gitee.com/lei142857/springcloud-config.git 5#search-paths 表示仓库下的子目录 6spring.cloud.config.server.git.search-paths=ch01/portal,ch01/goods 7#username 表示你的 GitHub 用户名 8spring.cloud.config.server.git.username=19882445846 9#password 表示你的 GitHub 密码 10spring.cloud.config.server.git.password=tl869257546此时启动配置中心,可通过以下方式访问配置文件
- /{application}/{profile}[/{label}]
- /{application}-{profile}.properties
- /{label}/{application}-{profile}.properties
- /{application}-{profile}.yml
- /{label}/{application}-{profile}.yml
{application} 表示配置文件的名字,对应的配置文件即 application {profile} 表示环境,有 dev、test、online 及默认 {label} 表示分支,默认我们放在 master 分支上
例如:http://localhost:8888/master/application.properties
返回json数据
- name 表示配置文件名 application 部分
- profiles 表示环境部分
- label 表示分支
- version 表示 GitHub 上提交时产生的版本号
当有微服务获取配置中心文件时,配置中心首先会自动从远程仓库pull最新配置文件,否则使用本地缓存配置文件
Config Client构建 
修改微服务配置文件,让微服务自动从配置中心加载配置
导入依赖
xml1<dependency> 2 <groupId>org.springframework.cloud</groupId> 3 <artifactId>spring-cloud-starter-config</artifactId> 4</dependency>创建
bootstrap.properties配置文件,用于获取远程配置信息properties1## name 对应配置文件中的 application 部分,这个也是应用名 2## profile 对应了 profile 部分 3## label 对应了 label 部分 4## uri 表示配置中心的地址 5spring.application.name=application 6spring.cloud.config.profile=portal1 7spring.cloud.config.label=master 8spring.cloud.config.uri=http://localhost:8888/Spring Cloud有一个
引导上下文的概念,这是主应用程序的父上下文。引导上下文负责从配置服务器加载配置属性,以及解密外部配置文件中的属性。和主应用程序加载application(yml或 properties)中的属性不同,引导上下文加载(bootstrap)中的属性。配置在 bootstrap中的属性有更高的优先级,因此默认情况下它们不能被本地配置覆盖创建controller测试是否获取到远程配置信息
java1@RestController 2@RequestMapping("/test") 3public class TestController { 4 @Value("${eureka.client.serviceUrl.defaultZone}") 5 private String defaultZone; 6 @RequestMapping("/getDefaultZone") 7 public String getDefaultZone(){ 8 return defaultZone; 9 } 10}访问接口可获得返回值:http://eure8761:8761/eureka/,http://eure8762:8762/eureka/;表示已经从配置中心获取到配置信息了
配置信息的加解密处理 
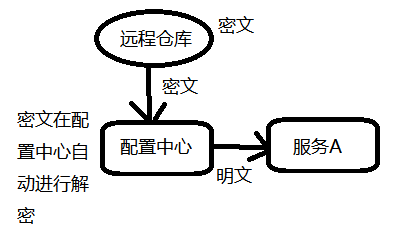
对称加密
配置中心,创建
bootstrap.properties配置文件,然后配置密钥properties1#设置对称密钥,用这个密钥进行加密和解密 2encrypt.key=catconfig server提供了加密与解密的接口
- 加密接口:http://localhost:8888/encrypt
- 解密接口:http://localhost:8888/decrypt (这个接口我们不需要用)
- 解密是config-server自动完成的
通过postman,post调用传入明文,则可获得加密后的密文
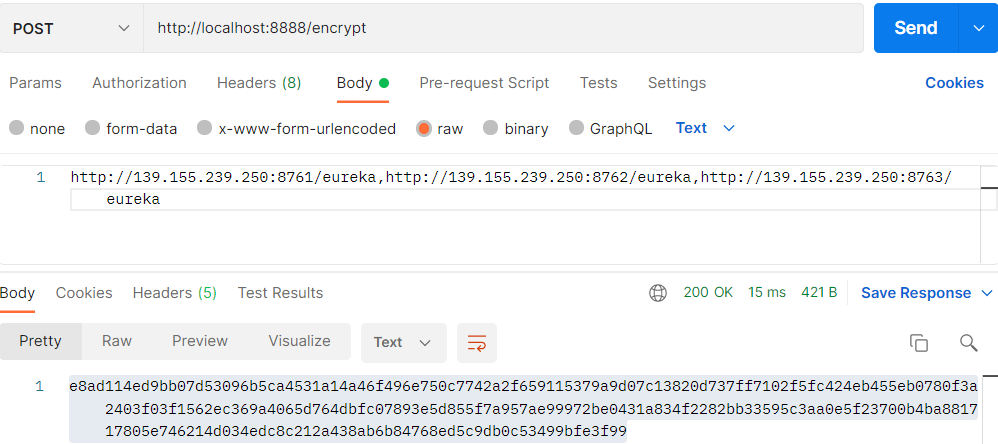
然后将远程仓库配置信息配置成密文,然后配置中心获取配置文件时会自动进行解密;使用 {cipher} 表示该属性值为密文
properties1#...... 2eureka.instance.lease-renewal-interval-in-seconds={cipher}10616d2f78c5fdf7ed15033fe64f3a2c0994366d0f19304cb521a72ca3458311 3#......通过http://localhost:8888/master/application.properties访问配置中心,看是否能得到
原文
配置中心局部刷新 
局部刷新通过Spring Boot 的actuator提供了一个刷新端点/refresh
在客户端添加springboot提供的监控依赖
xml1<!-- springboot 提供的监控接口起步依赖--> 2<dependency> 3 <groupId>org.springframework.boot</groupId> 4 <artifactId>spring-boot-starter-actuator</artifactId> 5</dependency>修改配置文件,放行刷新端点
properties1#配置spring boot 监控端点,暴露 endpoints 的,由于 endpoints 中会包含很多敏感信息 2#除了 health 和 info 两个支持直接访问外,其他的默认不能直接访问,所以我们让它都能访问 3management.endpoints.web.exposure.include=*在Controller上添加注解
@RefreshScope,添加这个注解的类会在配置更新时得到特殊的处理java1@RefreshScope 2@RestController 3@RequestMapping("/config") 4public class ConfigTestController { 5 @Value("${eureka.instance.lease-renewal-interval-in-seconds}") 6 private String eurekaInstanceId; 7 @RequestMapping("/getEurekaInstance") 8 public Object getEurekaInstance(){ 9 return eurekaInstanceId; 10 } 11}修改远程仓库配置文件,访问客户端的刷新端点访问http://localhost:8080/actuator/refresh 进行手动刷新配置;当访问刷新端点时,配置中心会自动读取远程仓库最新的配置文件,并缓存到本地
访问controller,可以看到获取到的配置信息已经被刷新了
局限性:这种方式的刷新,就是你对每个微服务分别进行刷新,也一个一个操作,如果你有80个微服务,那么就需要手动刷新这80个微服务
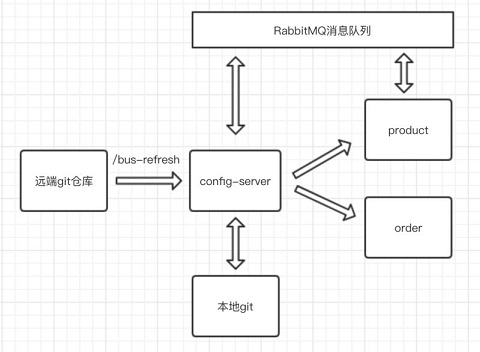
通过Bus消息总线全局刷新 

通过消息队列,实现全局刷新,发送一条刷新消息到每个微服务,然后微服务会自动去拉去最新配置
新建专门刷新全局配置得项目或直接使用任意微服务项目
导入springcloud消息总线rabbitMQ起步依赖,springboot监控起步依赖
xml1<dependency> 2 <groupId>org.springframework.cloud</groupId> 3 <artifactId>spring-cloud-starter-bus-amqp</artifactId> 4</dependency> 5<dependency> 6 <groupId>org.springframework.boot</groupId> 7 <artifactId>spring-boot-starter-actuator</artifactId> 8</dependency>修改配置文件
properties1#配置rabbitmq 2spring.rabbitmq.host=192.168.10.131 3spring.rabbitmq.port=5672 4spring.rabbitmq.username=root 5spring.rabbitmq.password=123456 6 7#开启spring cloud bus,默认是开启的,也可以省略该配置 8spring.cloud.bus.enabled=true 9 10#打开所有的web访问端点 11management.endpoints.web.exposure.include=*在其他微服务中集成springcloud消息总线,导入依赖并修改配置文件
访问:http://localhost:8888/actuator/bus-refresh通过消息总线进行全局配置刷新,RabbitMQ将收到消息,然后微服务会消费消息,config的所有客户端的微服务配置都会动态刷新
config高可用 
Spring Cloud Config的高可用机制解决方式非常简单,把Spring Cloud Config注册到Eureka就搞定了,此时用户访问的时候不是直接从配置中心获取配置信息,而是先通过eureka中获取配置中心的地址,然后再从配置中心获取具体服务的配置信息
注意:这里需要将eureka的连接信息等配置到bootstrap.properties文件中
Spring cloud config 高可用第二种方式:使用Nginx
spring.cloud.config.uri=http://nginx的ip:nginx端口/, 这个url写成访问nginx,然后通过nginx负载均衡转发到3个config服务
bootstrap.properties配置文件示例:
 1spring.application.name=application
 2spring.cloud.config.profile=goods1
 3spring.cloud.config.label=master
 4#将配置中心注册到注册中心时,可通过配置中心的服务名访问
 5spring.cloud.config.discovery.enabled=true
 6spring.cloud.config.discovery.service-id=CONFIG-SERVICE
 7#配置中心未注册到注册中心时可直接通过地址访问
 8#spring.cloud.config.uri=http://localhost:8888/
 9
10#访问配置中心的账号和密码
11spring.cloud.config.username=lei
12spring.cloud.config.password=123456
安全认证 
Config安全认证 
配置中心添加依赖
xml1<!-- spring-boot-starter-security --> 2<dependency> 3 <groupId>org.springframework.boot</groupId> 4 <artifactId>spring-boot-starter-security</artifactId> 5</dependency>在配置文件中配置账号和密码
properties1#配置安全认证的账号和密码 2spring.security.user.name=lei 3spring.security.user.password=123456需要从配置中心获取配置文件的客户端,在bootstrap.properties中配置访问账号和密码
properties1#访问配置中心的账号和密码 2spring.cloud.config.username=lei 3spring.cloud.config.password=123456
Eureka安全认证 
一般情况下Eureka 都会在一个内网环境中,但免不了在某些项目中需要让其他外网的服务注册到Eureka,这个时候就有必要让Eureka增加一套安全认证机制了,让所有服务提供者通过安全认证后才能注册进来
eureka服务端添加依赖
xml1<!-- spring-boot-starter-security --> 2<dependency> 3 <groupId>org.springframework.boot</groupId> 4 <artifactId>spring-boot-starter-security</artifactId> 5</dependency>配置文件配置用户名和密码
properties1#访问注册中心的账号和密码 2spring.security.user.name=lei 3spring.security.user.password=123456在eureka服务端编写配置类EurekaSecurityConfig,重写configure方法,把csrf劫持置为不可用,让服务能被接收和注册
java1/** 2 * csrf置为不可用 3 */ 4@Configuration 5@EnableWebSecurity 6public class EurekaSecurityConfig extends WebSecurityConfigurerAdapter { 7 @Override 8 protected void configure(HttpSecurity http) throws Exception { 9 http.csrf().disable(); 10 super.configure(http); 11 } 12}客户端配置访问注册中心的url中添加账户和密码
properties1#eureka注册中心的连接地址 2eureka.client.service-url.defaultZone=http://lei:123456@localhost:8761/eureka
分布式链路跟踪 Sleuth 
分布式链路跟踪概述 
分布式链路跟踪可以 串联整个调用链路,快速定位问题;理清各个微服务之间的依赖关系;进行各个微服务接口的性能分折;跟踪整个业务流程的调用处理顺序
Spring Cloud Sleuth [sluːθ]为 spring Cloud提供了分布式跟踪的解决方案
Spring Cloud Sleuth可以追踪10种类型的组件:async、Hystrix,messaging,websocket,rxjava,scheduling,web(Spring MVC Controller,Servlet),webclient(Spring RestTemplate)、Feign、Zuul
Springcloud Sleuth一些术语
- 跨度(span):基本工作单元。span用一个64位的id唯一标识,span被启动和停止时,记录了时间信息。初始化 span被称为"rootspan",该 span的 id和 trace的 ID相等
- trace(跟踪):形成树状结构的一组跨度,一组共享"rootspan"的 span组成的树状结构称为 trace, trace也用一个64位的 ID唯一标识, trace中的所有 span都共享该 trace的 ID
- annotation(标注):用于及时记录事件的存在,核心annotation用来定义请求的开始和结束
- CS (Client sent客户端发送):客户端发起一个请求,该annotation描述了span的开始
- SR (server Received服务器端接收):服务器端获得请求并准备处理它。如果用 SR减去 CS时间戳,就能得到网络延迟
- SS (server sent服务器端发送):该annotation表明完成请求处理(当响应发回客户端时)。如果用 SS减去 SR时间戳,就能得到服务器端处理请求所需的时间
- CR (Client Received客户端接收): span结束的标识。客户端成功接收到服务器端的响应。如果 CR减去 CS时间戳,就能得到从客户端发送请求到服务器响应的所需的时间
Zipkin
Zipkin主要是分析追踪数据
SpringCloud Sleuth 分布式链路跟踪仅仅只会生成一堆数据,这些数据不便于阅读;通常情况,会将Sleuth产生的数据上传到Zipkin服务器上,Zipkin Server会解析Sleuth数据,方便于阅读
Sleuth和ZipkinServer联动 
搭建ZipkinServer
本地搭建失败,直接使用docker运行 docker run -d -p 9411:9411 openzipkin/zipkin
也可以在github上下载源码,打包jar运行
微服务整合Sleuth,并上传数据到ZipkinServer
服务中导入依赖
xml1<!-- spring-cloud-starter-sleuth --> 2<dependency> 3 <groupId>org.springframework.cloud</groupId> 4 <artifactId>spring-cloud-starter-sleuth</artifactId> 5</dependency> 6 7<!-- spring-cloud-starter-zipkin --> 8<dependency> 9 <groupId>org.springframework.cloud</groupId> 10 <artifactId>spring-cloud-starter-zipkin</artifactId> 11</dependency>配置文件,添加下面配置
properties1#指定Zipkin server地址 2spring.zipkin.base-url=http://192.168.10.131:9411 3#发送跟踪数据到zipkin的类型web(http) 4spring.zipkin.sender.type=web 5#request采样的数量 默认是0.1 也即是10%,即采样10%的请求数据; 6#因为在分布式系统中,数据量可能会非常大,因此采样非常重要我们示例数据少最好配置为1全采样,100%的采集会稍微影响一点性能 7spring.sleuth.sampler.probability=1.0此时访问各个服务,zipkinServer就可以捕获到链路信息
Sleuth 目前只要是服务重启,所有的链路跟踪数据都会丢失,可以集成数据库或者Elasticsearch,此时数据就可以被持久化保存在第三方介质上,当Sleuth重启时,以前的链路信息就会得以保存下来
Spring Cloud Stream 
简介 
Spring Cloud Stream来整合消息中间件,这样就可以降低微服务和消息中间件的耦合性,做到轻松在不同消息中间件间切换,目前Spring Cloud Stream只支持rabbitmq 和 kafka
Spring Cloud Stream 可以说是在消息中间件上抽象了一层;它负责和不同的消息消息中间件交互,而应用程序负责和Stream提供的接口进行交互
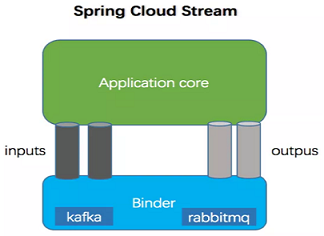
应用程序通过input(相当于消费者consumer)、output(相当于生产者producer)来与Spring Cloud Stream中Binder交互,而Binder负责与消息中间件交互
| 组成 | 说明 |
|---|---|
| Binder | Binder是应用与消息中间件之间的封装,目前实现了Kafka和RabbitMQ的Binder,通过Binder可以很方便的连接中间件,可以动态的改变消息类型(对应于Kafka的topic,RabbitMQ的exchange),这些都可以通过配置文件来实现; |
| @Input | 该注解标识输入通道,通过该输入通道接收消息进入应用程序 |
| @Output | 该注解标识输出通道,发布的消息将通过该通道离开应用程序 |
| @StreamListener | 监听队列,用于消费者的队列的消息接收 |
| @EnableBinding | 将信道channel和exchange绑定在一起 |
Stream整合rabbitMQ 
添加依赖
xml1<!-- spring-cloud-starter-stream-rabbit --> 2<dependency> 3 <groupId>org.springframework.cloud</groupId> 4 <artifactId>spring-cloud-starter-stream-rabbit</artifactId> 5</dependency>生产者和消费者的配置
properties1#对接具体的消息中间件 2#binders:这是一组binder的集合,这里配置了一个名为test的binder,这个binder中是包含了一个rabbit的连接信息 3spring.cloud.stream.binders.test.type=rabbit 4spring.cloud.stream.binders.test.environment.spring.rabbitmq.host=192.168.10.131 5spring.cloud.stream.binders.test.environment.spring.rabbitmq.port=5672 6spring.cloud.stream.binders.test.environment.spring.rabbitmq.username=root 7spring.cloud.stream.binders.test.environment.spring.rabbitmq.password=123456 8spring.cloud.stream.binders.test.environment.spring.rabbitmq.virtual-host=/ 9 10#bindings:这是一组binding的集合,这里配置了一个名为testOutPut的binding,这个binding中配置了指向名test的binder下的一个交换机testRabbit 11spring.cloud.stream.bindings.testOutPut.destination=testRabbit 12#设置要绑定的消息服务的binder 13spring.cloud.stream.bindings.testOutPut.binder=test 14 15#消费者,与生产者相比 binding的名字不同,也是通道与交换机绑定的关键 16spring.cloud.stream.bindings.testInPut.destination=testRabbit 17spring.cloud.stream.bindings.testInPut.binder=test发送消息
java1//创建信道;这里的名称要和配置文件中配置的bindings一致 2public interface MqMessageSource{ 3 String TEST_OUT_PUT="testOutPut"; 4 @Output(TEST_OUT_PUT) 5 MessageChannel testOutPut(); 6} 7 8//发送消息 9@EnableBinding(MqMessageSource.class) 10public class MessageSender { 11 @Resource 12 @Output(MqMessageSource.TEST_OUT_PUT) 13 private MessageChannel output; // 消息的发送管道 14 15 public void publish(String msg) { 16 output.send(MessageBuilder.withPayload(msg).build()); 17 System.out.println("消息发送:<" + msg + "> 完成,时间:" + new Date()); 18 } 19}接收消息
java1//创建信道;这里的名称要和配置文件中配置的bindings一致 2public interface MqMessageSink { 3 String TEST_IN_PUT = "testInPut"; 4 @Input(TEST_IN_PUT) 5 SubscribableChannel testInPut(); 6} 7 8//接收消息 9@EnableBinding(MqMessageSink.class) 10public class MessageReceiver { 11 @StreamListener(MqMessageSink.TEST_IN_PUT) 12 public void input(Message message) { 13 System.out.println("消息接收:<" + message.getPayload() + "> 完成,时间:" + new Date()); 14 } 15 16}
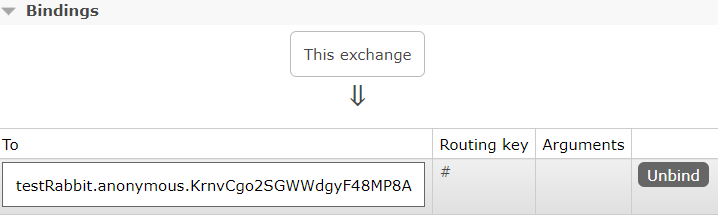
注意:默认情况,对于rabbitMQ来说创建的是临时队列,并且交换机类型是topic,路由键默认为#,即所有消费者都会创建队列,并能接收到消息
交换机:

队列:

绑定信息:
Stream分组与持久化 
消息分组,对于rabbitMQ来说即创建了指定名称的队列;此时消费者可以指定到一个分组(队列)中,则消息只会被消费一次;并且队列不再是临时队列,因此消息可以持久化保存
配置文件
1spring.cloud.stream.bindings.testOutPut.destination=testRabbit
2spring.cloud.stream.bindings.testOutPut.binder=test
3#指定分组,可以进行消息的持久化
4spring.cloud.stream.bindings.testOutPut.group=myGroup
5
6spring.cloud.stream.bindings.testInPut.destination=testRabbit
7spring.cloud.stream.bindings.testInPut.binder=test
8#指定分组,可以进行消息的持久化
9spring.cloud.stream.bindings.testInPut.group=myGroup
此时创建的队列:

为持久化队列,当没有任何监听者监听队列时,队列不会被删除,消息可以持久化保存
Stream设置路由键 
路由键默认为 #,可以手动设置路由键,仅适用于rabbitMQ;在消费端设置
配置文件
 1spring.cloud.stream.bindings.testOutPut.destination=testRabbit
 2spring.cloud.stream.bindings.testOutPut.binder=test
 3spring.cloud.stream.bindings.testOutPut.group=myGroup
 4#设置发送消息的路由键,该属性也可以实现动态路由键
 5spring.cloud.stream.rabbit.bindings.testOutPut.producer.routing-key-expression="key.asdas"
 6
 7
 8spring.cloud.stream.bindings.testInPut.destination=testRabbit
 9spring.cloud.stream.bindings.testInPut.group=myGroup
10#设置一个RoutingKey路由key,默认是#,我们可以指定
11spring.cloud.stream.rabbit.bindings.testInPut.consumer.binding-routing-key=key.#
动态路由键实现
 1spring.cloud.stream.bindings.testOutPut.destination=testRabbit
 2spring.cloud.stream.bindings.testOutPut.binder=test
 3spring.cloud.stream.bindings.testOutPut.group=myGroup
 4#这里设置路由键表达式为headers.routekey,在发送消息时,设置headers的routekey属性,则就会使用该属性作为路由键
 5spring.cloud.stream.rabbit.bindings.testOutPut.producer.routing-key-expression=headers.routekey
 6
 7
 8spring.cloud.stream.bindings.testInPut.destination=testRabbit
 9spring.cloud.stream.bindings.testInPut.group=myGroup
10#设置一个RoutingKey路由key,默认是#,我们可以指定
11spring.cloud.stream.rabbit.bindings.testInPut.consumer.binding-routing-key=key.#
发送者
 1@EnableBinding(MqMessageSource.class)
 2public class MessageSender {
 3    @Resource
 4    @Output(MqMessageSource.TEST_OUT_PUT)
 5    private MessageChannel output; // 消息的发送管道
 6
 7    public void publish(String msg) {
 8        //这里设置headers中routekey的属性值,配置文件中路由键表达式会读取到,并作为消息的路由键
 9        output.send(MessageBuilder.withPayload(msg).setHeader("routekey","key.123").build());
10        System.out.println("消息发送:<" + msg + "> 完成,时间:" + new Date());
11    }
12
13}
阿波罗配置中心 
安装apollo 
github 上下载Quick Start安装包,解压后大概目录结构如下
tex1-- client 2-- portal 3-- service 4-- sql 5-- demo.sh上传到linux,解压 unzip …
shell1$ unzip apollo-build-scripts-master.zip先根据sql初始化库表,然后运行
shell1## 修改数据库连接 2$ vim demo.sh 3 #这儿修改数据库连接 4$ ./demo.sh start启动成功后,访问:http://ip:8070 登录账号默认是: apollo/admin
- Config-service 8080端口
- Admin-service 8090端口
- Portal管控台 8070端口
集成apollo配置中心 
导入依赖
xml1<!-- apollo-client --> 2<dependency> 3 <groupId>com.ctrip.framework.apollo</groupId> 4 <artifactId>apollo-client</artifactId> 5 <version>1.9.2</version> 6</dependency>配置文件
properties1app.id=YOUR-APP-ID 2apollo.meta=http://config-service-url启动类添加,开启apollo配置支持
java1@EnableApolloConfig //开启apollo配置支持
Apollo客户端会把从服务端获取到的配置在本地文件系统缓存一份,用于在遇到服务不可用,或网络不通的时候,依然能从本地恢复配置,不影响应用正常运行
Apollo客户端的实现原理 
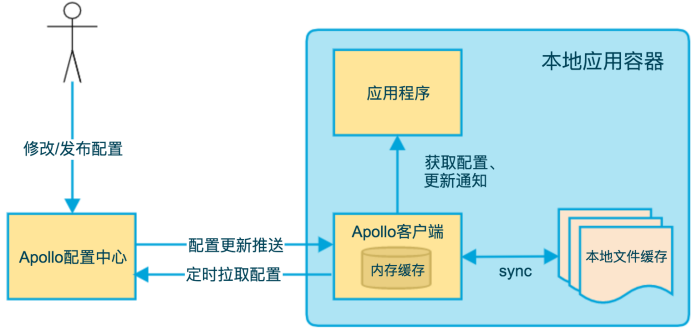
- 客户端和服务端保持了一个长连接,从而能第一时间获得配置更新的推送(通过Http Long Polling实现)
- 客户端还会定时从Apollo配置中心服务端拉取应用的最新配置,这是一个fallback机制,为了防止推送机制失效导致配置不更新
- 客户端定时拉取会上报本地版本,所以一般情况下,对于定时拉取的操作,服务端都会返回304 - Not Modified;定时频率默认为每5分钟拉取一次,客户端也可以通过在运行时指定System Property: apollo.refreshInterval来覆盖,单位为分钟
- 客户端从Apollo配置中心服务端获取到应用的最新配置后,会保存在内存中,客户端会把从服务端获取到的配置在本地文件系统缓存一份;在遇到服务不可用,或网络不通的时候,依然能从本地恢复配置
- 应用程序可以从Apollo客户端获取最新的配置、订阅配置更新通知
Apollo模块
- Config Service:提供配置获取接口、提供配置更新推送接口(基于Http long polling)
- Admin Service:提供配置管理接口、提供配置修改发布等接口、接口服务对象为Portal
- Meta Server:Portal通过域名访问Meta Server获取Admin Service服务列表(IP+Port)、Client通过域名访问Meta Server获取Config Service服务列表(IP+Port)、Meta Server从Eureka获取Config Service和Admin Service的服务信息,相当于是一个Eureka Client;增设一个Meta Server的角色主要是为了封装服务发现的细节
- Eureka:基于Eureka和Spring Cloud Netflix提供服务注册和发现、Config Service和Admin Service会向Eureka注册服务,并保持心跳
- portal:提供Web界面供用户管理配置
- client:Apollo提供的客户端程序,为应用提供配置获取、实时更新等功能
实战 
说明 
版本号:基于 spring-cloud-netflix 3.1.8 搭建;与前文教程版本有些许不一样
搭建的环境:基于 docker 搭建