SpringBoot 
SpringBoot入门 
简介 
SpringBoot简化了所有的spring配置文件,使开发,部署变得更简单了
特性:
- 能够快速创建基于Spring的应用程序
- 能够直接使用java main 方法启动内嵌的tomcat服务器运行jar包,不需要部署war包文件
- 提供约定的 starter POM 来简化maven配置,让maven的配置变得更简单
- 自动化配置,更具项目的maven依赖配置,Springboot自动配置spring,springmvc等
- 提供了程序的健康检查等功能
- 基本可以完全不适用XML配置文件,采用注解配置
四大核心:
- 自动配置
- 起步依赖
- Actuator(健康检测)
- 命令行界面
Hello SpringBoot 
快速搭建
- 通过spring官网快速生成,并注入spring-web依赖(自动配置好web.xml),然后下载demo包,并导入ide中
- 通过idea创建SpringBoot项目(idea集成了spring官网的自动生成)
pom.xml
 1<?xml version="1.0" encoding="UTF-8"?>
 2<project xmlns="http://maven.apache.org/POM/4.0.0" xmlns:xsi="http://www.w3.org/2001/XMLSchema-instance"
 3	xsi:schemaLocation="http://maven.apache.org/POM/4.0.0 https://maven.apache.org/xsd/maven-4.0.0.xsd">
 4	<modelVersion>4.0.0</modelVersion>
 5    <!-- 父依赖,后续SpringBoot依赖可以自动继承该依赖版本 -->
 6	<parent>
 7		<groupId>org.springframework.boot</groupId>
 8		<artifactId>spring-boot-starter-parent</artifactId>
 9		<version>2.5.0</version>
10		<relativePath/> <!-- lookup parent from repository -->
11	</parent>
12	<groupId>com.lei</groupId>
13	<artifactId>demo</artifactId>
14	<version>0.0.1-SNAPSHOT</version>
15	<name>demo</name>
16	<description>Demo project for Spring Boot</description>
17	<properties>
18		<java.version>11</java.version>
19	</properties>
20	<dependencies>
21        <!-- SpringBoot 起步依赖-->
22        <!-- SpringBootWeb 配置好了web.xml,并且默认使用tomcat作用web容器 -->
23		<dependency>
24			<groupId>org.springframework.boot</groupId>
25			<artifactId>spring-boot-starter-web</artifactId>
26		</dependency>
27        <!-- SpringBoot 测试起步依赖-->
28		<!-- SpringBoot 单元测试 -->
29		<dependency>
30			<groupId>org.springframework.boot</groupId>
31			<artifactId>spring-boot-starter-test</artifactId>
32			<scope>test</scope>
33		</dependency>
34	</dependencies>
35
36	<build>
37		<plugins>
38            <!-- SpringBoot 打包、编译插件 -->
39			<plugin>
40				<groupId>org.springframework.boot</groupId>
41				<artifactId>spring-boot-maven-plugin</artifactId>
42			</plugin>
43		</plugins>
44	</build>
45
46</project>
Application类
1//SpringBoot项目启动入口类
2@SpringBootApplication	//SpringBoot核心注解,主要用于开启SpringBoot自动配置
3public class DemoApplication {
4	public static void main(String[] args) {
5		SpringApplication.run(DemoApplication.class, args);
6	}
7}
后续步骤
- 在Appliction配置类的同级目录下创建相关的 dao包,service包,controller包等
- 创建hello controller
- 打包(jar)
- java -jar xxx.jar 运行jar包
- 浏览器访问 localhost:8080/hello
SpringBoot源码分析 
准备工作 
- 安装 JDK1.8+
- 安装并配置Gradle
- 使用新版IDEA,并安装代码插件 Statistic 和翻译插件 ECTranslation
- github上下载Springboot源码,并解压
- 阅读源码目录下的 README.adoc,里面说明了如何进行构建源码
- 进入DOS执行命令进行构建:./gradlew publishToMavenLocal,可能出现网络错误;git 错误解决如下:
- 该SpringBoot目录必须纳入到git管理中
- git init
- git add ./*,这里会报文件名太长的错误,通过下面命令:git config core.longpaths true
- git commit -m “1”
- 然后再进行源码构建
- 构建成功后 IDEA 导入;IDEA导入,选择源码目录下的
build.gradle作为工程导入 - 修改编码 UTF-8、配置自动注解
验证源码环境
创建gradle项目,并在依赖文件中,通过源码项目导入父依赖以及所需依赖
java1dependencies { 2 testImplementation 'org.junit.jupiter:junit-jupiter-api:5.7.0' 3 testRuntimeOnly 'org.junit.jupiter:junit-jupiter-engine:5.7.0' 4 //指定parent 5 implementation(platform(project(":spring-boot-project:spring-boot-parent"))) 6 //添加依赖 7 implementation(project(":spring-boot-project:spring-boot-starters:spring-boot-starter")) 8 //api(group:"org.apache.tomcat.embed",name:"tomcat-embed-jasper") 9}创建启动类,启动测试,因为是普通java程序,运行结束后退出
java1@SpringBootApplication 2public class Application implements CommandLineRunner { 3 public static void main(String[] args) { 4 SpringApplication.run(Application.class); 5 } 6 7 @Override 8 public void run(String... args) throws Exception { 9 System.out.println("SpringBoot start"); 10 } 11}
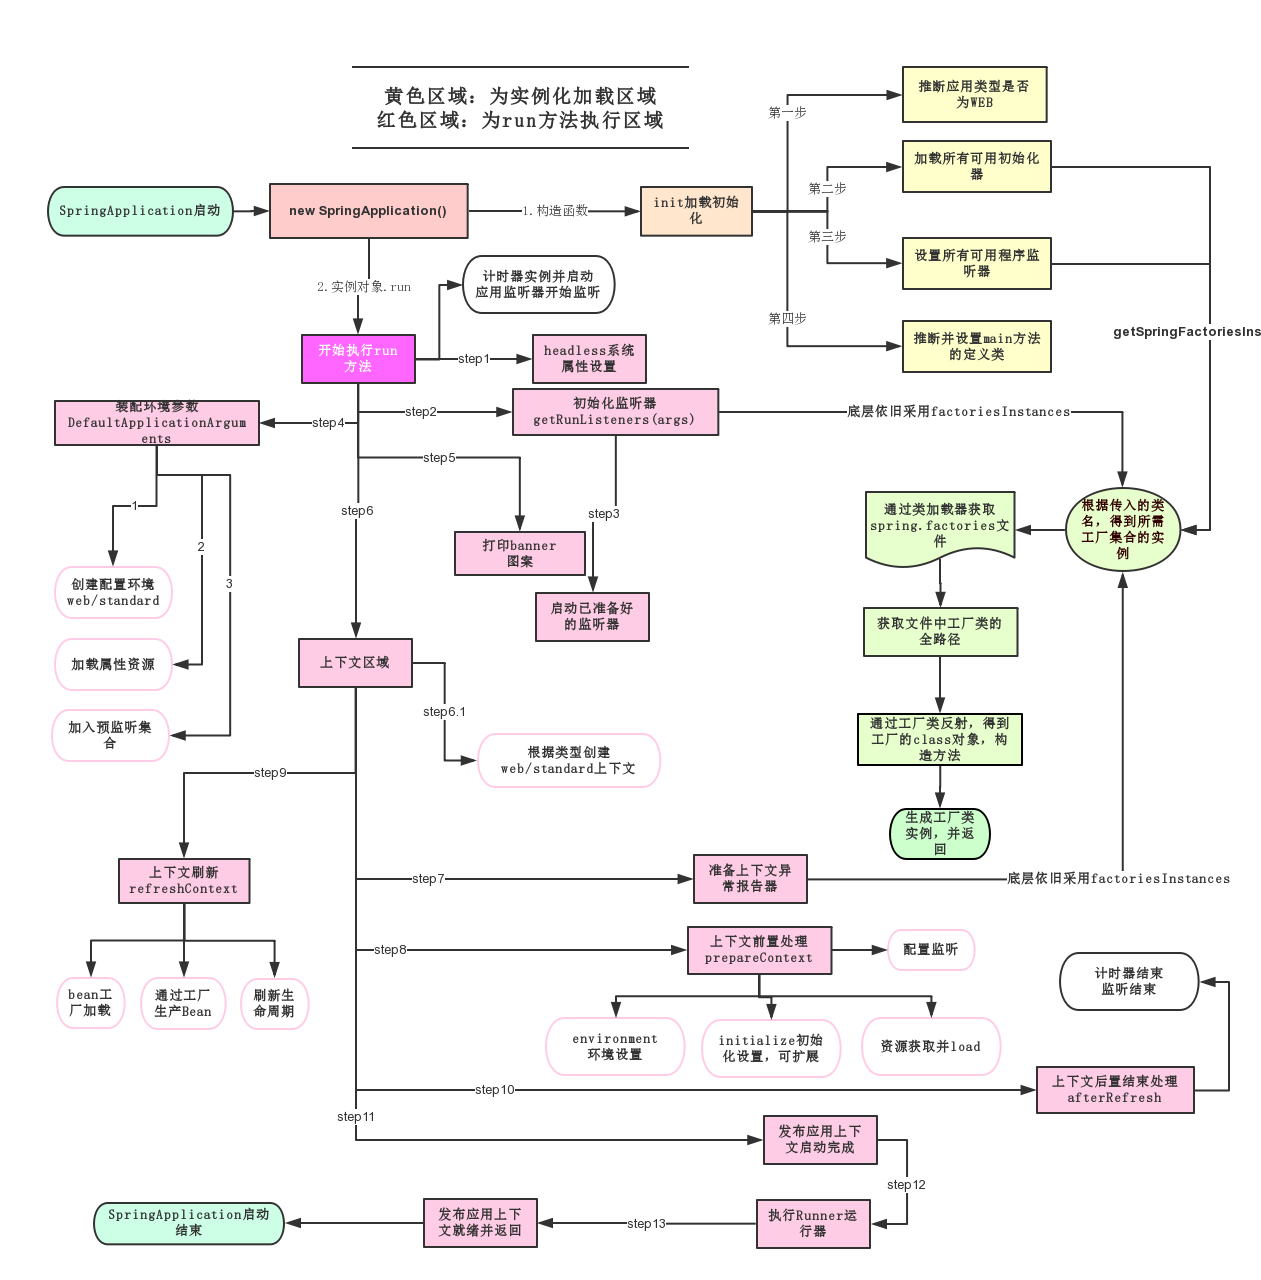
SpringBoot启动原理 
主要分为三部分
- 第一部分进行SpringbootApplication的初始化模块,配置一些基本的环境变量、资源、构造器、监视器
- 第二部分实现了应用具体的启动方案,包括启动流程监听模块、加载配置环境模块、及核心的创建上下文环境模块
- 第三部分是自动化配置模块,该模块是SpringBoot自动化配置的核心
宏观步骤(概括为18个小步骤)
- 创建并启动计时监控类 StopWatch
- 初始化应用上下文和异常报告集合(ConfigurableApplicationContext和Collection<SpringBootExceptionReporter>)
- 设置系统属性 configureHeadlessProperty()
- 创建Spring运行的监听器并启动
- 初始化默认应用参数类
- 准备Spring环境
- 创建beanner打印类
- 创建应用Spring上下文(spring容器)
- 准备异常报告器
- 准备应用上下文(spring容器)
- 刷新上下文(spring容器)
- 应用上下文刷新后置处理(spring容器)
- 停止计时监控类
- 输出日志信息
- 发布应用上下文启动完成事件
- 执行所有的Runner运行期(如果实现了CommandLineRunner接口)
- 发布应用上下文就绪事件
- 完成返回容器对象
总结:
new一个SpringApplication对象,使用一种类似于SPI机制的技术加载ApplicationContextInitializer、ApplicationListener 接口实例
调用SpringApplication.run()方法,run方法中大概有 18 个小步骤
调用createApplicationContext()方法创建Spring IOC上下文对象,创建上下文对象同时会注册spring的核心组件类
ConfigurationClassPostProcessor、AutowiredAnnotationBeanPostPrecessor等
调用refreshContext() 方法启动 Spring 容器(12步)和内置 Servlet 容器
自动装配 
- @import:spring注解,作用为注入一个指定的bean
- SpringBoot—-> start起步依赖(空的) —-> 整合依赖(整合相关包,然后暴露出去)
核心配置文件 
一个SpringBoot项目只有一个核心配置文件,有多种存在形式,取一种就可以
application.properties
properties1#设置内嵌Tomcat端口号 2server.port=8080 3#设置项目默认上下文根(localhost:8080/SpringBoot/hello) 4server.servlet.context-path=/SpringBootapplication.yaml
yaml1server: 2 port: 8081 3 servlet: 4 context-path: /SpringBoot
多环境配置文件 
application.properties
创建多个配置文件,文件名格式为 application-xxx.properties
在application.properties中指定需要使用的配置文件
properties1#指定需要使用的配置文件 2spring.profiles.active=xxx
application.yaml
创建多个配置文件,文件名格式为 application-xxx.yaml
在application.yaml中指定需要使用的配置文件
yaml1spring: 2 profiles: 3 active: xxx
获取自定义配置 
获取自定义配置的值,使用@Value(${…})
properties1school.name=tanglei 2school.address=wcjava1@Value("${school.name}") 2private String name; 3@Value("${school.address}") 4private String address;将自定义配置映射到一个对象
application.properties配置文件
properties1school.name=tanglei 2school.address=wc创建一个类,包含字段name、address
java1//注册为spring组件 2@Component 3//配置类,获取application的自定义配置,prefix为自定义配置的前缀 4@ConfigurationProperties(prefix = "school") 5public class School { 6 private String name; 7 private String address; 8}
通过Environment对象读取;(spring ioc直接给我们创建了该对象)
application.properties配置文件
properties1school.name=tanglei 2school.address=wc注入Environment对象bean,通过该对象读取
java1@SpringBootApplication 2public class Application implements CommandLineRunner { 3 4 @Autowired 5 private Environment environment; 6 7 8 public static void main(String[] args) { 9 SpringApplication.run(Application.class); 10 } 11 12 @Override 13 public void run(String... args) throws Exception { 14 //读取自定义配置 15 System.out.println(environment.getProperty("school.name")); 16 System.out.println(environment.getProperty("school.address")); 17 } 18}
常用配置 
 1#指定需要使用的配置文件(多环境配置文件)
 2#多环境配置文件的命名格式:application-dev.properties
 3spring.profiles.active=xxx
 4
 5#配置数据库
 6spring.datasource.type=com.alibaba.druid.pool.DruidDataSource	#指定数据源
 7spring.datasource.driver-class-name=com.mysql.cj.jdbc.Driver
 8#链接地址、 useSSL 安全套接字协议,mysql的版本是5.7之后的版本必须要加上useSSL=false
 9#connectTimeout 链接超时、socketTimeout读写超时、autoReconnect当数据库连接异常中断时,是否自动重新连接
10#serverTimezone 设置时区
11#zeroDateTimeBehavior JAVA连接MySQL数据库,在操作值为0的timestamp类型时不能正确的处理;【exception:默认值,抛出异常、convertToNull:将日期转换成NULL值、round:替换成最近的日期即0001-01-01】
12#rewriteBatchedStatements 默认情况下会无视executeBatch(),设置为true,驱动才会帮你批量执行SQL
13#characterEncoding 所处理字符的解码和编码的格,如果项目和数据库一致可不设
14#allowMultiQueries 可以在sql语句后携带分号,实现多语句执行
15spring.datasource.url=jdbc:mysql://192.168.10.129:3306/crm_manage?useSSL=false&connectTimeout=10000&socketTimeout=30000&autoReconnect=true&serverTimezone=GMT%2B8&zeroDateTimeBehavior=ROUND&rewriteBatchedStatements=true&characterEncoding=utf8&allowMultiQueries=true
16spring.datasource.username=crm_manage
17spring.datasource.password=JCRMp3LHkrSZ5y6c
18
19#配置redis
20spring.redis.host=192.168.10.129
21spring.redis.port=6379
22spring.redis.password=123456
23
24#配置restful返回json字符串时的时间格式和时区
25spring.jackson.date-format=yyyy-MM-dd HH:mm:ss
26spring.jackson.time-zone=GMT+8
27
28#mybatis
29mybatis.mapper-locations=classpath:mapper/*.xml		#自定义mapper.xml文件所在位置
30mybatis.type-aliases-package=com.lei.model		#定义别名
31
32#jsp视图解析器
33spring.mvc.view.prefix=/
34spring.mvc.view.suffix=.jsp
35
36#启动类配置
37spring.main.banner-mode=off			#关闭logo
38spring.main.sources=com.lei.Application			#指定配置类,启动类可以不传入启动类的
39classspring.main.allow-bean-definition-overriding=true		#允许 bean 定义覆盖
40spring.main.lazy-initialization=true	#延时初始化bean,获取时才会创建;可以在指定bean上添加注解 @Lazy(false)来不延时初始化
41
42#自动化配置
43spring.autoconfigure.exclude=配置类	#排除指定的自动化配置,也可以通过 @SpringBootApplication(exclude = {DataSourceAutoConfiguration.class}) 排除指定自动化配置
44
45#jasypt
46jasypt.encryptor.password=sdjhauidasdw    #加密解密的秘钥key
47jasypt.encryptor.property.prefix=EVC(		#识别密文内容的开始
48jasypt.encryptor.property.suffix=)			#识别密文内容的结束
49
50#线程池相关
51spring.task.execution.pool.core-size=5
52spring.task.execution.pool.max-size=100
53spring.task.execution.thread-name-prefix=th-
54spring.task.execution.pool.queue-capacity=999
55
56#ssl配置
57
58server.port=8088   #ssh端口
59server.ssl.key-store=classpath:tomcat.keystore   #证书
60server.ssl.key-store-password=      #证书密码
61server.ssl.trust-store-type=jks #证书证书类型 jks/PKCS12 1#logback配置
2logging:
3 level:
4 root: info
5 com.lei.mapper: debug
6 file:
7 path: /
8 name: "log.log"
9 charset:
10 console: UTF-8
11 file: UTF-8
12 pattern:
13 dateformat: "MM-dd HH:mm:ss"启动时区配置 
启动类配置
java1@SpringBootApplication 2public class MbsGenericApplication { 3 @PostConstruct 4 void started() { 5 TimeZone.setDefault(TimeZone.getTimeZone("GMT+8")); 6 } 7 public static void main(String[] args) { 8 SpringApplication.run(MbsGenericApplication.class, args); 9 } 10}JVM启动参数配置
tex1-Duser.timezone=GMT+8
Springboot参数接收 
注意看请求头中的 content-type 属性,他告诉后台用什么方式解析参数
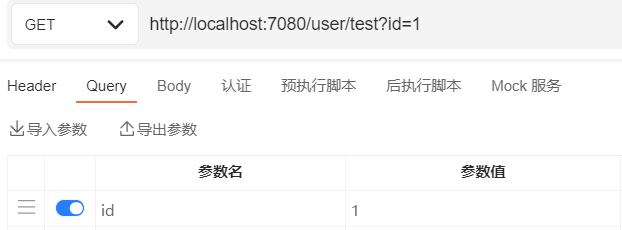
@PathVariable 
restful风格
1@GetMapping({"/test/{id}","/test"})
2public Object test(@PathVariable(value = "id",required = false) String id){
3    return "id:"+id;
4}
@PathVariable 的 required 属性默认为true,如果设置为false表示该参数可以为空,此时访问url时可以不携带参数;注意:mapping需要设置不带参数的路径,否则会抛404
@PathParam 
从请求地址中截取参数
1@GetMapping("/test")
2public Object test(@PathParam(value = "id") String id, @PathParam(value = "name") String name) {
3    return "id:" + id+name;
4}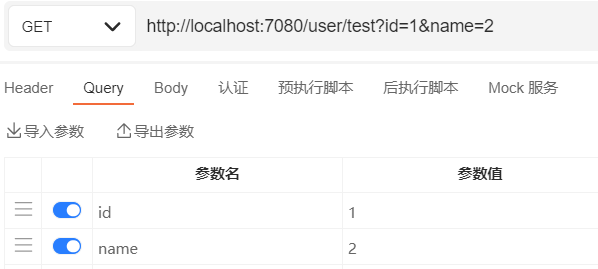
@PathParam注解没有 required属性,可以不传参数
@RequestParam 
被标注的参数的值来源于 request.getParameter或request.getParameterValues
 1//获取参数
 2@GetMapping("/test")
 3public Object test(@RequestParam String id) {
 4    return "id:" + id;
 5}
 6
 7//处理上传文件
 8@GetMapping("/test")
 9public Object test(@RequestParam("file") MultipartFile file) {
10    return "id:" + map;
11}
获取url后拼接参数
获取body中通过 multipart/form-data 发送的参数
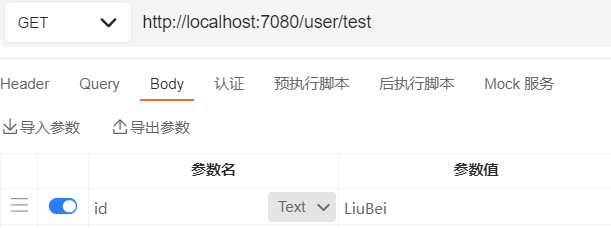
@RequestParam 注解存在required属性,默认为true,当后台未接收到参数时(null)会抛错;
@RequestParam 可以处理 multipart/form-data 中上传的文件
@RequestPart 
@RequestPart与@RequestParam比较相似;它不能解析 url 上的参数
- @RequestPart这个注解用在multipart/form-data表单提交请求的方法上
- 支持的请求方法的方式MultipartFile,属于Spring的MultipartResolver类。这个请求是通过http协议传输的
- @RequestParam也同样支持multipart/form-data请求
- 他们最大的不同是,当请求方法的请求参数类型不再是String类型的时候
- @RequestParam适用于name-valueString类型的请求域,@RequestPart适用于复杂的请求域(像JSON,XML)
@RequestBody 
@RequestBody 可以接受 application/json、application/xml、application/javascript、text 等
1//会自动解析文件,并赋值到map之中
2@RequestMapping("/test")
3public Object test(@RequestBody Map map) {
4    return "id:" + map;
5}
可以自动将参数解析为 Entity
无注解 
- 可以处理 multipart/form-data 、 url 地址后参数
- 可以将参数自动解析为 Entity (无法映射为map)
dubbo集成ssm 
接口工程:存放实体bean和业务接口
服务提供者:
- 它是一个SpringBoot框架web项目,集成MyBatis、Redis
- 添加依赖:mybatis依赖、mysql驱动、dubbo依赖、zookeeper依赖、redis依赖、接口工程
- 配置SpringBoot核心配置文件
- 配置连接数据库
- 配置连接redis
- 配置dubbo
服务消费者:
- 它是一个SpringBoot框架的web项目,集成JSP、dubbo
- 添加依赖dubbo依赖、zookeeper依赖、解析jsp的依赖、接口工程
- 配置SpringBoot核心配置文件
- 配置jsp视图解析器
服务提供者 
相关依赖 pom.xml
xml1<dependencies> 2 <!-- SpringBoot起步依赖 --> 3 <dependency> 4 <groupId>org.springframework.boot</groupId> 5 <artifactId>spring-boot-starter</artifactId> 6 </dependency> 7 <!--SpringBoot dubbo整合起步依赖--> 8 <dependency> 9 <groupId>org.apache.dubbo</groupId> 10 <artifactId>dubbo-spring-boot-starter</artifactId> 11 <version>2.7.8</version> 12 <exclusions> 13 <exclusion> 14 <groupId>org.slf4j</groupId> 15 <artifactId>slf4j-log4j12</artifactId> 16 </exclusion> 17 </exclusions> 18 </dependency> 19 <!--dubbo--> 20 <dependency> 21 <groupId>org.apache.dubbo</groupId> 22 <artifactId>dubbo</artifactId> 23 <version>2.7.8</version> 24 </dependency> 25 <!--zookeeper客户端--> 26 <dependency> 27 <groupId>org.apache.curator</groupId> 28 <artifactId>curator-framework</artifactId> 29 <version>4.2.0</version> 30 </dependency> 31 <dependency> 32 <groupId>org.apache.curator</groupId> 33 <artifactId>curator-recipes</artifactId> 34 <version>4.2.0</version> 35 </dependency> 36 <!--SpringBoot mybatis起步依赖--> 37 <dependency> 38 <groupId>org.mybatis.spring.boot</groupId> 39 <artifactId>mybatis-spring-boot-starter</artifactId> 40 <version>2.2.0</version> 41 </dependency> 42 <!--mysql驱动--> 43 <dependency> 44 <groupId>mysql</groupId> 45 <artifactId>mysql-connector-java</artifactId> 46 </dependency> 47 <!--SpringBoot redis起步依赖--> 48 <dependency> 49 <groupId>org.springframework.boot</groupId> 50 <artifactId>spring-boot-starter-data-redis</artifactId> 51 </dependency> 52 <!--接口工程--> 53 <dependency> 54 <groupId>org.example</groupId> 55 <artifactId>api</artifactId> 56 <version>1.0-SNAPSHOT</version> 57 </dependency> 58</dependencies>SpringBoot核心配置文件
properties1#mysql配置 2spring.datasource.driver-class-name=com.mysql.cj.jdbc.Driver 3spring.datasource.url=jdbc:mysql://192.168.10.129:3306/jdbc_learn?useSSL=true&useUnicode=true&characterEncoding=utf8 4spring.datasource.username=jdbc_learn 5spring.datasource.password=tWDp8b2xDFZpzF5N 6#mapper文件位置 7mybatis.mapper-locations=classpath:mapper/*.xml 8#dubbo相关配置 9dubbo.application.name=provider 10dubbo.registry.address=zookeeper://192.168.10.130 11dubbo.registry.port=2181 12dubbo.protocol.name=dubbo 13dubbo.protocol.port=20880 14dubbo.scan.base-packages=com.lei.service.impl 15#redis配置 16spring.redis.host=192.168.10.129 17spring.redis.port=6379编写接口服务方法的实现
java1//暴露服务 2@DubboService 3public class StudentServiceImpl implements StudentService { 4//注入mapper 5 @Autowired 6 private StudentsMapper studentsMapper; 7//注入redis操作类 8 @Autowired 9 private RedisTemplate<Object,Object> redisTemplate; 10 11 @Override 12 public int getStudentCount() { 13 //redis查询,有返回,无进mysql查询结果并放入redis 14 Integer total= (Integer) redisTemplate.opsForValue().get("total"); 15 if (total==null){ 16 total=studentsMapper.queryCount(); 17 redisTemplate.opsForValue().set("total",total,30, TimeUnit.SECONDS); 18 } 19 return total; 20 } 21 22 @Override 23 public Students queryStudentById(long id) { 24 return studentsMapper.selectByPrimaryKey(id); 25 } 26}
服务消费者 
添加依赖 pom.xml
xml1<dependencies> 2 <dependency> 3 <groupId>org.springframework.boot</groupId> 4 <artifactId>spring-boot-starter-web</artifactId> 5 </dependency> 6 7 <dependency> 8 <groupId>org.springframework.boot</groupId> 9 <artifactId>spring-boot-starter-test</artifactId> 10 <scope>test</scope> 11 </dependency> 12 <dependency> 13 <groupId>org.apache.dubbo</groupId> 14 <artifactId>dubbo-spring-boot-starter</artifactId> 15 <version>2.7.8</version> 16 <exclusions> 17 <exclusion> 18 <groupId>org.slf4j</groupId> 19 <artifactId>slf4j-log4j12</artifactId> 20 </exclusion> 21 </exclusions> 22 </dependency> 23 <dependency> 24 <groupId>org.apache.dubbo</groupId> 25 <artifactId>dubbo</artifactId> 26 <version>2.7.8</version> 27 </dependency> 28 <dependency> 29 <groupId>org.apache.curator</groupId> 30 <artifactId>curator-framework</artifactId> 31 <version>4.2.0</version> 32 </dependency> 33 <dependency> 34 <groupId>org.apache.curator</groupId> 35 <artifactId>curator-recipes</artifactId> 36 <version>4.2.0</version> 37 </dependency> 38 <!--SpringBoot内嵌tomcat的jsp支持--> 39 <dependency> 40 <groupId>org.apache.tomcat.embed</groupId> 41 <artifactId>tomcat-embed-jasper</artifactId> 42 </dependency> 43 <dependency> 44 <groupId>org.example</groupId> 45 <artifactId>api</artifactId> 46 <version>1.0-SNAPSHOT</version> 47 </dependency> 48</dependencies> 49<build> 50 <resources> 51 <!--因为需要整合jsp文件,所以要指定jsp文件编译位置--> 52 <resource> 53 <directory>src/main/webapp</directory> 54 <targetPath>META-INF/resources</targetPath> 55 <includes> 56 <include>*.*</include> 57 </includes> 58 </resource> 59 </resources> 60 <plugins> 61 <plugin> 62 <groupId>org.springframework.boot</groupId> 63 <artifactId>spring-boot-maven-plugin</artifactId> 64 </plugin> 65 </plugins> 66</build>创建webapp目录,并指定为web资源目录
SpringBoot核心配置文件
yaml1spring: 2 #视图解析设置 3 mvc: 4 view: 5 prefix: / 6 suffix: .jsp 7#dubbo设置 8dubbo: 9 #zookeeper设置 10 registry: 11 address: zookeeper://192.168.10.130 12 client: curator 13 port: 2181 14 application: 15 name: consumer 16 scan: 17 #扫描指定包下的远程注入注解 18 base-packages: com.lei.controller创建控制层
java1@Controller 2public class UserController { 3 //远程注入bean,负载均衡策略为 random 4 @DubboReference(loadbalance = "random") 5 private UserService userService; 6 @DubboReference 7 private StudentService studentService; 8 @RequestMapping("/t1") 9 public String t1(){ 10 return userService.say(); 11 } 12 @RequestMapping("/t2") 13 public String t2(int id, Model model){ 14 model.addAttribute("msg",studentService.queryStudentById(id)); 15 return "index"; 16 } 17 @RequestMapping("/t3") 18 public String t3( Model model){ 19 model.addAttribute("msg",studentService.getStudentCount()); 20 return "index"; 21 } 22}
手写starter启动器 
创建自动配置模块 
创建maven项目:ch01-autoconfig
目录结构如下:

pom文件如下
xml1<dependencies> 2 <dependency> 3 <groupId>org.springframework.boot</groupId> 4 <artifactId>spring-boot-starter</artifactId> 5 </dependency> 6 <dependency> 7 <groupId>org.projectlombok</groupId> 8 <artifactId>lombok</artifactId> 9 </dependency> 10</dependencies>MyProperties类,用于读取properties配置文件java1@Data 2@ConfigurationProperties("spring.user") //配置文件前缀 3public class MyProperties { 4 private String name; 5 private Integer age; 6 private String address; 7}MyBean自己需要注册的bean的类java1@Data 2public class MyBean { 3 private MyProperties myProperties; 4}MyAutoConfig自动配置类,用于装配beanjava1@Configuration 2//ConditionalOnClass,当classpath路径下存在该类时,配置生效 3@ConditionalOnClass(MyBean.class) 4@EnableConfigurationProperties(MyProperties.class) 5public class MyAutoConfig { 6 @Autowired 7 private MyProperties myProperties; 8 9 @Bean 10 //prefix:前缀 11 //value:具体的配置名 12 //havingValue:判断是否等于value取出的值 13 //ConditionalOnProperty 满足条件才装配该类 14 @ConditionalOnProperty(prefix = "spring.user", value = "enabled", havingValue = "true") 15 public MyBean myBean(){ 16 MyBean myBean=new MyBean(); 17 myBean.setMyProperties(myProperties); 18 return myBean; 19 } 20}resources/META-INF/spring.factories,SpringBoot会自动扫描该配置文件,并读取里面的类properties1org.springframework.boot.autoconfigure.EnableAutoConfiguration=com.demo.MyAutoConfig
创建starter项目 
仅用于依赖,里面不存在任何内容,依赖于autoconfig模块
pom文件
1<dependencies>
2    <dependency>
3        <groupId>com.demo</groupId>
4        <artifactId>ch01-autoconfig</artifactId>
5        <version>0.0.1-SNAPSHOT</version>
6    </dependency>
7</dependencies>
创建测试项目 
pom文件,依赖自己创建的starterxml1<dependencies> 2 <dependency> 3 <groupId>org.springframework.boot</groupId> 4 <artifactId>spring-boot-starter</artifactId> 5 </dependency> 6 <dependency> 7 <groupId>com.lei</groupId> 8 <artifactId>ch01-SpringBoot-start-demo</artifactId> 9 <version>0.0.1-SNAPSHOT</version> 10 </dependency> 11 <dependency> 12 <groupId>org.springframework.boot</groupId> 13 <artifactId>spring-boot-starter-web</artifactId> 14 </dependency> 15</dependencies>application.propertiesproperties1#spring.user.enabled=true,自己创建的starter中的配置类才会生效 2spring.user.enabled=true 3spring.user.name=lei 4spring.user.age=24 5spring.user.address=81497400@qq.com创建控制器,并测试
java1@RestController 2public class TestController { 3 @Autowired 4 private MyBean myBean; //这里的myBean是通过自己创建的starter加载进来的 5 @RequestMapping("/t1") 6 public Object t1(){ 7 return myBean; 8 } 9}访问

相关注解 
@Configuration:标记该类为SpringBoot配置类@ConditionalOnClass(MyBean.class):标记类或方法,当classpath中存在MyBean字节码文件时,配置类生效@ConditionalOnProperty(prefix = "spring.user", value = "enabled", havingValue = "true"):标记类或方法,prefix前缀、value属性、havingValue该值与属性值进行比较;配置是否生效@EnableConfigurationProperties(MyProperties.class):使读取配置属性的类MyProperties生效@ConfigurationProperties("spring.user"):将配置属性映射到类
websocket 
介绍 
- websocket时html5定义的一个协议,由tcp协议实现的一种网络协议
- 该协议可以主动向客户端发送信息
- http是短连接,一个请求结束,连接关闭,客户端到服务端单向;websocket是长连接,只需要一次请求初始化连接,然后所有的请求与响应都通过该TCP连接通信,双向
- 传统web推送和websocket
- 传统web推送:通常在页面通过Ajax定时轮询,浏览器需要不断的向服务器发送请求;无效请求占用大量带宽、CPU资源
- websocket:可以节省带宽和资源,消息推送及时、通信高效、协议标识符
ws
- 业务场景
- 聊天室
- 股票基金的实时显示
- 企业内部管理通讯
- 系统提醒、用户上下线提醒、实时数据更新
java中websocket Api 
- javaee 7中开始支持 websocket 协议,javaee 7定义了一套 websocket API 规范,也就是一系列接口,没有实现
- 位于 javax.websocket 包下,包含客户端 API 和服务端 API
- websocket API 的具体实现需要 web 容器
- 服务端实现:Tomcat 7.x+、Spring 4.x+
相关注解 
服务端代码
java1@ServerEndpoint("/socket") 2public class MyWebSocket { 3 @OnOpen 4 public void onOpen(Session session) throws Exception{ 5 System.out.println("客户端连接成功"); 6 session.getBasicRemote().sendText("websocket连接成功"); 7 } 8 @OnMessage 9 public void onMessage(String message, Session session) throws Exception{ 10 System.out.println("接收到消息"); 11 session.getBasicRemote().sendText("消息"+message); 12 } 13 @OnClose 14 public void onClose(){ 15 System.out.println(this+"关闭连接"); 16 } 17 @OnError 18 public void onError(Session session,Throwable throwable){ 19 System.out.println("出错"); 20 throwable.printStackTrace(); 21 } 22}客户端代码
html1<!DOCTYPE html> 2<html lang="en"> 3<head> 4 <meta charset="UTF-8"> 5 <title>Title</title> 6 <script type="text/javascript" src="js/jquery-3.6.0.js" ></script> 7 <script> 8 var ws 9 $(function (){ 10 if ("WebSocket" in window){ 11 var url="ws://localhost:8080/socket" 12 ws=new WebSocket(url) 13 //连通后回调函数 14 ws.OPEN=function (){ 15 console.log("websocket连接") 16 } 17 //接收到服务端返回的数据时执行 18 ws.onmessage=function (msg){ 19 console.log(msg.data) 20 } 21 //关闭websocket时执行 22 ws.onclose=function (){ 23 console.log("关闭websocket连接") 24 } 25 } 26 $("#sendbtn").click(function (){ 27 sendMsg($("#sendmsg").val()) 28 }) 29 $("#closebtn").click(function (){ 30 ws.close() 31 }) 32 }) 33 function sendMsg(msg){ 34 ws.send(msg) 35 } 36 </script> 37</head> 38<body> 39 <div> 40 <label for="sendmsg"></label> 41 <textarea id="sendmsg" style="width: 500px;height: 50px"></textarea> 42 </div> 43 <div> 44 <input type="button" id="sendbtn" value="发送"> 45 <input type="button" id="closebtn" value="离开"> 46 </div> 47</body> 48</html>
SpringBoot中websocket 
SpringBoot 的 web 起步依赖内嵌的 tomcat 集成了 websocket 依赖
在线聊天室实现
添加websocker起步依赖
xml1<!--模板引擎起步依赖--> 2<dependency> 3 <groupId>org.springframework.boot</groupId> 4 <artifactId>spring-boot-starter-thymeleaf</artifactId> 5</dependency> 6<!--websocket起步依赖--> 7<dependency> 8 <groupId>org.springframework.boot</groupId> 9 <artifactId>spring-boot-starter-websocket</artifactId> 10</dependency>编写配置文件,启用websocket支持,并注入 扫描websocket注解的bean
java1@Configuration 2@EnableWebSocket 3public class MyConfig { 4 /** 5 * 注入一个ServerEndpointExporter,该Bean会自动注册使用@ServerEndpoint注解申明的websocket endpoint 6 */ 7 @Bean 8 public ServerEndpointExporter serverEndpointExporter() { 9 return new ServerEndpointExporter (); 10 } 11}编写工具类,维护所有在线人的信息
java1public class WebsocketUtil { 2 //保存用户信息的map 3 public static final ConcurrentHashMap<String,Session> CLIENTS=new ConcurrentHashMap<>(); 4 //发送消息给所有人 5 public static void sendMessageAll(String msg) { 6 CLIENTS.forEach(((username, session) -> sendMessage(session,username,msg))); 7 } 8 //获取在线人数,即map中key的数量 9 public static String getOnlineInfo() { 10 Set<String> set=CLIENTS.keySet(); 11 if (set.size()==0){ 12 return "当前无人在线"; 13 } 14 return set.toString()+" 在线"; 15 } 16 //发送消息 17 public static void sendMessage(Session session, String username,String msg) { 18 if (session==null){ 19 return; 20 } 21 final RemoteEndpoint.Basic basic=session.getBasicRemote(); 22 if (basic==null){return;} 23 try{ 24 basic.sendText(msg); 25 }catch (Exception e){ 26 e.printStackTrace(); 27 } 28 } 29}编写websocket类,用于接收请求
java1@Component //SpringBoot需要注入到ioc容器 2@ServerEndpoint("/websocket/{username}") 3public class ChartWebsocket { 4 @OnOpen 5 public void openSession(@PathParam("username") String username, Session session){ 6 String msg="用户["+username+"]进入聊天室"; 7 //发送登录信息给其他人 8 WebsocketUtil.sendMessageAll(msg); 9 String onlineInfo=WebsocketUtil.getOnlineInfo(); 10 //发送在线人数给自己 11 WebsocketUtil.sendMessage(session,username,onlineInfo); 12 //将信息放入工具类map 13 WebsocketUtil.CLIENTS.put(username,session); 14 } 15 @OnMessage 16 public void onMessage(@PathParam("username") String username,String message){ 17 //接收到信息后,发送给所有人 18 WebsocketUtil.sendMessageAll("["+username+"]:"+message); 19 } 20 @OnClose 21 public void onClose(@PathParam("username") String username){ 22 System.out.println(this+"关闭连接"); 23 //广播某人退出聊天室 24 WebsocketUtil.sendMessageAll(username+"退出聊天室"); 25 //移除该用户的信息 26 WebsocketUtil.CLIENTS.remove(username); 27 } 28 @OnError 29 public void onError(@PathParam("username") String username,Session session,Throwable throwable){ 30 System.out.println("出错"+username); 31 } 32}前端页面
html1<!DOCTYPE html> 2<html lang="en" xmlns:th="http://www.thymeleaf.org"> 3<head> 4 <meta charset="UTF-8"> 5 <title>聊天室</title> 6 <link th:href="@{/bootstrap-4.6.0-dist/css/bootstrap.css}" rel="stylesheet"> 7 <script type="text/javascript" th:src="@{/js/jquery-3.6.0.js}"></script> 8 <script> 9 var ws 10 $(function (){ 11 if ("WebSocket" in window){ 12 ws=new WebSocket("ws://localhost:8080/websocket/"+$("#username").val()) 13 ws.OPEN=function (msg){ 14 alert("进入聊天室") 15 } 16 //接收到服务端返回的数据时执行 17 ws.onmessage=function (msg){ 18 $("#disPlayTextarea").text($("#disPlayTextarea").text()+msg.data+"\n") 19 } 20 //关闭websocket时执行 21 ws.onclose=function (){ 22 console.log("关闭websocket连接") 23 } 24 }else { 25 alert("浏览器不支持") 26 } 27 $("#sendBtn").click(function (){ 28 sendMsg($("#sendmsg").val()) 29 }) 30 $("#closeBtn").click(function (){ 31 ws.close() 32 }) 33 }) 34 function sendMsg(msg){ 35 ws.send(msg) 36 } 37 </script> 38</head> 39<body> 40<div class="container"> 41 <div class="container"> 42 <div class="form-group"> 43 <label for="disPlayTextarea">websocket聊天室</label> 44 <textarea class="form-control" disabled id="disPlayTextarea" rows="10"></textarea> 45 </div> 46 </div> 47 <div class="container"> 48 <div class="form-group"> 49 <label for="sendmsg"></label> 50 <textarea class="form-control" id="sendmsg" rows="1"></textarea> 51 </div> 52 <input type="button" class="btn-primary" id="sendBtn" value="发送信息"> 53 <input type="button" class="btn-warning" id="closeBtn" value="退出聊天室"> 54 <input type="hidden" id="username" th:value="${username}"> 55 </div> 56</div> 57</body> 58</html>